2016년 12월 8일 목요일

App Inventor sin internet (App Inventor without internet)


Is it possible to create or design in app inventor without being connected to internet ??

-- 
You could use offline versions of MIT AI, but they are not synced and not up-to-date. Also, offlines are not really stable.

-- 

Update on "Tabs in App inventor 2?"


Following MartinC's post on the closed topic of Tabs in App inventor 2? 
I have put together a demo aia of TABs using ordinary buttons and standard colouring, with slightly more efficient block code (with comments) and a demo of a set of Sub Tabs.

TabsTabs.aia


--
very nice, keep up the good work! 
the mentioned example from MartynC you can find here: Tabs in App inventor 2?
 Screen.png
 Screen2.png
-- 
I like this and especially how you did the buttons used for the tabs. 

-- 

Tabs in App inventor 2?


Hi I would like to know how can I create tabs in App inventor 2?

-- 
Tabs in an AI2 app?   There is no control to do that.  It can not do dropdown menus either but there are spinners.

-- 
could explain how to do it?

-- 
Explain how to do what?   You can not have Tabs on AI2 Projects.  You have to come up with an alternate solution...I might uses Layouts and hide or show them instead of Tab sheets using the Visible property true or false and possibly use a spinner to select the layouts you want to display.

-- 
Scrollable or fixed tabs? (http://developer.android.com/design/building-blocks/tabs.html)

 I have done both in AI Classic. Perhaps we can redo them for AI2?

-- 
You can create the effect by using buttons and then making elements visible and invisible.

See the 2 attached images. The tabs are buttons. When click a button, change the background colours, make the current screen invisible, make the new screen visible. I also make the current page button inactive. ie when on the settings page, the settings button is inactive.

There are probably other ways to do this but I find this way easy to manage.
 Screenshot01.png


 Screenshot02.png

-- 
very nice MartynC! keep up the good work!

-- 
Might explain how to do it please

not quite understand the English

-- 
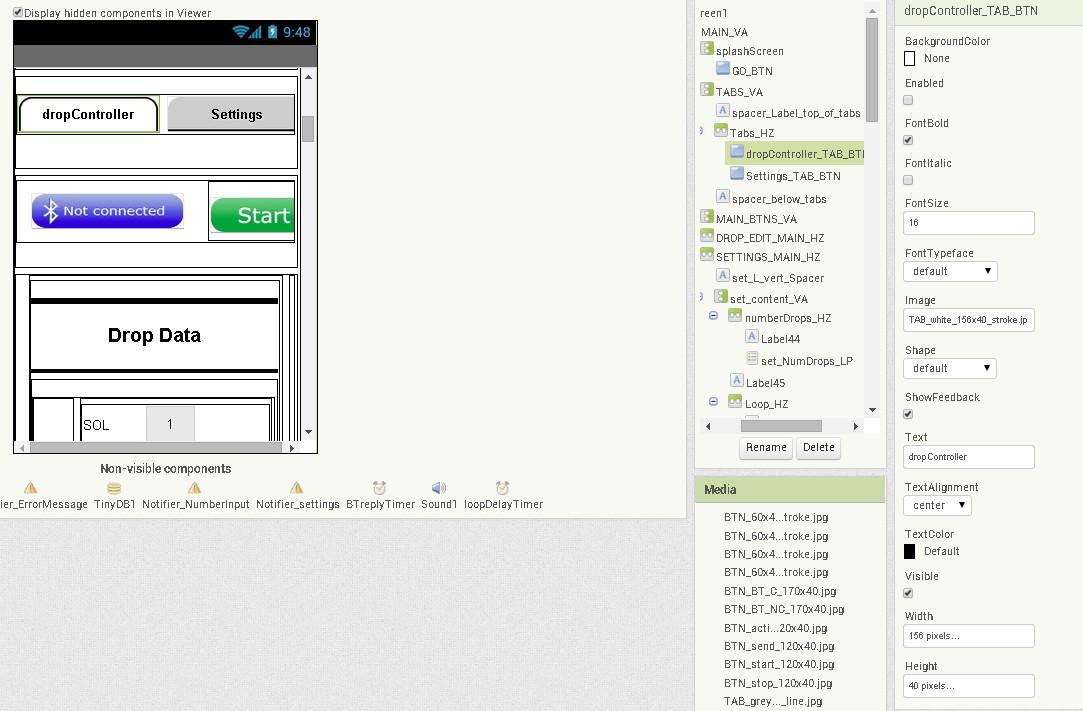
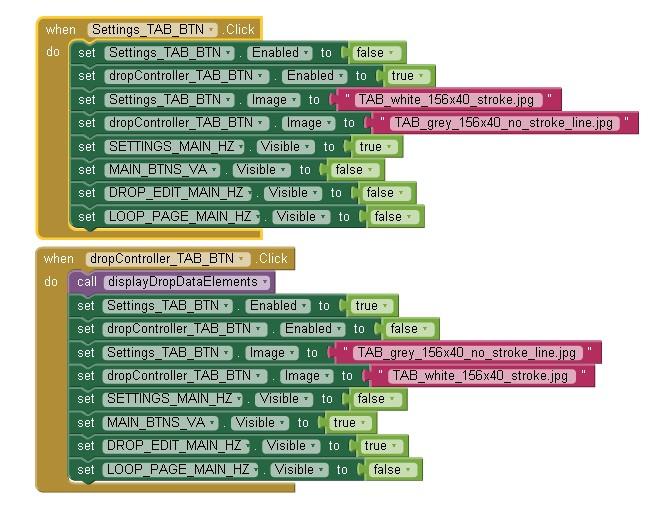
Attached is a screen shot of the designer and the blocks. Hope this helps.

The app starts on the dropController page and the dropController tab/button is inactive.
When the Settings tab/button is clicked - the dropController page is made invisible and the settings page is made visible. There are various other elements I turn on and off as well; such as the two main buttons which are in their own wrapper.

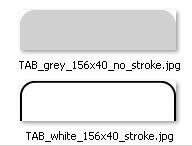
The tab effect is helped by using images for the buttons. When the screens are changed I simply swap the button background images round. This makes it look like the current screen is on top.

I use a similar trick with a splash/start screen. The start screen is a button the size of the screen with a message that says tap the screen to start. Once the button is clicked it is made invisible and the dropController screen is made visible.

tab designer.jpg


 tap_imgae4buttons.jpg

-- 
thank you very much

-- 
I have an error opening the app displays the contents of the two tabs?
I could not create five tabs?

 al abrir.jpg
 TAB1.jpg

 TAB2.jpg


-- 
I've dove a very quick 3 tab version and kept the logic for changing the screens and buttons simple.

This should give you a good place to start.

 3TAB.jpg

 app.aia

--
Nice Martyn.  Thank you for sharing.  In addition to Tabs, this is a nice exercise in using a single screen effectively to manage a lot of data. The example shows how to do a lot using very little screen real estate.  Good work.

-- 
I had been told it was not possible to do tabs

-- 
thank you very much friend...@ utilgame .... This is NOT a tab ... it is a very clever way to "simulate" a Tab in AI2.  :)      Pretty neat...when AI2 does not have the control you need, sometimes it is possible to 'build' one using the AI2 components.

-- 
Sweet build!

-- 

Building Apps with many Screens


App Inventor makes it easy to add more screens to an app, but you’ll need to be cautious about adding too many screens.   App Inventor’s design makes it expensive in terms of computing resources to have an app with multiple screens, and it is easy to exceed App Inventor’s limitations.   As a rule of thumb, you should not have more than 10 screens in any single app, and App Inventor will warn you when you attempt to exceed this limit.
Many screens: Proceed with caution
App Inventor will not prevent you from creating an app with more than 10 screens.  But be aware that if you do that, you are in danger of exceeding the processing and memory limitations of most Android devices as well as your browser.   The precise limits depend on several different factors such as the size of your app, the storage taken up by sounds and images, the speed of your network connection, and the configuration of your Web browser.  But as you keep adding screens, you’ll run across one or more of these factors, and the consequences could be very unpleasant.  This could include the Blocks editor running more and more slowly, and the inability of App Inventor to build your project.  In extreme cases, you could exceed the capacity of App Inventor to save or load your project: you would be stuck with no way to view or even fix your project and you’d have to ask for help on the forum, and even the people there might be unable to help.
If you’re building an app with more than 10 screens, save your project (aia file) to your local computer -- not just the App Inventor server -- each time you make a significant change.   It’s a good idea to save the versions of the project under different names, like MyAppV1, MyAppV2, and so on.   That way, if you do run into a problem, you have a history of versions to examine.  Be especially careful if you add a lot of screens to a project at once.  That’s a likely time to run into problems.
Making a series of backups like this is a good idea, not only in the case of multiple screens, but any time you are working on large and complex projects.   There is always a risk of losing your work, and it’s worth the effort to make backups as a precaution.
Designing your apps to limit the number of screens
If it seems that your app requires a large number of screens, you might think about redesigning it to not use so many.   For example, suppose your app has to show several different screen images all with the same functionality but each image having a different background.  One way to code this would be to use a different App Inventor screen for each image, each screen with its own background image.  With that method,  you’d need as many screens as there are images.   But another way to code this is to have only a single screen and change the screen background.   Similar ideas apply to other kinds of elements:  If each screen image has a label with its own text message, then rather than having multiple screens, each with its own label, you could have a single screen and a single label, and just change label’s text. For example:
DON’T DESIGN YOUR APP LIKE THIS:
INSTEAD DESIGN IT LIKE THIS:
It’s possible to go even further in this direction.  For instance, suppose some screen images include buttons and others do not.  Rather than building an app with actual multiple screens, you can use a single screen and show and hide the buttons (by means of the Visible property) when the screen image changes.  
Here’s an example of an app that has one view that has four buttons, and different view that has a label and an image.    Rather than using two screens, there is a single screen with two  vertical arrangements, which are alternately make visible and hidden.
All this, of course, comes at the price of increased program complexity in the blocks that handle the view switching -- it’s much simpler to add a new screen for each new view and not have to worry about view switching logic.  You can work that way for small numbers of screens.   Perhaps someday we’ll make App Inventor smart enough to handle the view switching logic automatically, or increase the power of the system and relax the constraints on numbers of screens.   But for now, please be aware of the limitations on apps with large numbers of screens and be prepared to deal with the limitations.

Internal Error & All blocks deleted


This problem started happening for no reason, as I did not change anything on the project and it started to happen, probably after some update. My images are light My project is smaller than 5mb

-- 
after getting the first message you should click "Restore the previous version", else your screen will be empty later

see the following general tips and in your case especially #6

1. Use different screens wisely
Before starting to create another screen, first you should think about is it really necessary? See also Building apps with many screens and SteveJG's post about advantages/disadvantagesbecause in only one screen you also can use vertical arrangements to simulate different screens, just set the arrangements to visible = true/false as needed... See also Martyn_HK's example about how to use Tabs in App Inventor and another example from Cyd

2. App Inventor works best if you use images whose size matches the size you want them to appear on your screen. If you import larger images into your app, your app may run out of system memory. Using Images with App Inventor

3. Avoid redundancy
Probably it helps to read chapter 19 - 21 in Dave's book http://www.appinventor.org/book2 to get an idea how to do DRY programming with App Inventor Don't repeat yourself 


-- 
It's not work

--
import your latest backup and restart from there

-- 

Yandex Translate with TexttoSpeech


Hi, I was making a simple translation app with Yandex Translate, and I got it to display the translation and say it. But some languages such as Russian, Thai, Japanese, Korean, and others were not being spoken. I'm assuming it's the problem with the alphabet as they are not recognized. I've also recognized the pronunciation with some European languages aren't perfect either. How can I fix this? 

-- 
"were not being spoken" ... did you use the correct language abbreviations in the Yandex languageToTranslateTo  slot?    es-ru will specify Spanish to Russian translation.

" assuming it's the problem with the alphabet "  good guess.  The Yandex tool may require using the diacritiatle marks and characters in the textToTranslate slot.

How can you fix?     For the 'correct' text, perhaps copy the text you want to translate  using the tool here:  https://www.google.com/search?q=google+translate&oq=google+translate&aqs=chrome..69i57j69i59j69i64j69i60l3.7375j0j7&sourceid=chrome&ie=UTF-8  

otherwise you may have to use  a List or List of Lists to provide a dictionary of the European languages etc.  Also be aware, your device may not have all the appropriate fonts available on your device.

What would be helpful to forum members attempting to help is to see a code snippit from your app (a block image).

Some issues might be related to the speech engine software in your Android...Yandex might not require a specific engine and then again it might...it depends on how the tool works.  You might check the Yandex site.

-- 
I'm still not sure about this :(...could you help me out a little here, please? By the way, code 3 and code 4 are part of the same code it's just that it was too long so I had to take two pictures of it. Also, as you can see in code 2, I'm also trying to make a feature where if you shake your phone/tablet, the translated sentence will be said by Yandex. Really appreciate the help. 
code1.JPG 표시 중
code2.JPG 표시 중

code3.JPG 표시 중

code4.JPG 표시 중

-- 
Whooah partner.  Ya' gotta' walk a'fore you gallop.

Solved: not speaking the correct language.
You use a TextToSpeech block.  If you want that to work
correctly you need to provide the correct language block 
of TTS in addition to the language for Yandex, don't ya' think?

Where is your set TextToSpeech.Language to block?  For example, when 
you use Korean in Yandex, you should use Korean in TTS?  You may 
have to also change the set TextToSpeech.County toblock.  Just experiment and find what works.

The TextToSpeech NEEDS the language code to pronounce what is in your Speak message block,
otherwise what you hear will sound like a Texan trying to speak French phonetically.  Yeah, a disaster.

You will have other issues depending on the device that is running your app.  Not all devices know 
the languages Google's TTS engine knows (see the TextToSpeech Available Languages block). The Google engine work with   Do It Result: (de en es fr it ja ko pt ru zh)  on my phone but with only a few languages on my tablet (earlier OS).  My phone TTS won't work with your tr, vi, si,sv languages but other's phones might. Also, the 
emulator will work with only some languages.

You might review how others use the accelerometer as a switch.  I am uncertain your code will work as is.  
For the moment you might get rid of the Accelerometer blocks temporarily.  Replace them with a Translate 
button until you get the language pronunciation sorted out.  After all, you do not want your app sounding like 
a Texan trying to speak French.  Fix how it talks, then tackle the fun stuff.

Youshould find a safe way to use the accelerometer as a switch in these forum links:  https://groups.google.com/forum/#!searchin/mitappinventortest/accelerometer%7Csort:relevance  

Good luck.

Merry Christmas, Wesołych Świąt,  Feliz Navidad, God Jul, Joyeux Noel, Καλά Χριστούγεννα, Happy Christmas, Veseloho Rizdva, Prettige Kerstdagen, Frohe Weihnachten!, 성탄 축하 , Buon Natale,  聖誕快樂 ,  圣诞快乐,  Sretan Božić, C рождеством!,  عيد ميلاد مجيد

-- 
Wow, thanks for the quick reply and clear directions. I'll try to do that and get back to you if it doesn't work. If it works, I'll mark it as complete. Thanks a bunch! 

-- 

Issue with sending data with BLE extension


I've implemented the BluetoothLE_workshop example I've found in other topics with some revisions and have successfully gotten the app to connect/disconnect with my BLE Bluetooth device (Adafruit BluefruitLE), but I'm trying to send a simple value to the device and get Runtime Error: Invalid long: "E0A9" each time. I'm new to bluetooth and App Inventor, so please excuse me if I've done something obviously wrong.

I've attached my aia file and a screen capture of the error.
Screen Shot 2016-12-08 at 2.52.32 AM.png 표시 중


-- 
Looking at what you are doing I would suspect your issue is that you have text box as the "Value" for WriteIntValue. Try changing that a number entry box from under the Math section.

I've implemented the BluetoothLE_workshop example I've found in other topics with some revisions and have successfully gotten the app to connect/disconnect with my BLE Bluetooth device (Adafruit BluefruitLE), but I'm trying to send a simple value to the device and get Runtime Error: Invalid long: "E0A9" each time. I'm new to bluetooth and App Inventor, so please excuse me if I've done something obviously wrong.

I've attached my aia file and a screen capture of the error.

-- 


This was working...and then I changed something like selection index and so on.


I'm trying to use the listpick selection # to send a URL to the webViewer component, then hide one layout/unhide another.
It was working a while back, but I changed a bunch of things around (organizational/functional) and now it's just not doing much. Can't figure out why.


When I select the first option in the "viewFullListPick" listviewer, it's supposed to hide the listpicker and table and un-hide the webviewer and table. Currently it does nothing.
It's probably something simple, but nothing I've tried has worked.

-- 
Maybe you wanted to compare the SelectionIndex against 1, instead of the Selection?

"1" is an unlikely option to offer, since there must be more informative options?

-- 
I was both hopeful and afraid it was something as simple as that. I haven't tested yet, but it looks like you are definitely correct.

-- 


Coding errors for mini game


My code is saying "The operation + cannot accept the arguments: [*empty-string*][1]" but i used the code before and it worked perfectly. Also, I used one code for two different screens, but only one screen works. I would like to know if it is a glitch on the website or if I did the code wrong.

-- 
You did not post an image of your relevant blocks Kitkat so any advice is a huge guess.  It appears you have a Math addition block somewhere in your code and the value is blank.  Have you done a DoIt with your code?  That should help you find the value that is not showing a numerical value.   If you post an image of you blocks you will get specific advice.

You used the same code on two different screens.  Perhaps the code is not really identical or the code depends on a value on the other screen?  Whatever is happening, it is most probable it is not a 'glitch' on the website.   It could be a coding error  or you might not have passed a variable value correctly between screens (You do know that to use a value from one screen on another you have to 'pass that value' to the second screen using a TinyDB probably, depending whether you are passing a single value or many values.

Again, post some block images and someone will look at your code and please do a DoIt.   see http://www.appinventor.org/bookChapters/chapter15.pdf for DoIt and other methods to debug your app.


-- 
 minigame_cofing.jpg 
This is the coding. Sorry I did not post the picture before.

-- 
1. OK, thanks for the blocks.  You did not do a DoIt so we cannot see what is happening with  score.text +  -1
2.  you appear to have two 'unlocked' blocks... is this true?
 minigame_coding.jpg

3. You do not show how frequently Clock1 'fires'.  What interval are you using ... remember, the interval value is in ms; you might be using the clock too quickly.  You have a lot of blocks to execute in your timer.

You might 'fix' the unlocked blocks and try again   and or post an image with a DoIt.

-- 


Looking to understand how info is gathered


I am having some issues with certain parts of my app not working.  I have a few calls to the web and  I think its because information is not yet available, when the next procedure is asking for it.  So if someone could explain how info is gathered and if there is a way to manage it in an order before the next step occurs.  Example I have the following, I placed the procedures in the block as I would like them to occur. 

 screen.png
-- 
It's hard to comment on your long list of procedure calls in Screen1.Initialize 
without seeing what's in those procedures.

So I'll address mistaken mindsets you have to unlearn, learned from
other environment.

Arduino and BASIC programmers often come to AI2 with the idea that
they are in total control, and everything they ask for will come back done
immediately and without fail.

AI2 programmers must think more like kids setting up games of MouseTrap
or setting up long chains of dominoes on a gym floor,
or like industrialists setting up factory floors who lay plans for how
work will flow from work station to work station.

Almost every thing takes time, and has an event block to catch the 
resulting post-completion flow.

This means that there's a limit to what you can cram into a procedure.
There's no way a procedure can handle both the start and end of a long running process.
(Long running = longer than the time to snap your fingers.)

Any kind of Web or online database access or GUI interaction takes time,
so it's broken into parts aught in event blocks.

-- 
the web component works asynchronously
this is one of the most important concepts you have to understand while using App Inventor

for example in a button.click event:
call Web.1.Get

and in the Web1.GotText event a little bit later you get the result back

see also the filebyfile example https://puravidaapps.com/filebyfile.php how to download a file, wait until it has been downloaded, then download the next file, wait until it has been downloaded etc.
A very good way to learn App Inventor is to read the free Inventor's Manual here in the AI2 free online eBook   http://www.appinventor.org/book2 ... the links are at the bottom of the Web page.  The book 'teaches' users how to program with AI2 blocks.
There is a free programming course here http://www.appinventor.org/content/CourseInABox/Intro  and the aia files for the projects in the book are here:  http://www.appinventor.org/bookFiles  
How to do a lot of basic things with App Inventor are described here:  http://www.appinventor.org/content/howDoYou/eventHandling  .

Also do the tutorials http://appinventor.mit.edu/explore/ai2/tutorials.html to learn the basics of App Inventor, then try something and follow the
 Top 5 Tips: How to learn App Inventor

You will not find a tutorial, which does exactly what you are looking for. But doing the tutorials (not only reading a little bit) help you to understand, how things are working. This is important and this is the first step to do.

-- 
I will look at your filebyfile.  I am assuming I should be able to incorporate its ideas to download info from the procedures in the same way.

-- 


FilebyFile


This is a response to a previous post, 

☞ Looking to understand how info is gathered


I was not able to look at this further until now and the conversation will not allow any more post.

Taifun, I looked at your filebyfile, not sure how to make this idea work with procedures as you have a list and the url is the same for all items.  I have 5 procedures with different url's, I would like to be done in a specific order.  With each one prior not to start until result of prior one is gotten.

-- 
Create a procedure that calls each filebyfile procedure in turn, suggest using a clock to ensure completion before starting the next one :)  This might be the long winded way but may be easier to code / review.

-- 

 I have 5 procedures with different url's, I would like to be done in a specific order.  With each one prior not to start until result of prior one is gotten.
you have to understand the concept of asynchronous methods, which is "do something and after it is done, then do something else"

for example let's assume you have 2 web components and want to get something from somewhere

in a button.click event (or in Screen.Initialize) call Web1.Get (= do something), then in the Web1.GotText event (i.e. after it is done) then call Web2.Get (= do something else) and in the Web2.GotText event (after it is done) then continue etc.

-- 
I understand that these need to be done in this way, what I do not understand is how to make it happen.  Each one of these web calls are in a procedure call when the app starts, but it is not working the way that I need it to.  Your idea of the filebyfile makes sense, but I am not understanding how to get a call to a procedure, then move to the next one like your list in the filebyfile.

-- 
It would really help if you provided a screenshot of your relevant blocks, so we can see what you are trying to do, and where the problem may be.

-- 
Simplify your app by saving all those procedure calls until you are finished with all your file by file getting.

-- 
When the screen Initialize these are the procedures in the order I need them completed.
Procedure 1 & 2 is a call to the phone, 3, 4 and 5 are to the web with different urls.  I am confused how to take these and put them in the file by file blocks.  As the example has the same url to get the files from.

--
please also provide a screenshot of procedure 1-5

-- 

How to Add and Manage Printers


Cloud Print is now part of the OS. In the past, this app is where you’d go to find and manage printers, but since it’s no longer a standalone product, all that stuff is now tucked away neatly in the Settings menu.
To check your printer situation, first pull down the notification shade and hit the cog icon. On some devices, like anything running stock Android, you may need to pull it twice. This will get you into the Settings menu.
Screenshot_20160919-091420
Now, this is where things can get hairy: every manufacturer seems to hide the setting we’re looking for in a different place. So, for the sake of simplicity and universal acceptance, we’re going to do this the easy way: tap the magnifying glass icon (or the word “Search” on Samsung handsets), then search for “Printing.”
Screenshot_20160919-091428 Screenshot_20160919-091439
Regardless of where the setting is on your specific phone, the option should pop up. Tap that guy and be thankful for the search tool. It just saved you a lot of hassle.
Now that you’re there, some options may or may not be available. For example, Cloud Print should be there regardless of which type of device you have. But there are also some specifics, like “Samsung Print Service Plugin” which will be available on Samsung devices, as well as other devices if you’ve had a Samsung device before. It’s interesting.
Screenshot_20160919-091445
Regardless of how many options are listed here, the result is still the same: this is where you manage your printing options. More often than not, you’re going to just use Cloud Print for most everything, because it’s the most prolific on Android.
If you’d like to manage your printers, tap on “Cloud Print,” then the three-button overflow menu in the top right (on Samsung devices, it may read “MORE”).
Screenshot_20160919-091450
This is where you can choose to add a printer to your Cloud—just select “Add printer.” The app will automatically start searching for printers on your local network. If it’s already a part of cloud print, then it won’t show up here, which will help you avoid duplicates.
NOTE: Cloud Print only works with printers that are connected to your network directly over Wi-Fi or Ethernet. If you’re sharing a printer connected to a Windows computer, for example, it won’t work–but we have some other options for you at the end of this post.
Screenshot_20160919-091456 Screenshot_20160919-091750
If you’re not looking to add a printer, though, just tap “Settings” instead of “Add printer.”
In the Settings menu, you can change things like printer visibility for specific accounts—for example, if you have a work email and printers on your device, but don’t want those printers to display in your list, simple jump into that account and change the visibility. You can also choose to show only printers that you’ve used recently.
Screenshot_20160919-091502 Screenshot_20160919-091909
Otherwise, this is where you’ll manage print jobs and printers. It’s all really straightforward.
Screenshot_20160919-091509

How to Print in Supported Applications

Okay, so now that you know how to add and manage printers, let’s talk about actually printing something from your phone. Like I said earlier, only some apps support printing. Pretty much any office-based applications, like Word, Docs, Excel, Spreadsheets, Gmail, etc. will work for you, but Google’s Photos app also supports printing.
The thing is, it’s kind of hidden in certain apps. For example, it’s pretty front-and-center in Photos—just tap the three-button overflow menu, then “Print.” So simple.
Screenshot_20160919-095653
In Sheets or Docs, however, it’s not as simple. In those apps, you have to first tap the three-button menu, then select “Share & Export.” From there, “Print” will be an option.
Screenshot_20160919-092432 Screenshot_20160919-092439
From there, the Cloud Print app will open, with your default printer pre-selected. You can change things like the number of copies to print, paper size and orientation, and color. To modify those settings, just tap the little arrow at the bottom of the print header.
Screenshot_20160919-095909 Screenshot_20160919-092627
If you have multiple printers installed, you can select from the list by tapping the printer name at the top of the header. A list of everything installed or available to the print service will show up here, including all available printers.
Screenshot_20160919-092829
Once you’ve locked in all your options, tap the little print button. It should automatically send the document to your printer, and you’re good to go. That’s pretty much that!

How to “Print” to PDF

Sometimes you may not need an actual paper copy of something, but you want a universally accepted document that will just work wherever you need it. For that kind of thing, PDFs are great. And printing to PDF is stupid-easy on Android.
Select the print option outlined in the above section, then tap the drop-down menu with all of your available printer options. There should be at least a couple of options for saving the file as a PDF: “Save as PDF,” which saves the file locally to the Android device, and “Save to Google Drive” which will save the PDF to your Google Drive.
Screenshot_20160919-092829
Once you’ve selected the appropriate option here, just tap the print button.
If you choose to save the file locally, a “Save as”-esque dialog will appear. Just save the file wherever you’d like.
Screenshot_20160919-100312
If you choose to save the PDF to Drive, the print window will just close and appear to do nothing. That’s not the case, however, as the document should be available in your Drive’s root folder. It’s silly that no save options are available, but alas, that’s how it is.

Print to Specific Brands of Printer

Many popular printer brands will also offer a companion app for their hardware, allowing you to access more advanced functionality.
The best thing to do in this case is just jump into the Play Store and search for your specific brand of printer. Unfortunately, everything from this point forward is going to be very brand-specific, so some independent research may be necessary on your part, especially if you’re trying to do something specific.
2016-09-19_10h04_10
For what it’s worth, I’ve found very little value in most manufacturers’ apps, as they often just offer redundant features that can already be done directly from Cloud Print. That said, some of the apps will let you do things like scan and fax directly from the phone, so it’s at least worth exploring. Godspeed.

Print Directly to USB, Bluetooth, or Networked Printer

So let’s say you have an old networked printer that is shared on a Windows network. Alternately, you may have a printer you want to physically connect to your Android phone or tablet via a USB OTG cable. Or, you may have a wireless printer that connects over Bluetooth.
All of these types of printers—USB, Bluetooth, and Windows network—are unsupported by Android. Google recommends setting up Cloud Print on a PC connected to such a printer. Android doesn’t include any support at all for these types of printers.
If you want to print to such a printer directly, you will have to use a third-party app. Unfortunately, there aren’t any available high-quality apps that do this for free. PrinterShare is a well-reviewed app that can print to Windows network share printers, Bluetooth printers, and even USB printers via a USB OTG cable. Unfortunately, if you want to use these advanced features you’ll have to pay about $10 for PrinterShare premium. Luckily, you can print test documents with the free app to test if your printer configuration is supported. This isn’t the ideal solution—Android’s built-in options are—but if you really need this feature, you’ll have to pay for the privilege. It’s a hard-knock life.
2016-09-19_09h51_21

Printing on Android has come a long way, and the odds of having exactly what you need at your fingertips are pretty good at this point. Cloud Print’s integrated options are generally pretty reliable, but there are also options out there should you need to print from an unsupported printer, like a Windows shared or Bluetooth printer.