2016년 12월 17일 토요일

How to switch two image sprites ?


How can i switch two image sprites ?
image switch.png 표시 중
--
you might want to elaborate what you are talking about


probably
set ImageSprite1.Picture to someting.jpg
set ImageSprite2.Picture to somethingElse.jpg

-- 
I want to switch places I8 withI10 and I10 with I8 the same time.

--
try the mentioned blocks
to switch the position of 2 sprites is the same as changing the picture of 2 sprites...


--
For the kind of question you are asking, sounds to me that you need to learn the very basics of App Inventor yet, before trying to make more complex apps with graphics.
Have you followed any basic tutorials yet? Looks like you didn't, so please do it and have fun creating. http://appinventor.mit.edu/explore/ai2/tutorials

If for some reason, you don't want to switch just the image of the sprites, like Taifun suggested you. You need to save the position of one of them in a variable while copying the position of the other, so you don't lose those values. You need to use variables for that:

 Capture.PNG
-- 
Thank you for your time and for your answer.
That i know and not work for what i want to do.
Thank you.


-- 
Thank you very much, you "save my life".

i search for tutorials and lesson but i cant find nothing. Trust me when i say, before get help i help myself searching and learning for internet.
Your answer help me and now i can foward with my app. Thank you so much and i hope you can help me if i need.
Thank you


-- 

Howto: Using Google Drive to access Files (Images) from AI2


This tutorial will show you how to fetch files from your google drive, install them to a folder on your device, and then use them in the same app.

Before I start, credits to the wonderful Taifun of PuraVidaApps, who did most of the leg work for this.

Why do this? Because with a little bit of thought, you can use Google Drive not only to store but to access and display images and other files in your AI2 apps and beyond. Often you need many image files in an app and will exceed the 5mb limit, so you need to draw in the images from elsewhere.

I have setup the demo app to require a button click to start the downloading of files. In the real world you would most likely have this to run on Screen Initialise. The app will work with the images I have provided, so to use the demo you will not need to follow some of the setup.

Using the demo:

Install the apk (link) or run the aia through the Companion. 

On the very first run of the app, you should click on the Get Images button. You should quite quickly see a yellow notification telling you you are downloading files, and soon after a picture of some donkeys. Wait until the Ready notification disappears, then if you click on the donkeys, you should then get an image of pigs, a further click will give you chickens and then back to the donkeys. To test it again, simply press the Reset button, then the Get Images button again. (This doesn't delete the images on your device, but behaves in the same way). If you installed the app and you start it up again, you will need to press Reset first before it will run properly. If you want to delete the images in order to further test using a file manager go to /sdcard/Download/prefetch/test/ and remove the files.

How to create the fetching of files from Google Drive

Setup
You need Google Drive
Create a folder and give it public access
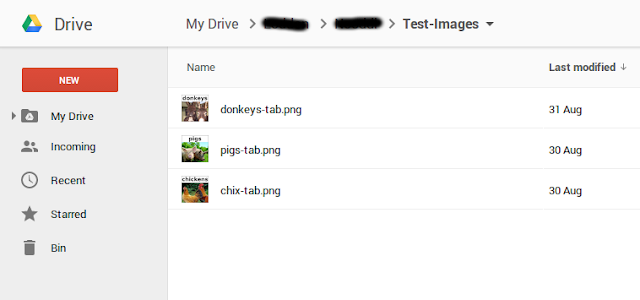
Add your images (in my case only three from another project)
Note the name of your folder
Open up two google sheets (yes, I know it could all be done in one sheet if I wasn’t so lazy with the coding! This separation does help in someways, though)
Name one for SheetIDs, the other SheetNames
Open up the script editor for each and add the correct code.

Code for SheetIDs  (NOTE: SEE BOTTOM OF POST REGARDING API CHANGES IN GOOGLE APPS SCRIPT)


function getimgfileids() {
  
// This example gets a folder from Google Drive and pastes the ids for the files it contains to a spreadsheet.
  
// Could be setup with a time based trigger to keep up to date.

 
var ss = SpreadsheetApp.getActiveSpreadsheet();
 
var sheet = ss.getActiveSheet();
 
var urlCol = 1;   // column number where URL's should be populated; A = 1, B = 2 etc.
 
var urlRow = 1;   // row to start at, increments with each file to create list.
 
var folder = DocsList.getFolder('Test-Images'); //the name of the folder with the files.
 
var files = folder.getFiles(); //"gets" all the files in the folder.

  sheet
.clear();  //removes all data from sheet for fresh start

  
for (var i in files) {
    sheet
.getRange(urlRow, urlCol).setValue(files[i].getId());
    urlRow 
= urlRow+1;
  
}
}

Code for SheetNames  (NOTE: SEE BOTTOM OF POST REGARDING API CHANGES IN GOOGLE APPS SCRIPT)


function getimgfilenames() {
  
// This example gets a folder from Google Drive and pastes the names for the files it contains to a spreadsheet.
  
// Could be setup with a time based trigger to keep up to date.

 
var ss = SpreadsheetApp.getActiveSpreadsheet();
 
var sheet = ss.getActiveSheet();
 
var urlCol = 1;   // column number where URL's should be populated; A = 1, B = 2 etc.
 
var urlRow = 1;   // row to start at, increments with each file to create list.
 
var folder = DocsList.getFolder('Test-Images'); //the name of the folder with the files.
 
var files = folder.getFiles(); //"gets" all the files in the folder.

  sheet
.clear();  //removes all data from sheet for fresh start

  
for (var i in files) {
    sheet
.getRange(urlRow, urlCol).setValue(files[i].getName());
    urlRow 
= urlRow+1;
  
}
}

Run the code on each sheet. Note: for your own work you will have to change the name of the folder in your code (Look for “Test-Images”).
A list should appear in Column A for each sheet, one of IDs and one of Names. Google kindly keeps everything in order.


If you have a static app you need do no more, if your images folder is likely to change, you can setup a trigger to run say once a week, then you can advise users to re-run the fetch.

You now need some urls:

For each spreadsheet:

open the sharing settings for each file and copy it, should look like this:

replace the /edit?usp=sharing with /export?format=csv

For the google drive folder use:


Create a new project in AI2

AI2 Designer
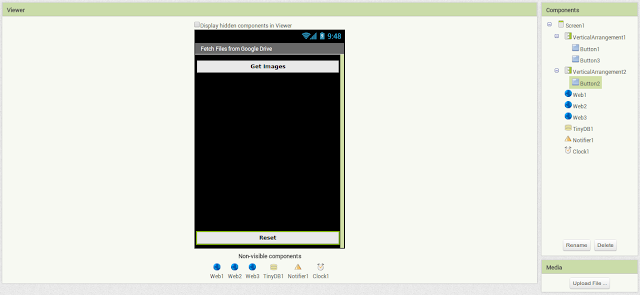
I’ll leave you to decorate as you see fit, but all you need for this to work are three buttons
and 3 Web thingies, a Notifier, a Clock, and a TinyDB
AI2 Blocks

Summary: We make a list of the IDs and the Names, use the IDs to create a downloadable url for each file and the Names to, well, name the files (!). We then fetch each file in turn. Finally just to prove it worked, the images are loaded to a button so you can click through them. (Sounds easy, huh?)

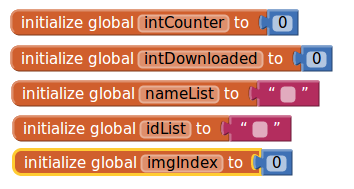
We need some global variables:

A few counters, and a couple of empty variables for lists
Two urls for each spreadsheet as above, a download url, and finally a save location.
Web1 grabs the names of all the files in the folder and puts them in a list, “nameList”.

Web2 grabs the IDs of all the files in the folder and puts them in a list, “idList”. And then it starts the Clock Timer.

I found I needed a timer to slow down the checking of the database test and the initiating of the file downloads. The database check tests to see if the download has been run before, if it has, and has completed successfully, then it won’t try to download anything and will report “Ready” with the Notifier. The key element is the “nextfile” procedure.
In essence, the nextfile procedure iterates through each file in the lists and initiates the download. You will see I had to “trim” the output from the list to remove the parantheses on either end. This then takes us to Web3.
Web3 will test if we have finished,  if we haven’t it calls “nextfile” again. If we have finished, then commits “DONE” to the tinydb, and sets the first image to Button 3.
Button1 starts all this off

Button2 resets things (namely the database) so you can run everything again.
Button3 iterates through all the image files in the folder on the device and displays them on the button

There is a screen error block too in case something goes wrong
I have attached an aia file and a link to the apk to save you having to write the code out by hand, and will be happy to answer any questions or to help deal with any bugs I haven’t found!

Enjoy :)
[EDIT]

Google have changed their API for grabbing folders and documents from DocsList (deprecated 20th April 2015) to DriveApp, so users will meed to amend the spreadsheet scripts accordingly. Should look something like this:

function getimgfileids() {
  
// This example gets a folder from Google Drive and pastes the ids for the files it contains to a spreadsheet.
  
// Could be setup with a time based trigger to keep up to date.
 
var imgFolderID = '0B5al230KXbSyZlJvV3FmdHBvZEE'; // the ID of the folder with files
 
var ss = SpreadsheetApp.getActiveSpreadsheet();
 
var sheet = ss.getActiveSheet();
 
var urlCol = 1;   // column number where URL's should be populated; A = 1, B = 2 etc.
 
var urlRow = 1;   // row to start at, increments with each file to create list.
 
var folder = DriveApp.getFolderById(imgFolderID); // the folder with the files.
 
var files = folder.getFiles(); //"gets" all the files in the folder.

  sheet
.clear();  //removes all data from sheet for fresh start

  
while (files.hasNext()) {

   var file = files.next();
    sheet.getRange(urlRow, urlCol).setValue(file.getId());
    urlRow 
= urlRow+1;
  
}
}


--
That is fantastic Tim, excellent work. This will come in very handy.

--
My pleasure :)

--
Thank you for sharing with the community Tim.   I expect there should be a lot of interest in how to do this.  It works real neat!

--
great solution for downloading several files!
I now linked to your example from my "Webprefetch File by File" page https://puravidaapps.com/filebyfile.php

--
Hi, I can not see the images could you post it again?

--
Fixed the images, (for a second time!)

Also added a pdf of the tut in case images disappear again :)

--
Thank you. Will help me with annual files.

--

Not downloading from google drive


Though I tried to use this package with some solutions, it did not begin to download a file.
Even if using the sentence "pli=1" and aia file on the page, it did not work now.
https://puravidaapps.com/filebyfile.php
How do you think about it?

-- 

Playing sound file greater than 3MB if possible, 300MB


I have known the limit about using sound block.
By Extention or  other solutions,  it is possible to play sound file ?

--
How to overcome the App Inventor project limit of 10 MB

--
I have already tried it.
So, I asked you about the issue.

--
what exactly is your question?
1) do you have issues in downloading your file from Google Drive? if yes, follow Ghica's tip in your other thread Not downloading from google drive, or
2) do you have issues in playing your successfully downloaded file? if yes, then use the Player component instead of the Sound component...

-- 

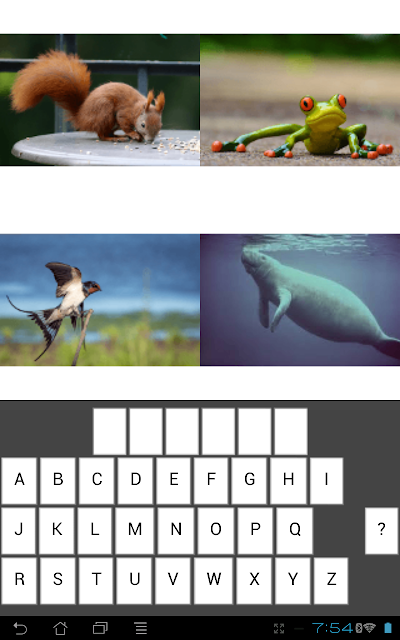
One Word Four Pics


This is a simplified MITAI variation of the popular game.
Guess a word that describes something that four pictures have in common.
A hint button is included in case you get stuck.
Tap a picture to zoom in or out.
There are 22 puzzles.
Add more puzzles, sound effects and scoring for a more complete game.


--
Many thanks. Is your component compatible with Appinventor?

--
Short answer: yes.
My current policy is to use only standard MITAI features.
I will likely never implement an extension as that requires coding Java (yuck!) and that is a deal-breaker for me.

--
plz help me about your app my email adress ozgurs...@gmail.com

--


MoleMash for App Inventor 2


MoleMash for App Inventor 2


 MoleOnEmulator.png
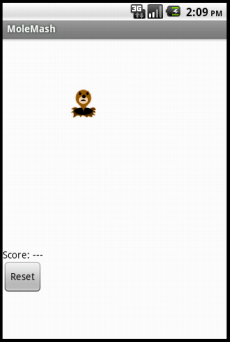
In the game MoleMash, a mole pops up at random positions on a playing field, and the player scores points by hitting the mole before it jumps away. This tutorial shows how to build MoleMash as an example of a simple game that uses animation.

Getting Started

Connect to the App Inventor web site and start a new project. Name it "MoleMash", and also set the screen's Title to "MoleMash". Open the Blocks Editor and connect to the phone.
Also download this picture of a mole and save it on your computer.

Introduction

You'll design the game so that the mole moves once every half-second. If it is touched, the score increases by one, and the phone vibrates. Pressing restart resets the score to zero.
This tutorial introduces:
  • image sprites
  • timers and the Clock component
  • procedures
  • picking random numbers between 0 and 1
  • text blocks
  • typeblocking

The first components

Several components should be familiar from previous tutorials:
  • Canvas named "MyCanvas". This is the area where the mole moves.
  • Label named "ScoreLabel" that shows the score, i.e., the number of times the player has hit the mole.
  • Button named "ResetButton".
Drag these components from the Palette onto the Viewer and assign their names. Put MyCanvas on top and set its dimensions to 300 pixels wide by 300 pixels high. Set the Text of ScoreLabel to "Score: ---". Set the Text of ResetButton to "Reset". Also add a Sound component and name it "Noise". You'll use Noise to make the phone vibrate when the mole is hit, similar to the way you made the kitty purr in HelloPurr.

Timers and the Clock component

You need to arrange for the mole to jump periodically, and you'll do this with the aid of a Clock component. The Clock component provides various operations dealing with time, like telling you what the date is. Here, you'll use the component as a timer that fires at regular internals. The firing interval is determined by the Clock 's TimerInterval property. Drag out a Clock component; it will go into the non-visible components area. Name it "MoleTimer". Set its TimeInterval to 500 milliseconds to make the mole move every half second. Make sure that TimerEnabled is checked.

Adding an Image Sprite

To add the moving mole we'll use a sprite.
Sprites are images that can move on the screen within a Canvas. Each sprite has a Speed and a Heading, and also an Interval that determines how often the sprite moves at its designated speed. Sprites can also detect when they are touched. In MoleMash, the mole has a speed zero, so it won't move by itself. Instead, you'll be setting the mole's position each time the timer fires. Drag an ImageSprite component onto the Viewer. You'll find this component in the Drawing and Animation category of the Palette. Place it within MyCanvas area. Set these properties for the Mole sprite:
  • Picture: Use mole.png, which you downloaded to your computer at the beginning of this tutorial.
  • Enabled: checked
  • Interval: 500 (The interval doesn't matter here, because the mole's speed is zero: it's not moving by itself.)
  • Heading: 0 The heading doesn't matter here either, because the speed is 0.
  • Speed: 0.0
  • Visible: checked
  • Width: Automatic
  • Height: Automatic
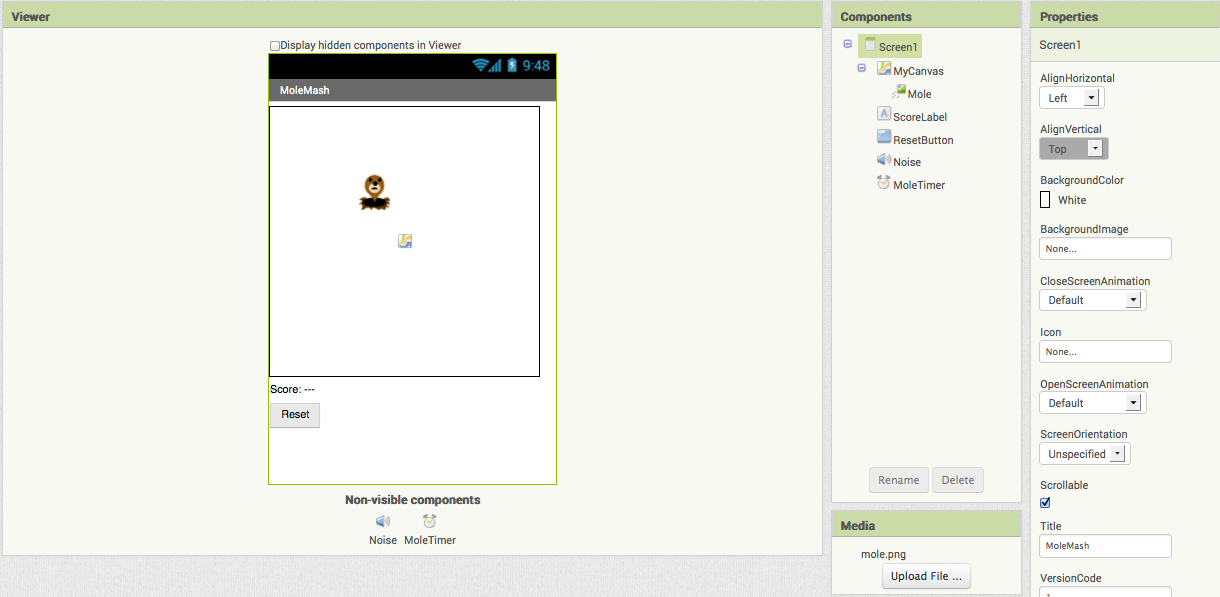
You should see the x and y properties already filled in. They were determined by where you placed the mole when you dragged it onto MyCanvas. Go ahead and drag the mole some more. You should see x and y change. You should also see the mole on your connected phone, and the mole moving around on the phone as you drag it around in the Designer. You've now specified all the components. The Designer should look like this. Notice how Mole is indented under MyCanvas in the component structure list, indicating that the sprite is a sub-component of the canvas.
 MoleMashDesigner.png

Component Behavior and Event Handlers

Now you'll specify the component behavior. This introduces some new App Inventor ideas. The first is the idea of a procedure. For an overview and explanation of procedures, check out the Procedures page.
A procedure is a sequence of statements that you can refer to all at once as single command. If you have a sequence that you need to use more than once in a program, you can define that as a procedure, and then you don't have to repeat the sequence each time you use it. Procedures in App Inventor can take arguments and return values. This tutorial covers only the simplest case: procedures that take no arguments and return no values.

Define Procedures

Define two procedures:
  • MoveMole moves the Mole sprite to a new random position on the canvas.
  • UpdateScore shows the score, by changing the text of the ScoreLabel
Start with MoveMole:
  • In the Blocks Editor, under Built-In, open the Procedures drawer. Drag out a to procedure block and change the label "procedure" to "MoveMole".
    Note: There are two similar blocks: procedure then do and procedure then resu;t. Here you should use procedure then do.
    The to MoveMole block has a slot labeled "do". That's where you put the statements for the procedure. In this case there will be two statements: one to set the mole's x position and one to set its y position. In each case, you'll set the position to be a random fraction, between 0 and 1, of the difference between the size of the canvas and the size of the mole. You create that value using blocks for random fraction and multiplication and subtraction. You can find these in the Math drawer.
  • Build the MoveMole procedure. The completed definition should look like this:
     MoveMole.png
    MoveMole does not take any arguments so you don't have to use the mutator function of the procedure block. Observe how the blocks connect together: the first statement uses the Mole.X set block to set mole's horizontal position. The value plugged into the block's socket is the result of multiplying:
    1. The result of the call random fraction block, which a value between 0 and 1
    2. The result of subtracting the mole's width from the canvas width
    The vertical position is handled similarly.
With MoveMole done, the next step is to define a variable called score to hold the score (number of hits) and give it initial value 0. Also define a procedure UpdateScore that shows the score in ScoreLabel. The actual contents to be shown in ScoreLabel will be the text "Score: " joined to the value of score.
  • To create the "Score: " part of the label, drag out a text block from the Text drawer. Change the block to read "Score: " rather than " ".
  • Use a join block to attach this to a block that gives the value of the score variable. You can find the join block in the Text drawer.
Here's how score and UpdateScore should look:
 UpdateScore.png

Add a Timer

The next step is to make the mole keep moving. Here's where you'll use MoleTimer. Clock components have an event handler called when ... Timer that triggers repeatedly at a rate determined by the TimerInterval.
Set up MoleTimer to call MoveMole each time the timer fires, by building the event handler like this:
 MoleMashTimerEventHandler.png
Notice how the mole starts jumping around on the phone as soon as you define the event handler. This is an example of how things in App Inventor start happening instantaneously, as soon as you define them.

Add a Mole Touch Handler

The program should increment the score each time the mole is touched. Sprites, like canvases, respond to touch events. So create a touch event handler for Mole that:
  1. Increments the score.
  2. Calls UpdateScore to show the new score.
  3. Makes the phone vibrate for 1/10 second (100 milliseconds).
  4. Calls MoveMole so that the mole moves right away, rather than waiting for the timer.
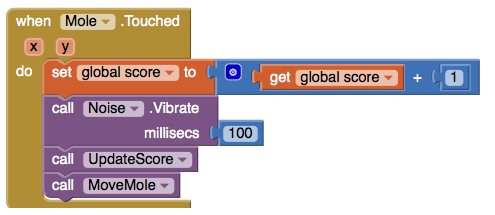
Here's what this looks like in blocks. Go ahead and assemble the when Mole.Touched blocks as shown.
 MoleMashTouchEventHandler.png
Here's a tip: You can use typeblocking: typing to quickly create blocks.
  • To create a value block containing 100, just type 100 and press return.
  • To create a MoveMole block, just type MoveMole and select the block you want from the list

Reset the Score

One final detail is resetting the score. That's simply a matter of making the ResetButton change the score to 0 and calling UpdateScore.

Complete Program

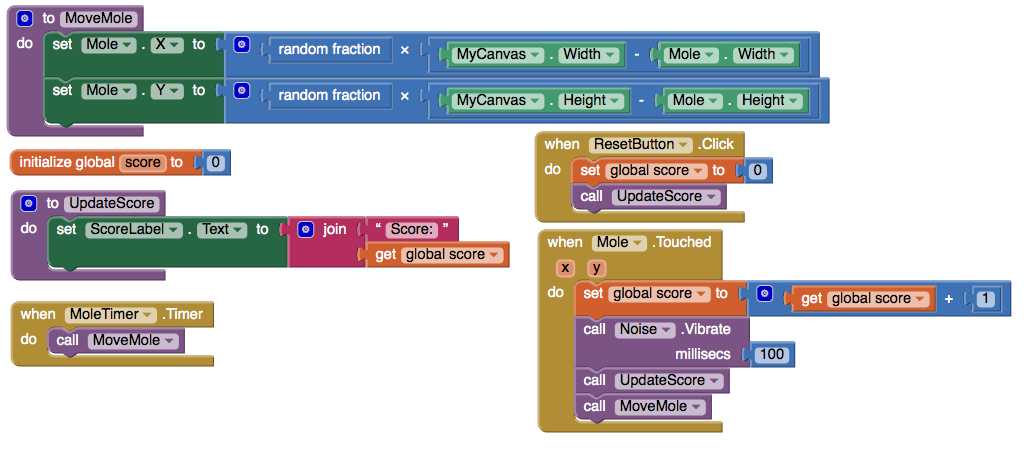
Here's the complete MoleMash program:
 MoleMashComplete.png

Variations

Once you get the game working, you might want to explore some variations. For example:
  • Make the game vary the speed of the mole in response to how well the player is doing. To vary how quickly the mole moves, you'll need to change the MoleTimer's Interval property.
  • Keep track of when the player hits the mole and when the player misses the mole, and show a score with both hits and misses. To do this, you'll need do define touched handlers both for Mole, same as now, and for MyCanvas. One subtle issue, if the player touches the mole, does that also count as a touch for MyCanvas? The answer is yes. Both touch events will register.

Review

Here are some of the ideas covered in this project:
  • Sprites are touch-sensitive shapes that you can program to move around on a Canvas.
  • The Clock component can be used as a timer to make events that happen at regular intervals.
  • Procedures are defined using to blocks.
  • For each procedure you define, App Inventor automatically creates an associated call block and places it in the My Definitions drawer.
  • Making a random-fraction block produces a number between 0 and 1.
  • Text blocks specify literal text, similar to the way that number blocks specify literal numbers.
  • Typeblocking is a way to create blocks quickly, by typing a block's name.

Scan the Sample App to your Phone

Scan the following barcode onto your phone to install and run the sample app.
 MoleMashBarcode.png

Download Source Code

If you'd like to work with this sample in App Inventor, download the source code to your computer, then open App Inventor, click Projects, choose Import project (.aia) from my computer..., and select the source code you just downloaded.
Done with MoleMash? Return to the other tutorials here.


Tutorial Version: 


Tutorial Difficulty: 

 
  • Basic

Tutorial Type: 

 
  • Sprites 
  • Clock Timer 
  • Game