2016년 12월 26일 월요일

MIT App Inventor extension for sending udp packets


Is there any extension for MIT App Inventor through which I can send udp packets?
I have created udp server & client using java but unable to convert it into extension package.
Please help.

--
see my answer here: http://stackoverflow.com/a/41332599/1545993
or below

--
There is the Client TCP Extension by Jean-Rodolphe Letertre. You might want to ask the author of that extension to provide udp functionality, too.
Btw. next time you might want to look into the App Inventor Extensions directory to find a list of all available extensions...
More information about how to create an extension see the App Inventor Extensions document.

--

how i can share images with web viewer ?


i have a web site showing my pictrue and images in it ...
i want to creat app with "app inventor" to link my site with it to show my images and share any image with "whatsapp" directly from my app ... 

--
you will have to download your images to be able to share them


-- 


List split-last element


Give a look to block.

if the last imput "compensation" is blank, it gives me the error in which app inventor says that there are only 7 elements in list, and not 8 as i set in "when AddPeople initialize"

i find the solution to add "unknown" if the texbox "compensation" is blank, do you have other solutions?


--
oh and just...merry xmas :-D

-- 
what about adding your values into a list and pass the list to the other screen?

⦁ How to work with Lists and Lists of lists (pdf) by appinventor.org

also there also exists the mutator functionality for local variables...

actually you do not need local variables at all, just assign the list items directly to the labels...

-- 
thanks for reply.
the real problem is that i prefer not use too much the DB in this case, cause i have to delete these lists when i save the contact (wevery contact has many list, "tags, organizations etc)

-- 

Clock Component


I want to set reminders using the clock component. But the problem incurred is that the clock component does not remain on when the app closes. What do I do?


--
There's a "services in background" for App Inventor on the way being cooked, but while it appears to public you can give a try to http://services.appinventor.mit.edu/ and reminders will work. It's a testing site so you may find there are other lacking components and metodes.

-- 
unfortunately App Inventor apps can't run in the background
probably the alarm extension could help https://www.puravidaapps.com/alarm.php


--
MIT is working on background services and should hopefully be available soon.

-- 
-- 

Empaquetar el archivo de video junto con la aplicacion (Package the video file with the application)


How can you add the video file that the video player runs when packaging the application (do the .apk)? Is that the whole program is added less the video that was uploaded to be run by the video player.

--
you will have to upload your video as asset into your project
however there is a limit for App Inventor apps of 10 MB
How to overcome the App Inventor project limit of 10 MB

-- 
The video must be 1MB or less and must be in formats recognizable by Windows. In the design window in the video player component, select the video file you uploaded.

-- 
I already dis upload the video file as asset, but when I build de .apk the video player does not show the video. Is empty.

-- 
I upload the video file. Everything works fine with the Al Companion. But when I pack the application and install it on the cell phone does not display the video file, only the video player is empty. So the video is not added to the .apk package

-- 
It would really help if you provided a screenshot of your relevant blocks, so we can see what you are trying to do, and where the problem may be.


-- 

MusicVideo Browser


check out my new App...you have two browsers to search videos and play videos/music on the most popular Sites...
It also keeps playing in background

--
I really like the Idea and the Design of your app and I think its way more useful than the official Youtube app because your allows to play videos in the background.Great work :)
Some Improvements I could think of are:
1) it would be good if another tap on the "make player fullscreen-button" in the upper right corner after making a player bigger would reduce the size to normal again.(Because it's not very intuitive that you have another button for that at another place, in my opinion)
2) An option to completely hide the 2nd player and only use the 1st  player would be helpful, as this would enable people to use the app as aregular video viewer with a bigger size.
3) The "this is your first start message" gets displayed sometimes even though I have used the app before.
4) The press again to exit message is not very beautiful.
5) The app crashes when I open the "select saved link" listpicker and then tap somewhere else on the screen to close it.(using the back button works fine though).
Except for those few points I really like your app. ;)
TvF
PS: May I ask you how you got the Youtube videos to play in the Webview as I can't seem to figure out how to do this for one of my projects?

--
To be able to play Youtube videos in the webview you have to edit Manifest and add android:targetSdkVersion="14" or higher.

--
Works great!
Thanks Boban a hundred times!! ;)

--
I have heard that you can get your app suspended in Google if you use Youtube videos i your app.

--
Yeah I read that, too in the youtube documentation or something I think, that you mustn't play youtube videos through anything else than the official player. This case should be allowed , though, I think. as it is more like a normal webbrowser displaying the official youtube site with the official player. But still thanks for the info.

--


videos don't show in webviewer


In a previous post Taifun propmpted me to use webviewer to play a video, as video player forcefully shows controls, which I do not need and I don't want. As the video I need is stored as an asset (but in production app will be on the sdcard), I included the code to play it in a html file,an asset definitely, hoping to have it played by the browser. But the browser shows nothing, only the controls (which I can easily hide in html file, when I need ). The address of source is the same as that one of html file, changing it simply in "clip.mp4" does not change the results. Any ideas?


--
To be able to play Youtube videos in the webviewer, you have to edit the manifest and add android:targetSdkVersion="14" or higher. Thank you Boban!

to modify the manifest, you can use AppTOMArket or ApkModder
for further questions about modifying the manifest, please ask in the AppToMarket forum https://groups.google.com/forum/#!forum/apptomarket or Apk Modder forum https://groups.google.com/forum/#!forum/gwayapps

-- 
Youtube does not matter at all, because the video is one of mine, my question has nothing to do with Youtube video.

--
sorry, if the answer was confusing for you,
if you want to use the webviewer to play videos, then have to edit the manifest 

-- 

Creating a Service Account for Fusion Tables


How to create a Service Account for Fusion Tables with the Google Developers Console

Fusion Tables are a great cloud-based way to hold data for your App Inventor app. Before you can use Fusion Tables, you need set up several things.

Create Google Developers account.
Create a project under that account
Set up the project to be able to use the Fusion Tables API
Create a service account for the project
Create a Fusion Table and associate it with the Service account

Steps A-E are one using the Google Developer console.
Once you’ve done all this, you can use Google Docs to create a Fusion table associated with the service account.    Finally, you can work in App Inventor to create an app that uses the Fusion table.

1.0 - Start a Developers Console Project

If you already have a Google Cloud project, you’ll see the project name in a dropdown at the top of the page.  You can create the service account under that existing project.   Go to step 1.1.
Alternatively you may want to create a new project to use with your service account.  Choose create a project from the dropdown.   Google will ask you for a project name.   Choose a name that does not include spaces.Fusion.

 Screen Shot 2016-01-13 at 1.12.19 PM.png
(You can always get back to the project manager from the upper-right corner of the console, next to the search bar)
(If you already have a project in the Console, it is automatically selected. You can make another one just for your Fusion Tables if you like, from the Project Manager)
Google will also ask you to specify a billing account for this project.   Note that you can use this project for as many service accounts as you like.

You need to set up a billing account if you don’t already have one.   Follow the directions at Google Cloud Platform Help:  Manage your billing account to create a new billing account.  Then select that account as the billing account for your new project.
When your new project is set up, you can return to console.developers.google.com and you should see your new project in the propdown at the top of the screen.

1.1

click the menu in the upper left corner of the developers console (three horizontal lines)

 Screen Shot 2016-01-13 at 12.57.31 PM.png

1.2
click API manager

 Screen Shot 2016-01-13 at 12.56.25 PM.png
2.0 - The API Manager
If you’re not already looking at it, click on the API Manager from the Developer's Console menu.

 Screen Shot 2016-01-13 at 12.56.25 PM.png
2.1
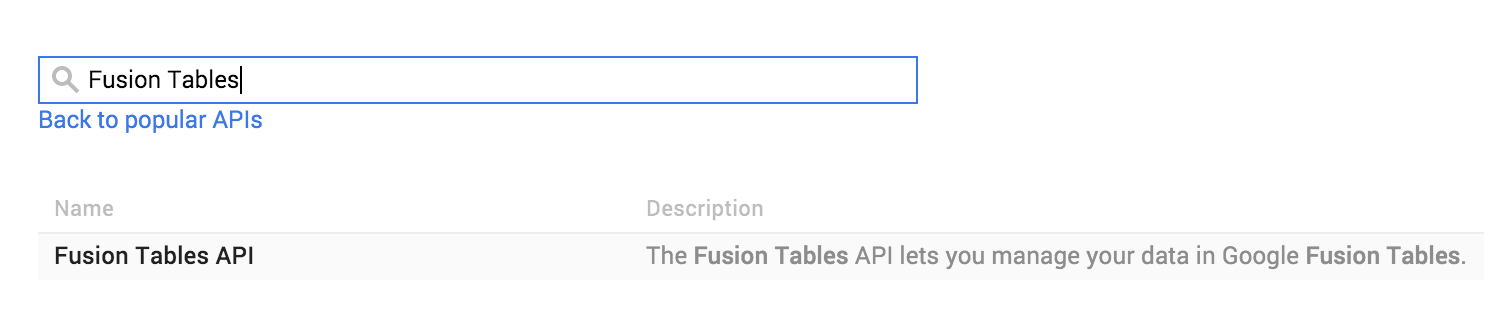
search for "Fusion Tables" in the list of API and click on Fusion Tables API

 Screen Shot 2016-01-13 at 1.03.04 PM.png
2.2
Click on “Enable”
 Screen Shot 2016-01-13 at 1.03.27 PM.png

After it is enabled, the button will change, and it will prompt you create credentials.
(The API is only enabled for the currently selected project. If you only have one, no problem)

2.3

Click the "Go to Credentials" button to continue.
 Screen Shot 2016-01-13 at 1.04.07 PM.png

3.0 Credentials and Service Accounts
If you came from the “Go to Credentials” button (2.3), then find the sentence that says "If you wish you can skip this step and create an API key, client ID, or service account." Click on "service account"

 Screen Shot 2016-01-13 at 4.04.15 PM.png
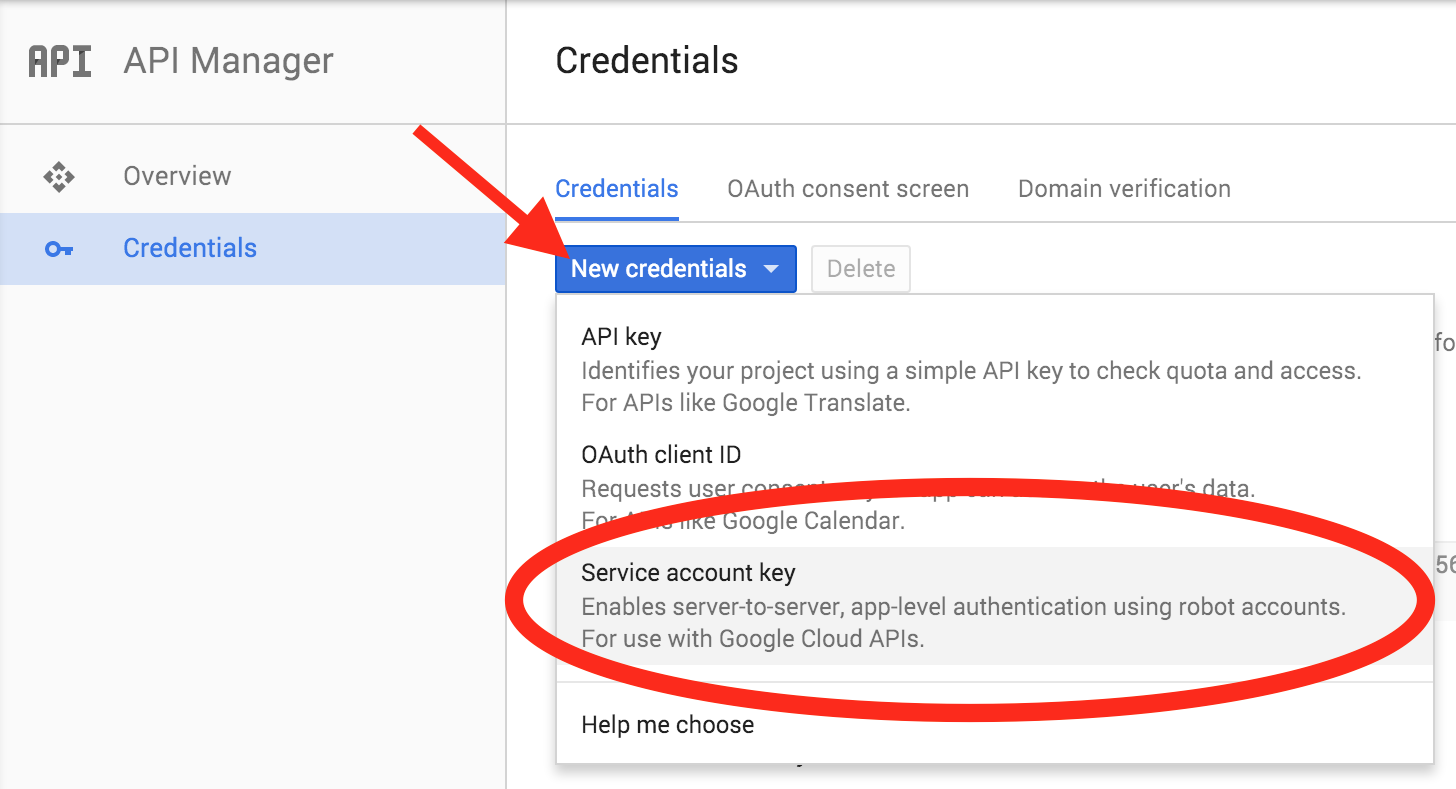
3.1 (alternative to 3.0)
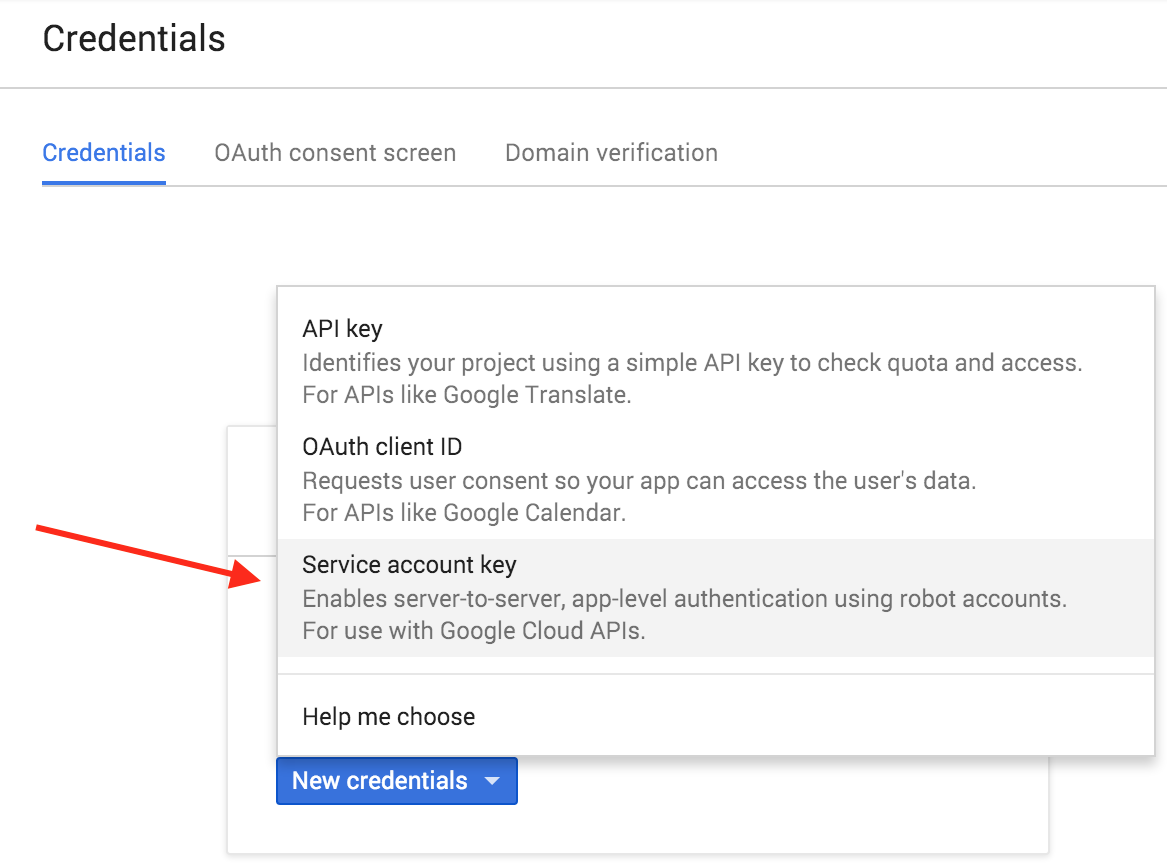
If you didn’t come from the “Go to Credentials” button, select “Credentials” after selecting the API Manager in the Developer's Console menu.
 Screen Shot 2016-01-13 at 4.00.29 PM.png


Then click on “New credentials” then “Service account key”
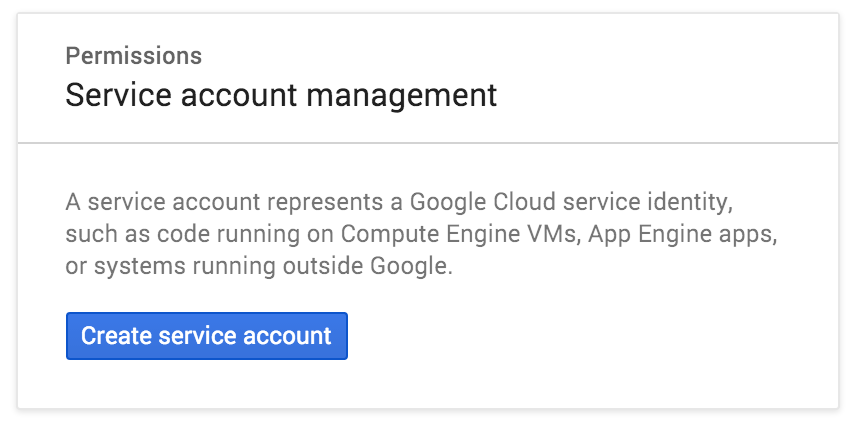
 Screen Shot 2016-01-13 at 4.08.32 PM.png
3.2
Click “Create service account”
 Screen Shot 2016-01-13 at 1.28.22 PM.png

3.3
Give it a simple name without spaces, like fusiontables.
Check "Enable Google Apps Domain-wide Delegation"
Type in your Product name, which is the name of the app you're building!   Then click Create.

Screen Shot 2016-01-14 at 5.16.47 PM.png

After a moment, it will report "Service account created." Click "close"

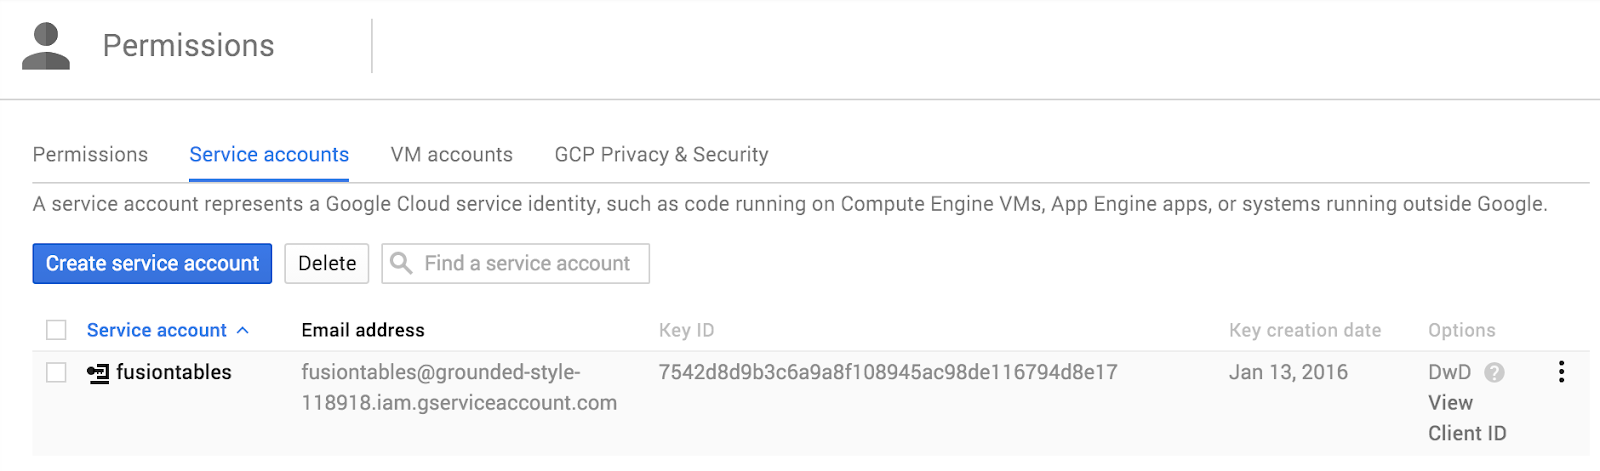
3.4 Service Account ID (email address)

You should now see a page entitled “IAM & Admin” that shows the service accounts for your project.   It should look like below, with the new service account listed and a (long) email address, entitled “Service account ID”.  You will need that email address later in App Inventor.
If you need to get back to this IAM & Admin page, you can find it by going to developer console https://console.developers.google.com and selecting IAM & Admin from the three horizontal lines menu at the upper left.   Then select either Service Accounts or Permissions to see the email address (service account id).

 Screen Shot 2016-01-13 at 4.16.35 PM.png
3.5 Get your Key
With a service account now set up, you can get a key to bring into App Inventor.
From the API Manager Credentials page select your service account. click “Create Credentials”
 Screen Shot 2016-01-15 at 6.14.52 PM.png

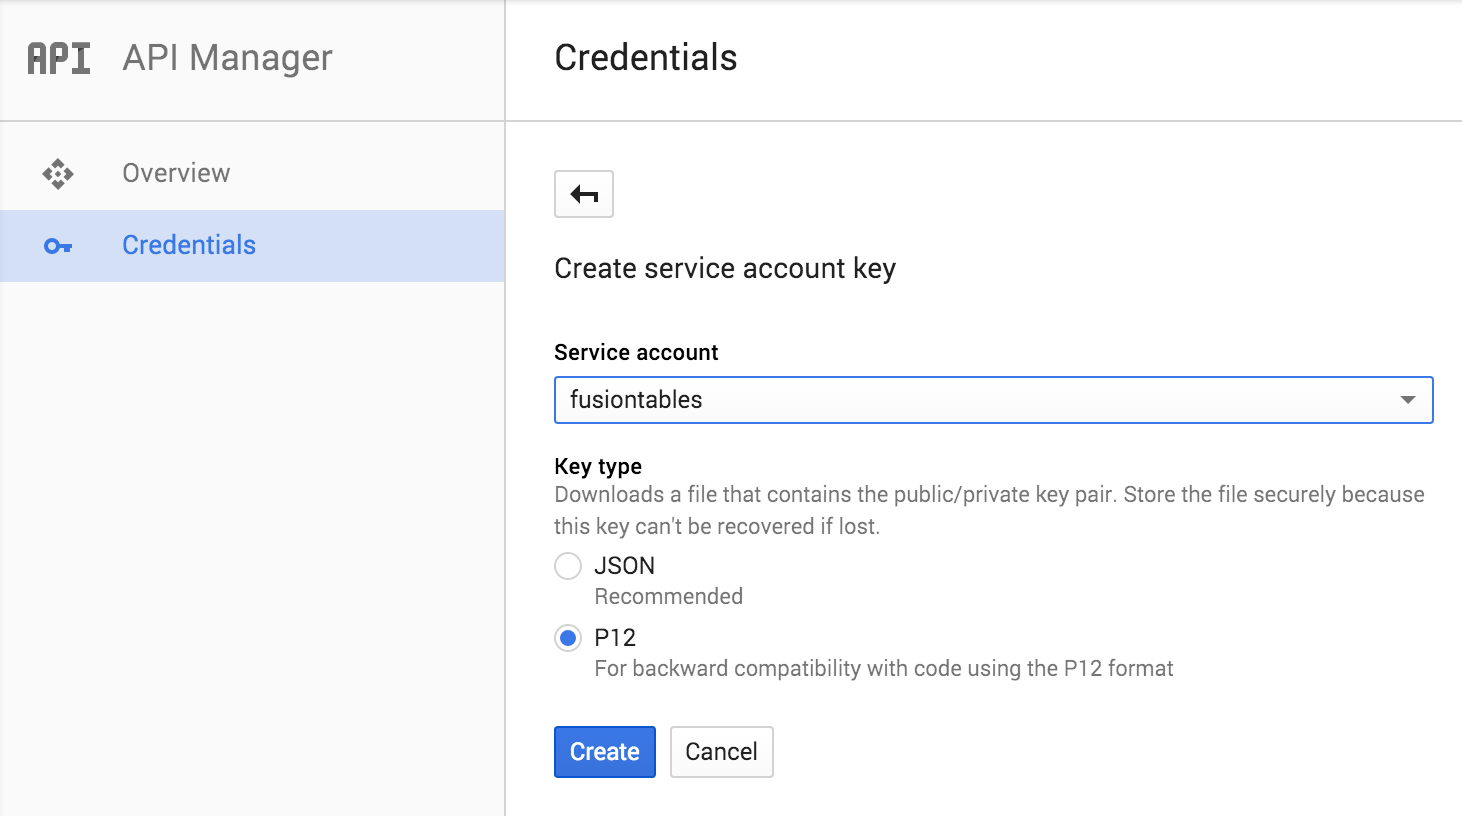
Choose that you want a service account key.
Choose which account you want a key for (you probably only have one, the one we just created -- select it from the dropdown list, and select Key type: P12. Click “Create.”
 Screen Shot 2016-01-15 at 6.14.59 PM.png

You will immediately download a new file that ends in .p12. This is the file you will need to upload into App Inventor.
If this file has any spaces in its name, rename the file to remove the spaces. App Inventor will reject the file if it has spaces or strange characters in the name, so you might as well check it now.
You’ll also be given the option of creating a password for the key, with the initial password “notasecret”.   You can leave this as it is, unless you want to make your service account  App Inventor app.
Whew!  That was a long process.   At the end of all this, you should have a service account, together with an account id (email address) and a p12 service account key.
You’re now ready to go ahead and create a fusion tables that use the service account and create App Inventor apps that use these Fusion tables.   Part 4 of this document shows how to create Fusion tables and share them with your service account.    Part 5 reviews what information you need to provide to App Inventor in order to create apps that use the tables.

4.0 Creating a Table

You now have the ability to share Fusion tables. Here we discuss how to create tables to share.
Open Google Drive at drive.google.com

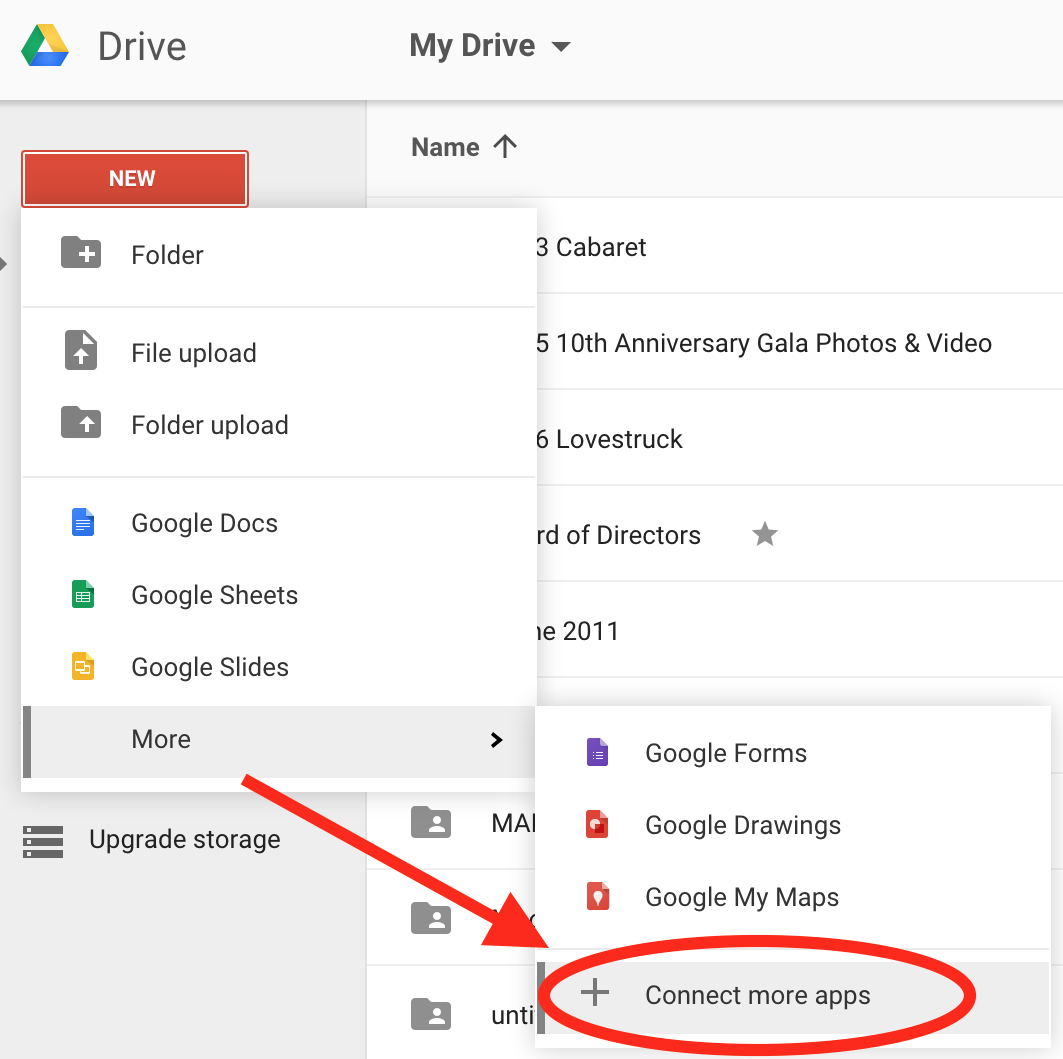
4.1 “Connecting” Fusion Tables to Drive

Click “NEW”, then “More”, then “Connect more apps”.
(Fusion Tables may already be available in this menu, in which case, you can skip this step.)
 Screen Shot 2016-01-14 at 4.57.32 PM.png


Search for “fusion tables” and click the “CONNECT” on the Fusion Tables card.

 Screen Shot 2016-01-14 at 4.57.51 PM.png

4.2 Create a new Table
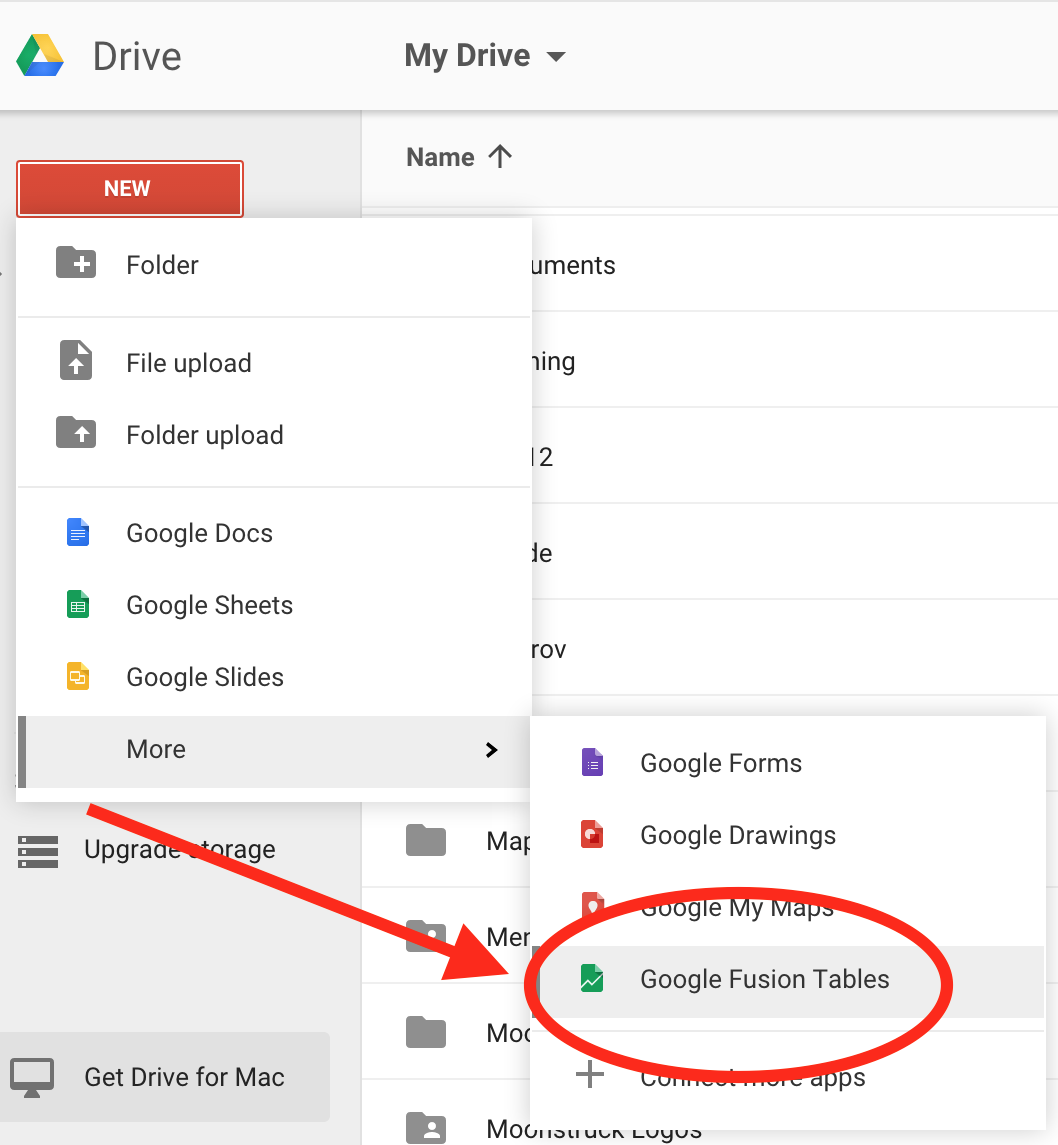
Click “NEW” in Drive, select “More” and click “Google Fusion Tables”
 Screen Shot 2016-01-14 at 5.02.24 PM.png

It will ask you if you want to import an existing data file, or to start with a completely empty new table. The choices here are yours, and yours alone! Afterwards, it will bring you into your new Fusion Table.
 Screen Shot 2016-01-14 at 5.22.33 PM.png

How to set up the table’s data and structure depends on your app, so that is outside the scope of this document.

4.3 Share the table with the Service Account

For App Inventor to be able to access this table, it must be shared with the Service Account email you created.
In the Fusion Table, click "Share"
Under "Invite people" enter your service account email, from the Developer Console (e.g. myservice...@developer.gserviceaccount.com)
Ensure "Can Edit" is selected.
Unclick "notify people" (the service account isn't a real person so it doesn't care about the notification)
Click "OK", and when it says "skip sending notification?" click "OK".
Click “Done”

5 What you need to bring into App Inventor

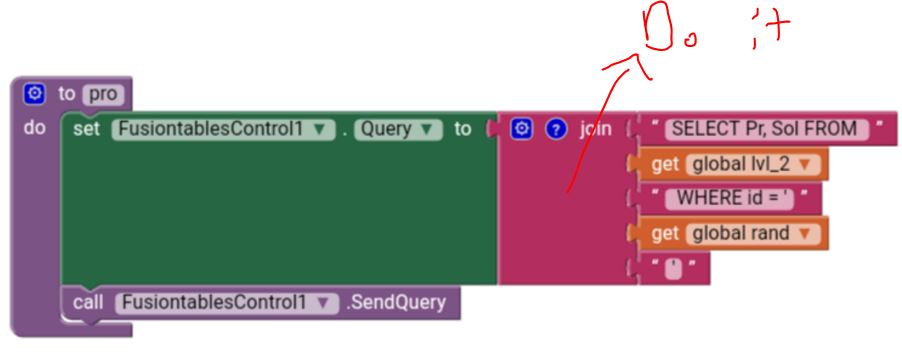
Now you’re  ready to use your table in an App Inventor app such as Pizza Party.   You can follow the tutorial here.
 Here’s an overview of what you’ll need
  • Service Account Email address (also called service account ID)
  • Service Account key file (.p12)
  • Fusion Table ID code (see below)
The Service Account email and keyfile are discussed above. (Section 3.4 and 3.5).
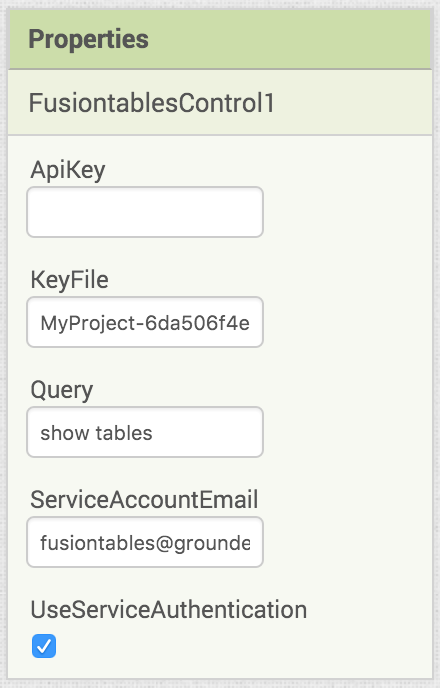
When you create your app, you’ll need to copy and paste the service account email address into the ServiceAccountEmail property of the Fusion Tables component in App Inventor.
You’ll also need to upload the key file as media into App Inventor. In the Fusion Tables component properties, select the KeyFile to the file you uploaded.
You’ll use these in setting up the FusiontablesControl component in your app.  You’ll need to
check the UseServiceAuthentication option in the component properties. It should look like this:

 Screen Shot 2016-01-18 at 11.51.48 AM.png

You will also need the Table ID. In the fusion table itself, go to “File > About This Table”. The ID is the last row. Copy it and paste it into a new text block in App Inventor.
 Screen Shot 2016-01-14 at 5.33.35 PM.png

 Screen Shot 2016-01-14 at 5.34.59 PM.png


Fusion tables return nothing


Fusion tables does not return anything and I do not know what the problem might be

blocks.PNG 표시 중

fusion tables.PNG 표시 중

--
to use the list from csv row block does not make much sense if you want to convert a table in csv format into a list of lists
use the list from csv table block instead

see also the Pizza Party tutorial about how to work with fusiontables
also use Do it to debug your blocks


-- 
Sorry that was a try I really have with the block list from csv table text and it do not work well it only returns ((is a directory))Screenshot_20161226-154214_01.png 표시 중

--
as already said, use Do it
-- 
I have done it is attached in the first message of the post I also attach in this

I think the SQL syntax is ok

fffff.PNG 표시 중
-- 
what happens, if you send a SELECT * FROM <tableid> to the table?
just display the result in a label to make it as simple as possible...

--
i have done it and it returns nothing.

It has to be a problem with my fusion table.

i attach i capture of mine

-- 
do the Pizza Party tutorial to learn how to work with fusiontables and use the service account method

-- 
i am using the service account that is not the problem, and i have seen all the turorials of puravida and pizzaparty.

See the capture attached

service.PNG 표시 중

-- 
this is not a correct service account email address
first get the Pizza Party tutorial running, then continue with your app
--

How can i save data apk of canvas with image sprites and How can i random image?


How can i save data apk of canvas with image sprites? 
 How can i random images sprites from a canvas ?
Thank you for your time and help. 
Schimbare image sprite.png 표시 중
--
you only can save the canvas including everything on it including sprites etc.
the file will be stored on your sdcard

I would use a correct file name, for example Canvas1.jpg ...

A very good way to learn App Inventor is to read the free Inventor's Manual here in the AI2 free online eBook http://www.appinventor.org/book2 ... the links are at the bottom of the Web page.  The book 'teaches' users how to program with AI2 blocks.
There is a free programming course here http://www.appinventor.org/content/CourseInABox/Intro  and the aia files for the projects in the book are here:  http://www.appinventor.org/bookFiles  
How to do a lot of basic things with App Inventor are described here: http://www.appinventor.org/content/howDoYou/eventHandling  .

Also do the tutorials http://appinventor.mit.edu/explore/ai2/tutorials.html to learn the basics of AppInventor, then try something and follow the
 Top 5 Tips: How to learn App Inventor

You will not find a tutorial, which does exactly what you are looking for. But doing the tutorials (not only reading a little bit) help you to understand, how things are working. This is important and this is the first step to do.

-- 
Ok i guess i forgot to put at the end the extinction, my bad sorry. :)
But how can i random the images sprites from canvas( every time when start the images sprites to change positions) ?

--
But, do you want to save images that are shown inside the canvas frame or save the coordinates of the canvas?

-- 
I want to save the the coordonate of the  images sprites in the canvas.

--
the coordinates of a sprite you can get from its X and Y property...

It would really help if you provided a screenshot of your relevant blocks, so we can see what you are trying to do, and where the problem may be.

-- 

one big List (i made 3 Lists because of length)


in my app i need one List with over 200 items.
Because of the length, I create 4 Lists with 50 items. (its very difficult to make a list over 50 items because of the screen.
Now i want  (initialize screen) to make one list from the 4 Lists, but i dont know how to do this.

Or how can i create so many items in one List?

--
store all list items in a text file (see example below), then use the file component to read the file and in the File.GotText event convert it into a list using the split block, just split at \n (new line)

example list
A
B
C

-- 

Services in background


Dear App Inventor Team, is it possible to know a date where the "services" will be available for AppInventor. in 6 months, 1 year or 2? 

--
the developers never provide an ETA for any new features, but my guess is, this should be available in 2017...

-- 
Thank you very much Taifun. I see theres a complication with battery consumption. 

Lets hope nothing difficult to solve

-- 


hack of apps (piratage des applications)


App Inventor is a powerful tool to create apps for Android. After having the package in .APK, we can distribute it to friends, customers or other persons. But the main problem : How could i be the only person to install my apps in my friends' phones. How could i avoid that they share or distribute my app ?
NB : I shall use Google Play later

Thank you for your assistance

App Inventor est un outil puissant pour développer des applications. après avoir compacter l'application sous format .APK, nous pouvons le distribuer (l'installer ) dans les téléphones des amis, des clients ou d'autres personnes. Comment puis je être la seule personne à leur installer mon application dans leur smartphone ? Comment puis éviter qu'ils distribuent, partagent ou installent l'application dans d'autres téléphones ? 
NB : Je compte utiliser Google Play plus tard.

--
everybody will be able to install the apk file

but you could add some kind of password into your app, which must be entered after first run of the app....

-- 
thank you for the useful post. how could we create this kind of password to be used only for the first run of the app ? Do you mind, this method could help protecting the app of hacking ?

-- 
See attached for a simple scheme, which depends on its initial unlock for you to be there, knowing the formula involving the day of month and hour of day to generate the secret changing unlock code.

By the way, don't tell any one the formula.

And change the formula to something more private, since your enemies might read this post.

Screen1_Initialize.PNG 표시 중
unlock.PNG 표시 중

btnUnlock.PNG 표시 중

Designer.PNG 표시 중

--

How do i directly use phone date on my application without picking up the date


I'm doing a part where the user can enter the data and it can directly detect phone date without user using the date picker to pick up the date. 

--
The Clock component in the Sensors drawer has blocks for that.

-- 
ABG ?? What is that ? Sorry , because im new to the app inventor . Thank you for your kind help 

-- 
I guess, ABG should add this question into his FAQ... ;-)
T (aka Taifun)

-- 
I'm really sorry. Now i get what it means already. But i not too sure on how to do it . Is there any tutorial or something like that ? Thankyou. I appreciate your help,

-- 

How to create a list to show up on screen


I have a list that the user can add to.  When a button is selected I would like all of the items in the list to show on the screen.  I get this to work only if I have the following blocks.  The problem with this is it will not show if there is more than 3 inputs.  how can I have it automatically list every entry to one label?  I do not want to use a listpicker, I would like this to show on the screen.

--
Have you tried a ListView yet?

Also, if you are retrieving a list from TinyDB, ask for something that won't crash subsequent list lookup blocks if there's nothing there.

-- 
I have and I can not get it to automatically populate the list.

-- 
Maybe you can show us the blocks that store into TinyDB?

-- 
If you want to see what's in your TinyDB, you can use this utility from the Gallery ...

-- 
I sure can, here is what I have.

-- 
I believe your example for the utility does what I want, I will look at it closely and let you know.

-- 
I see in Screen1.Initialize you load ListView1.Elements from a single element list whose only element is the list you just got back from TinyDB and loaded into a List Picker?

That defeats the purpose of a ListView, cramming it all into slot 1, doesn't it?
It might as well be a label.

-- 
Yes it does put it all on one line.  I changed some things and the ListView will work and populate.  But if I have the screen "scrollable" checked then the ListView will not scroll. 

This is the current blocks.  I do not particularly like the look of the ListView, this is why I would like to be able to have it posted to a label.


--