2017년 3월 7일 화요일

IT Help for Schools using MIT App Inventor


Using MIT App Inventor in school
networking environments


May 2015


This document supersedes this older version.


Hello, Info, Tech and Networking Specialists,


Students at your school will be using MIT App Inventor, a Web-based software tool developed at MIT for programming Android phones and tablets. We have found that every school’s IT setup is a little different.  Please read this document to understand the requirements that need to be in place so that your students can successfully connect to and use App Inventor.


We have a few different ways to make App Inventor work. The most common options are discussed in this document. There may be other ways to get things working. Only you will be able to come up with a solution specific to your school.


Introduction to App Inventor


App Inventor is a web service hosted on MIT’s servers and Google App Engine.  The main App Inventor Web site is at:


In order to create apps, users need to log in at:


And that web site needs to be accessible from browsers running on student laptops.   (Note: MIT has encountered school networks that block connections to the sites at MIT.   Such blocks need to be removed before students can use App Inventor.) Note: The appinventor.mit.edu website is hosted on Internet Protocol (IP) addresses service from a content distribution network used by GitHub. ai2.appinventor.mit.edu is served from Internet Protocol addresses located at Google. The exact addresses can vary over time, so we cannot provide a definitive list here.


If students are using Android devices (phones or tablets) the device needs to communicate with the software running on the student laptops.  There are two methods for doing this. The recommended method is to connect wirelessly, over a WiFi network. The other method is to use a USB cable to connect the laptop to the device.  Each method has strengths and weaknesses, and the choice of which method use depends on your school’s environment.


With either method, each Android device will need to have the app “MIT AI2 Companion” installed to support App Inventor “live development” (i.e., instant changes on the phone in response to  changes in the browser).    The companion can be installed from the Google Play Store, or it can be downloaded to laptops and directly loaded into the device.  


Here’s the link to the MIT AI2 Companion App in case people need to download it:  https://play.google.com/store/apps/details?id=edu.mit.appinventor.aicompanion3


The companion software on the device needs to be updated periodically when there are new releases of MIT App Inventor.   This updating happens automatically in the case where the device is connected to the Web.  


Connecting to the device over WIFI


For the app to work, both the laptop  running the App Inventor software and the device need to be on the same WiFi subnet, not separated by any firewall. Both the laptop and the device need to connect to an MIT server (a so-called “rendez-vous server”) in order to exchange IP addresses.  Once the device and the laptop  have exchanged addresses, they  will connect to each other directly over the school network.


The critical piece of getting the WIFI connection to work is having the phones and the computers on a network or networks, with no restriction on connections between network devices. This kind of restriction is common in hotels, public WIFI, and often, schools.  This graphic illustrates how these restrictions might be functioning in your network.


If your school’s network restrictions prevent using the phones over WIFI, a solution we often use is to deploy a wireless access point to create a custom network just for the purpose of App Inventor.   For example, when we conduct our own MIT workshops in network-restricted environments, we often share a single external connection to the Internet by creating a custom network using a store-bought router,  or by using connection sharing from a laptop.   With this approach, all of the computers and phones need to connect to the custom network  during the workshop. The wireless access point is then removed when the workshop is over and students are done using it.


Connecting to the device with a USB cable


To use USB cables, the student laptops need to install a software package called App Inventor Setup, which contains applications for communicating with the hardware device.
The App Inventor Setup package also includes the Android emulator, that lets students work and test without an Android device at all.


The instructions for installing App Inventor Setup and using USB cables are here:


This will simply work with Android devices on most Mac or GNU/Linux operating systems.


For Windows, there’s a complication:  Windows systems require installing device drivers.  These drivers are specific to the type of device (e.g., the specific brand of phone).  Google provides a page on drivers  from which people can download device drivers for various phones, but in some cases the drivers need to be obtained from the device manufacturer. We highly recommend that Windows users of App Inventor use the WIFI connect method, which does not require installing drivers or the App Inventor setup software. Google Nexus devices generally work, even on Windows, without extra drivers. On Mac, extra drivers are not necessary for any phone.


In summary, the USB connection method is not recommended. Using WIFI connect instead avoids driver issues, but it requires network connectivity using the school’s WiFi.


Using the Emulator


For schools that cannot provide hardware devices for every student, App Inventor can be used with the Android Emulator, a software program that runs on student laptops and emulates many of the features of Android devices.   The emulator software is included as part of the App Inventor Setup package, and instructions on using the emulator are here:


The Emulator - Silent Install


The emulator must be installed on each machine individually.  If you are setting up a lab of several Windows computers, this installation can be streamlined somewhat by using “silent mode, where you create a configuration file and then duplicate that file on every machine,with no further need for console interaction.


Here are the flags to use with the setup package:


/S - for silent mode (default will be all users) and you will need admin permissions.
/user=all or /user=current (again you will need admin permissions for all users)
/update - update installation.
/skiplicense - skip license


For example, use the following command by typing it at the terminal or by including it in a script:


>MIT_App_Inventor_Tools_2.3.0_win_setup [/S] [/user=all or /user=current]


or


>sudo MIT_App_Inventor_Tools_2.3.0_win_setup [/S] [/user=all or /user=current]


if you need admin permissions.

The Emulator - User storage


The emulator is the standard Google Android emulator, which literally emulates an Android phone. Just as phones have memory where the operating system and applications are stored, so does the emulator. In the case of the emulator, the storage lives in a file on the laptop.  On a Mac, you find this user-specific file in


/Users/<username>/.appinventor/emulator/Appinventor-emulator-data


This file is created the a user the first time a user tries to use the emulator. For Windows, the file is located at


/Program Files/AppInventor/commands-for-Appinventor/extras/Appinventor-emulator-data


by copying a template which was loaded as part of the App Inventor setup tools.


The Emulator - AI Companion and updating


Just as the physical device uses the  AI2 Companion App to support live development, the emulator needs a copy of the companion installed in it (emulated, user-specific) memory.  The App Inventor setup tools install a “place holder” version of Companion when they install the emulator.  Unfortunately, this version of the Companion will be out of date, due to new releases of MIT App Inventor since the setup tools were created.  Accordingly, the first time a user uses the emulator,  not only is the Appinventor-emulator-data copied, but the user is prompted to upgrade the emulator’s Companion software. If you do not respond positively to the pop up instructions that appear, the Companion will not update.  Running App Inventor without the updated Companion may cause coding problems for the user.  The updated Companion is stored in the copy of Appinventor-emulator-data in the User’s directory.


If you use Deep Freeze


Some school networks use an application called Deep Freeze to limit access to their PCs.  If you use Deep Freeze, it  probably removes the User's personalized copy of Appinventor-emulator-data.  This results in a fresh copy being brought in the next time the User logs in (say on the next day).  This means each User  has to update the Companion again every day.


Administrators can get around a daily update requirement: . Using an administrator account, login, use the emulator, go through the Companion update process and THEN COPY Appinventor-emulator-data FROM THE USER'S DIRECTORY back to the version in /Program Files.  Make the copy before Deep Freeze makes its "official" frozen copy.   As a result, when students log in and a fresh copy of App Inventor-emulator-data is copied from Program Files to their directories, they will get the copy that contains the up-to-date Companion.


Note:  You may need to experiment to get this to work, depending on the details of your network setup.  Some Deep Freeze programs erase any change to the computers when they restart,  and updating  can be tricky.  One school found through extensive testing that the App Inventor-emulator-data has to be copied (after updating) from the user profile back to the .app inventor/emulator folder in the root of the C: drive, not the Program Files folder.


Installation Instructions


The complete instructions for installation are here:


The requirements are boiled down to a checklist below, which we hope will help you figure out what you actually need to do help us make App Inventor work at your school.


Thank you for your help and support! Please use the MIT through the App Inventor Forum if you get stuck or need some help.


Checklist for All Features


Requirement for:
WIFI connect to phone (recommended)
USB cable to phone
Emulator
App Inventor Setup Software
X
X
X
Browser:
Firefox 3.6+ -or- Chrome 4+
X
X
X
Whitelist (browser access)
appinventor.mit.edu
ai2.appinventor.mit.edu
http://qyv.me
X
X
X
Whitelist (port 80 connection, in app)
rendezvous.appinventor.mit.edu
X


Direct connection between devices on WIFI, computer and phone.
X


Windows Only: device drivers for specific android devices, as needed.

X


Design ON an Android tablet


I'm just starting with AI2. I've been doing my training on a w8.1 laptop, but I've now pinned the MIT AI2 dev site to my Android tablet. I can open it, see all the training apps I've built, open them on both block and designer - BUT - given that it's actually on an Android tablet, it won't let me run an app straight off the bat. If I click to run on AI companion it's asking me to scan the screen with the tablet(!) or go out and enter the code, I can't connect via a usb as it's actually on the device, and I can't seem to get hold of AiStarter.

So how do I develop Android tablet apps ON an android tablet?

--
Thanks for your response. This is definitely something we are a where of and is an issue on our list off things to fix and is something we are trying to prioritize into our development plan. FYI. We are currently working on a better way to support apps developed to work better tablets. Your point is definitely noted  and will continue to find time to work on this issue.

--
I can't drag n drop components on palette to viewer, but I can drag n drop the blocks. I use android tablet. Please make ai2 more compatible

--
I am new to MITAppInventor and I plan to teach some courses on android app programming.
My institute already has several Android tablets that I am hoping to use.

From what I read so far, it seems that the main issue with tablets are associated with publishing the app 
on Google Play. That is not a big concern for me. Other than that, are there any other limitations in using 
the MITAppInventor for developing an App for tablets....

--

My project,Soccer Kick,say that the it cant be compiled, what can I do?


When you get compilation errors, it's usually because something's wrong with your blocks.  AppInventor has a built-in system to show you where you have a problem, and what you need to do to remedy the problem.

If you look at the bottom of the workspace, you'll see a button and two icons above it.  This is the warning area.  In the first shot, everything's OK and the warning signals in the screen blocks are hidden (when the button says "Show Warnings," they're hidden) and at this stage, there are no warnings.

In the next screen shot, I've separated the number block from the global variable block for Date.
Notice how the count next to the warning triangle above the button now indicates that there are 2 warnings.  But where IS the problem???  
Well, now it's time to SHOW the warnings, so click on the button that says "Show Warnings."  It's caption will change to "Hide Warnings," but warning triangles now appear in the blocks as shown int he shot below.
Now, when you click on one of those warning triangles in the upper left hand corner of your blocks, App Inventor will tell you what you need to do to rectify the problem!  The reason there are TWO warnings is that each block has a warning about being disconnected. See below:
And that's it... Let AI tell you what you have to address when you have a compilation error!  See how it looks below, with the error fixed.  Once the two orphaned blocks are joined again, your warning counter will clear those two errors.  Now, you can click on the button that now says "Hide Warnings. and you'll be back to where the screen shots started above!
--
The RED colored warnings is a certain indication that there are coding errors and your app apk will not compile.  Usually, if you have the YELLOW colored warnings, you will have no issue compiling your app.   However, you should also try to eliminate as many YELLOW errors as possible; it is just good coding practice..

Another thing that prevents compiling is if your code is over 5MB in size; this includes resources (images, sound clips etc.). because they are compiled into the app apk.   If you make an aia file (your source code file) and the file is larger than 5MB, the code will not compile.   

Is your app larger than 5 Mb?  Do you see the RED warnings?      Did you fix the problem?  W like to know if you found a solution, knowing helps us help others.

--
Thank you for your response:  So I think that my project is largest than 5MB,can I do something to get it compiled?

Yes.  You can do several things.

1) Decrease the size of your Media resources attached to your app.  You probably added most of them from the Design screen (near the bottom).  Click on one of the resources   a png file for example.    You can Delete it from the menu there.   You may have some resources that you are not using.  These can be safely deleted, however, if you delete something referred to in your blocks, you have to replace it with something with the identical name whose file is smaller.  Usually png files are small, jpg, slightly larger and avoid bmp files all together.    Your goal is that the apps extra files should be as small as possible because they are included in the app size.

If you are using images, you probably loaded some at high resolution images,, make these images lower resolution using a Windows program like Paint.and reload them.

If you have sound files, consider shorter files.

Another major impediment is the number of blocks you use in your app.  You can reduce the number by coding smarter; reusing code etc.
1) Use procedures for repeating events.  Any code that you use over and over again can probably be put in a procedure.  Less blocks but you have to code smarter.
2) Develop different algorithms.  Virtually anything you code probably can be coded in an alternative way.  So, when something is working, consider refactoring.  Make the app do something but using less blocks.
3) Avoid multiple screens.
4) Avoid lots of layout components and a minimal number of components.  fewer components, faster refreshes and smaller app size.
5) Do not use the Do It feature  ...at least make sure you turn off individual question marks before you terminate your coding session.  Frequently if you leave Do Its open, when you start again, you may have screen stability issues and I suspect the app size is slightly larger than without
6) Do not comment in the blocks...this is probably a small block savings but all savings add up.
7) Do not leave unconnected blocks on your screen.   I am not sure this affects app size, but it might and it adds to your total block count which good programmers want to keep to a minimum.

Those are some ideas, there might be other suggestions somewhere on the forum.  

Also, be aware there are techniques to load resources outside of your app.  Perhaps someone will explain that here.

--
To overcome the App Inventor project limit of 5 MB 

--

Replace items between two lists after calculate the items each other list.


How to replace the items in lists after calculating each items between two lists.
Error:   (on screen)
List index smaller than 1
Replace list item: Attempt to replace item number 0 of the list (5 3 5). The minimum valid item number is 1.
*
In the replace list item part, I did make sure I will grab the position that I need to change the item's value and the (after calculating ) items that I will use them to replace the previous items.
Thus, I used the variables as the registers called "gain_for_index", "pay_for_index", "gain_for_register","pay_for_register"
I am stuck with this problem(List index smaller than 1) for few weeks, the only thing I noticed from the error message is that something wrong with "replace list item". That's the reason why I used the register to 
make sure I can grab the previous item to match the previous list index then replace the item in the "position (index)" I am desire to replace.    
Hope somebody can help me out this problem. I will appreciate it!
For example:
There are two lists as followed:    ( 3 items in each list )
===========================================
Gain List :  ( -3  -4  -6 )
Pay List :  ( 5  3  5)                   
===========================================
Then I need to calculate the items each other (between two lists) with order and replace the value in the original position (index).
The items (value) in two lists will finally be 0.
nd I will display some text on my screen between every round.
We don’t calculate the item which value is 0.
My logic part:


--
This is my "aia" file.

need help making a movie theater app.


hi im a first time app builder building my first app. Since i work in a movie theater my customers have asked for an app and i would like to build one. Our owner owns three locations, but i want to build it for one as a test. however i dont know what im doing, and im looking for some one to kinda of hold my hand and walk this retired marine through what appears to be a slightly complicated exercise. im not looking to build a complex tool here just something people can use to pull up our theater, see show times, buy tickets and get prices on concessions. Any help and hand holding would be appreciated,

-- 
If you have a website,  Just use a webviewer component to load your site.

--
cool. Now how do i do that? I also want to add options like buying tickets, planning a date night option where you can enter the number of people, and scroll through the concessions and see what a night out would cost you. I also want to eventually make it for all 3 locations not just one.

--
hey, i would like to get in on this as well but would more be interested in building an app like this https://play.google.com/store/apps/details?id=com.fandango or this https://play.google.com/store/apps/details?id=com.amc though maybe not that advance. just a simple, view movies or buy tickets.

i wouldnt want to use the webviewer since that defeats the purpose of creating the app (in my view) since all you are doing is loading the website directly in a browser.

--
For viewing the movies, you could probably utilize the Rotten Tomatoes API which uses JSON for results.  The Web component (not the viewer) has a block for translating JSON results.  As for buying movie tickets, perhaps the Google Wallet API?  I'm not really sure in this regard.

--
Haha, playing around with the Rotten Tomatoes API and trying to get just the info out of it that I want is a bit of a daunting task.  :)  But this should be a fun project.  I'll see how quickly I can whip up an app (hint: it probably won't be fast).

--
ok so i should start building the tutorials, then move into the more complicated areas? Cool. Hate going through the basics, would much rather get into the advanced. So which project is a good starting point?

--
Do NOT skip the beginner tutorials.  You ARE a beginner... They'll give you the tools, one by one, to move to more advanced things.

--
As Enis said, do the tutorials.  That way, when you're done, a lot of what you'll see in these pictures will make sense.

============

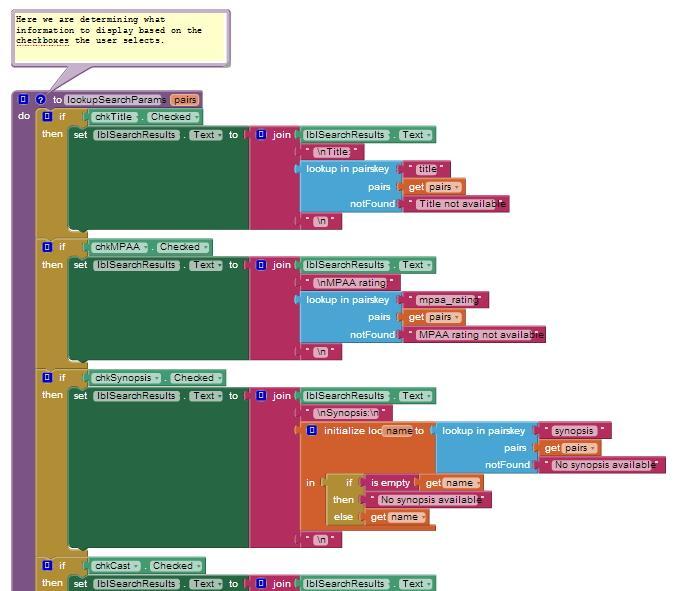
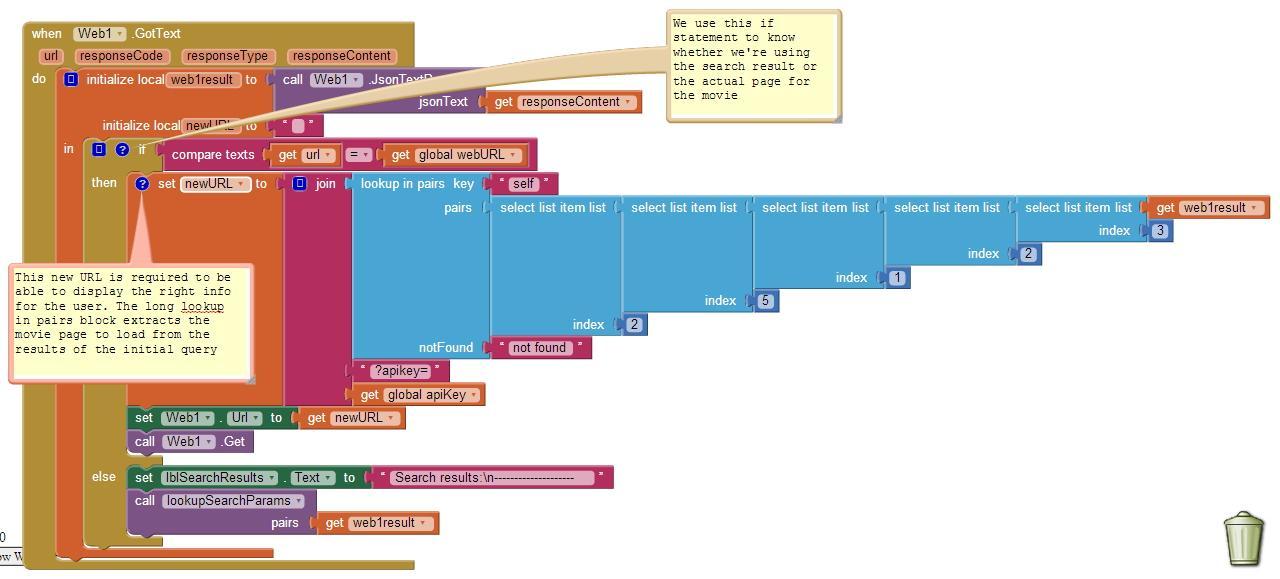
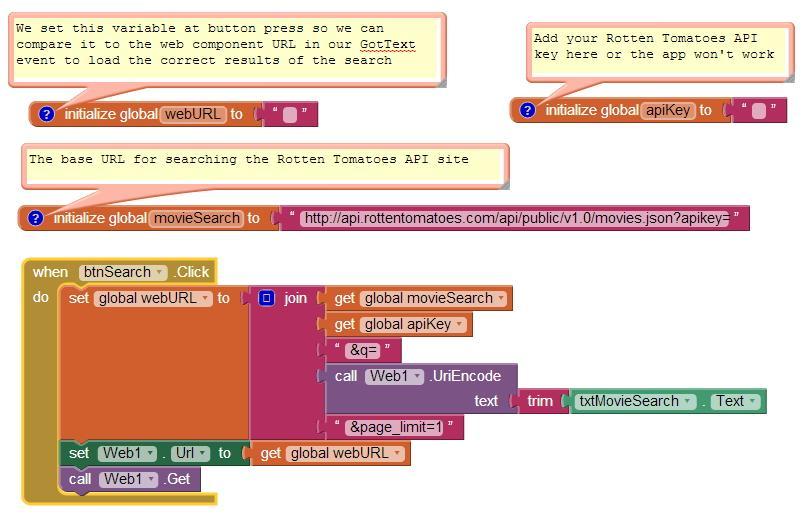
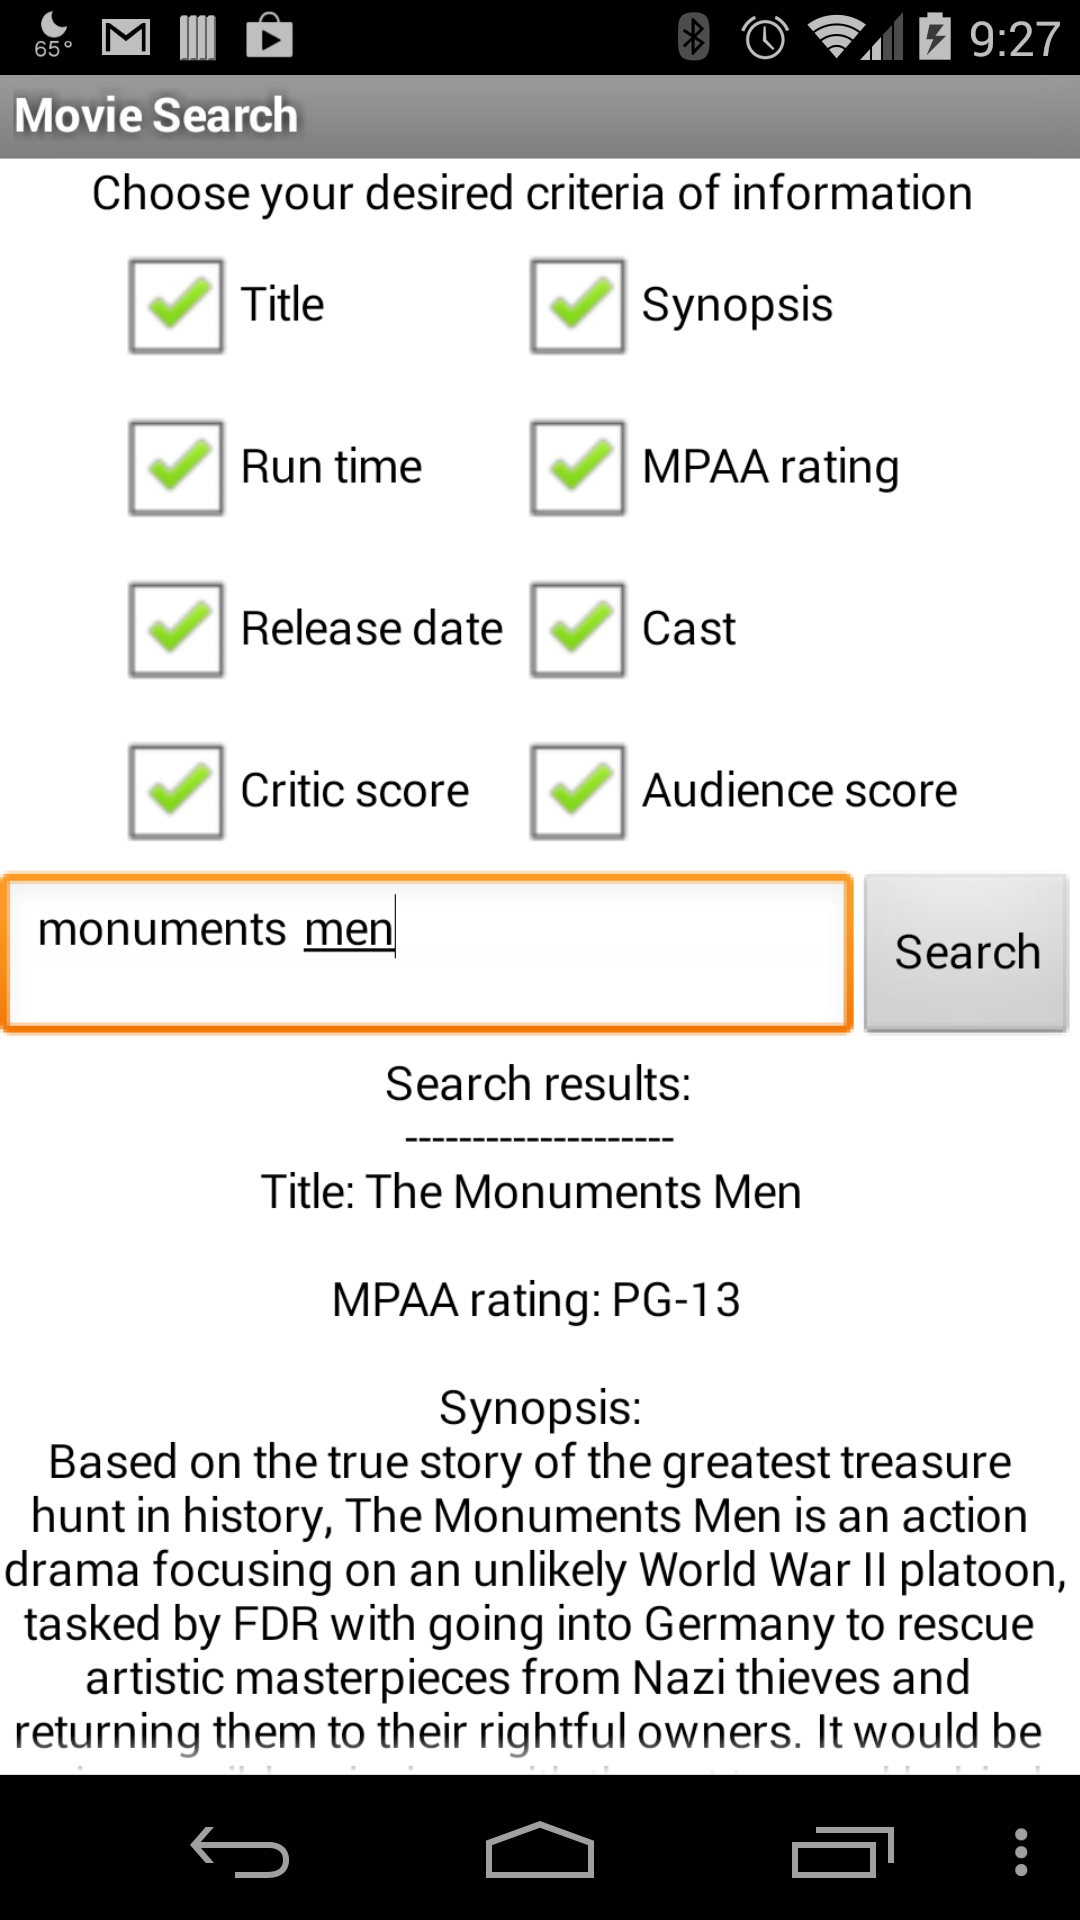
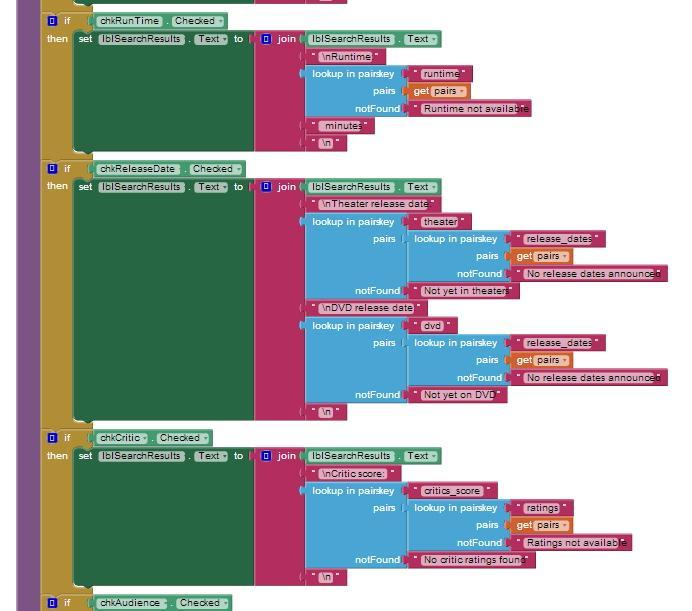
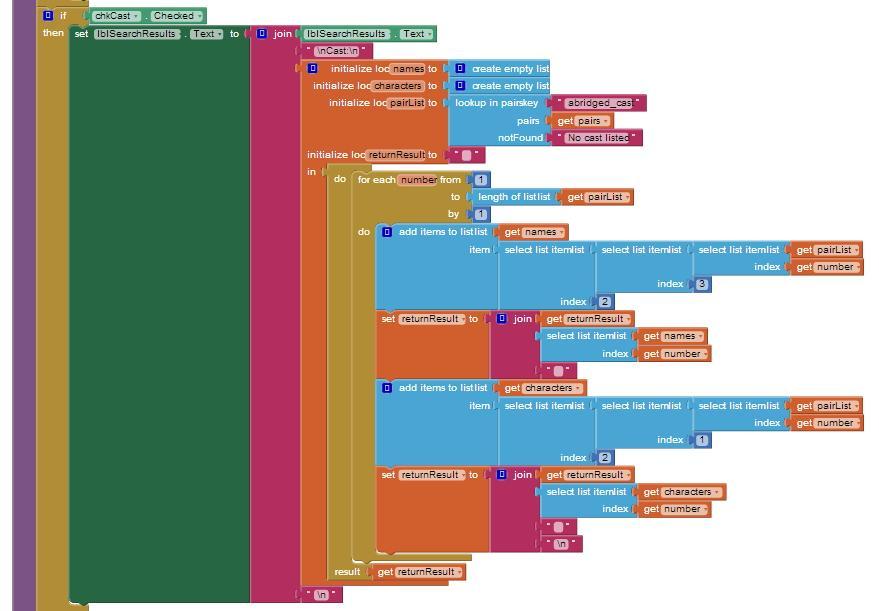
Attached is a movie search app I developed using the Rotten Tomatoes API (overview here).  The nice thing about Rotten Tomatoes over Fandango is that they offer more movie results; I believe Fandango is restricted to the most recent and in theaters.  If you're wanting an app for your job at a theater, that makes more sense.  However, Fandango doesn't offer their API in JSON, but RT does so that's what I went with.

This app isn't perfect, and it would probably need some refining for error catching as well as to fit your needs at work (which is what you can do with this if you like).  As of right now, if the API doesn't return the right information in the right spot you'll get an error when you search.  It also doesn't work well for movies with the same title (Bourne Identity, Supremacy, etc).  Right now it returns one result, and that result is because of the placement of a URL in the API at a specific spot.

Take a gander at the screenshots (including from my phone for how it looks at runtime) and when you've done the tutorials, load the aia file into your AI session to see it and have some fun making it work how you want.


 movie3.jpg

 movie2.jpg

 movie1.jpg


 Screenshot_2014-06-11-21-27-57.png

 movie6.jpg
 movie5.jpg

 movie4.jpg

--
Hey steve, how would you do the "now showing" part? like, you pull up the app, put in a date and it shows you what is showing at what cinema...and at what time.

--
Hey steve, how would you do the "now showing" part? like, you pull up the app, put in a date and it shows you what is showing at what cinema...and at what time.

According to the Rotten Tomatoes API forum, it's not possible.  They use a 3rd party service on their website which they don't have permission to put into the API for other's usages.

It is possible, however, to see what movies are in theaters.  You would just need to use the API for In Theaters Movies rather than the search API.  

--