2017년 5월 20일 토요일

How to save user's GPS coordinates as waypoints to draw on map


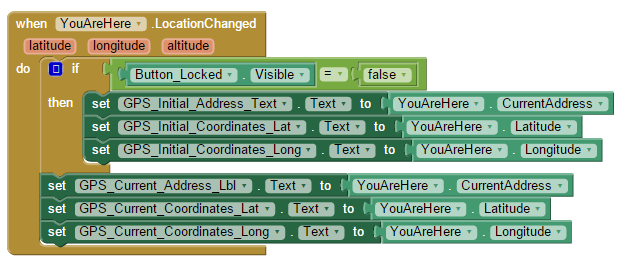
So I'm making an app that will display where the user is on google maps and trace where they have been (like leaving breadcrumbs). So far I figured out how to open a map at the user's location though how would save the users location to a file and then be able to overlay that info on a map and draw a line for where the user has traveled? I've been looking through some tutorials and other forum posts however they see to just be dead links. Any help would be appreciated, thank you! (I attached a screenshot of the code I have already put together)


--
1) You do know the code image posted does not always open a map of the user's current position?  When the CurrentAddress block is used, that code  only works if a) the device is connected 
to the Internet and  b) if an address is actually associated with the device's current latitude and longitude in the Google Address book.  Frequently, some current geocoordinates , especially in rural areas, result in No Address Available. In that instance, no location is plotted.

2) You will need to capture latitude and longitude instead of using the CurrentAddress blockt.  Do not use the CurrentAddress block.  Look at the MIT tutorial Where Is my Car: http://ai2inventor.blogspot.kr/2016/12/android-wheres-my-car-for-app-inventor-2.html  to learn how to plot a single point using lat and lon from your Android's GPS receiver.  To plot numerous points you probably will use a Google Static Map.  The static map, a version of a Google map, requires knowing the latitude/longitude of the points as input and may be your best friend with AI2.  information to locate and post any single way point.     Several of the AI2 third-party clone programming environments have a mapping component which may provide you with more options; AI2 does not and the developer has to provide all the required coding.  Also look at the MIT tutorial Map It  http://ai2inventor.blogspot.kr/2016/12/map-it-displaying-locations-on-google.html  though it does not show how to use the ActivityStarter to post maps.   

3)You have to save your way points.  An array of way-points can be contained in a List or a List of Lists.  'Saving' way points in this way is ephemeral; the track information 
disappears from the device if not 'saved' using a database or a CSV  file (comma separated value).  Save the track coordinates on the device using a TinyDB or as a CSV file using the File component.  Save similar data on the Web using a Fusion Table or a dedicated server or spreadsheet.

4) Once saved in a List or a database, all the coordinates may be plotted in one step using a Static Map or a developer might choose to post the data to a FusionTable as geocoordinates and display using a FTs mapping capability.  How can you use a static map with AI2?  The following will get you a start:  https://groups.google.com/forum/#!searchin/mitappinventortest/static$20map%7Csort:relevance (yes, some links are down)           .  This is specific to a FusionTable  https://groups.google.com/forum/#!searchin/mitappinventortest/static$20map%7Csort:relevance/mitappinventortest/3eAdOItlAlE/MHqQlwFqfGYJ   and will get your points plotted but not connected.

5)  Connecting the points with a line on a static map requires more programming.   Use the Google Mapping API.  https://developers.google.com/maps/documentation/static-maps/intro  Look especially at the section on Paths and the section on Polylines.  Oh no.  The examples are not AI2 examples so you need to do a bit of research. However, the example code can be used as input to the required url information   With AI2, the Activity Starter can be used to render the static google map.  Read about the ActivityStarter here  http://appinventor.mit.edu/explore/ai2/activity-starter.html

6)  How and where to start?   How and where depends on how knowledgeable you are about GPS or Internet location methods, if you know how to work with Lists  (AI2s array equivalent), are familiar 
with Google's Mapping API and and knowledge of how to use the AI2 Location sensor component you are ready to start your project.  A way to start is to program an app to collect the location list of way points.  Once you have a list of way points that can be stored,  learn to retrieve them and can consider how to plot them.  If you understand how to plot way points, it allows you to design your list to make the plotting as easy as possible by saving the data in the TinyDB, FT or CSV in a format that will make programming other parts of your app relatively easy..

7)  Are you ready to build this app?   If you have read and do understand the MIT tutorial Exploring with Location Sensor in AI2  ( http://appinventor.mit.edu/explore/ai2/location-sensor.html  )?
Do you understand how to use Lists?   Have you read the Google Maps API and do you understand how to 'translate' this information to an AI2 Project?  Do you know how to use the File control to use with a csv file if you store your track that way?  Have you done the Pizza Party tutorial to learn about how to use a Fusion Table?  Answer yes to all and actually do the tutorials then you are 
ready.

8)  There are several ways to make an app to post a 'track'.  Using a static map might be the simplest, using a Fusion Table might be more complicated. In each instance you probably 
will need to learn how to use Lists, a Fusion Table and/or TinyDb or to create a text file (CSV) using the File Control.

Here again is what you need to do:
Use the GPS to find the devices location
Save a location (latitude and longitude)
Store the location to a list
now you have a list of geolocation ... essentially a list of way points or perhaps a list of lists of way points
Save the list somehow
Add another location .... save it etc etc until you got all the way points you need in the list.
Now perhaps print the way points to your Android screen to see what you captured

When the way points behave correctly, retrieve the way points from your file, data base or whatever.
Put the way points in a format to be used by a static map (this is going to be a formatted text string)  or load them into  a Fusion Table.  This means you know how those tools work.
Plot the stored way points.

Can you do all this?     If not, do one step at a time.   You will need to experiment with the results.  Sooner or later you will have an app doing what you want it to do. When stuck return to the forum, show what you tried and ask a specific question.

--
Thank you for the reply! Ill take a look into all this tomorrow and start chipping away and learning how to redo my code correctly.

--

AI2 Breadcrumbs Tutorial


Breadcrumbs for App Inventor 2
Learning Goals
⦁ Use layout components to arrange the various objects on screen
⦁ Add data to list components
⦁ Save data using TinyDB and retrieve it when needed
⦁ Access the App Inventor LocationSensor component
⦁ Access the App Inventor ActivityStarter component

Outline
1. Setup App Inventor - http://appinventor.mit.edu/explore/ai2/setup.html
1. Create the Layout components
1. Using the app, dropping breadcrumbs
1. Using the app, find your way back


Create the app layout.
The App screen layout is made up by combining a number of Horizontal and Vertical Layout components. Use a horizontal arrangement component to display a group of components laid out from left to right.Use a vertical arrangement component to display a group of components laid out from top to bottom, left-aligned. Most apps will require a mix of Horizontal and Vertical Layout components to make sure that controls are layed out in a way that makes senses for the particular app.
This app contains 6 Vertical Layout components, each of which may contain a number of Horizontal Layout components, or one or more controls. In the diagram below, the Green blocks represent our Vertical components, the Blue ones are our Horizontal Components and the Red represent the controls used.
The tables beneath the diagram explain the name and function of each of the components used by the App.

Start\Stop dropping Breadcrumbs.
Component Name
Component Type
Description
Start_Stop
Layout component

Initial_Location
Label

Button_Locked
Button
When Visible then app is active and Breadcrumbs can be dropped
When tapped the app resets, existing breadcrumbs are cleaned up and a number of controls are disabled
Button_Unlocked
Button
When Visible, no initial location has been selected and most other controls are disabled
When Tapped, initial location is stored and controls are enabled
Initial GPS Co-ordinates
When the app is first started, these values get populated with values taken from the LocationSensor.
Component Name
Component Type
Description
GPS_Initial
Layout component

GPS_Initial_Address
Layout component

GPS_Initial_Address_Text
Textbox
Shows the Address text from the LocationSensor
GPS_Initial_Coordinates
Layout component

GPS_Initial_Coordinates_Lat
Label
Latitude from LocationSensor
GPS_Initial_Coordinates_Long
Label
Longitude from LocationSensor
Current GPS coordinates
This sections shows the current address text and GPS coordinates taken from the LocationSensor
Component Name
Component Type
Comment
GPS_Current
Layout component

GPS_Current_Address
Layout component

GPS_Current _Address_Text

Shows the Address text from the LocationSensor
GPS_Current
Layout component

GPS_Current _Coordinates_Lat

Latitude from LocationSensor
GPS_Current _Coordinates_Long

Longitude from LocationSensor
Drop breadcrumbs
This section allows us to save the current location to the list of saved breadcrumbs
Component Name
Component Type
Comment
GPS_Remember
Layout component

DropBreadcrumbs
Button
Adds the current location to the saved lists
Where have I been?

This section shows either the number of breadcrumbs dropped so far, or when an item is selected from the list shows the corresponding address text.
Component Name
Component Type
Comment
Breadcrumbs
Layout component

lstBreadcrumbs
ListView
A list containing the saved breadcrumb locations
GetDirections_Button
Button
Get Google directions from current location back to the selected breadcrumb location

How it all fits together

Setting up the trail
When first started, most of the components at set to disabled. Until we lock in the initial location, we don’t have a starting point so there’s no point in keeping track on anything.
See Figure 1 below which performs this initial setup and is run as soon as the app is started. Moving the Setup code into a procedure allows us to re-run it again when needed, i.e. if we reset the trail and want to restart the app
As we run this code to set things up, the LocationSensor component automatically gets triggered at start up. When it starts (and every time it detects a change in location) it fires a LocationChanged event. We use the values obtained from this event to display the address and Latitude & Longitude co-ordinates. (See Figure 2)
Initially we populate both the GPS_Initial and GPS_Current co-ordinate labels as we have not yet locked in the initial location. Once the initial location has been locked we no longer need to update the Initial Coordinate labels, so we just do the current labels.
Once we’re ready to start dropping the crumbs, we click the Unlocked button. Capturing this event (See Figure 3) allows us to enable all of the controls that we need to control the app. It also records our current location and saves this as the first entry in out breadcrumb trail.
It also hides the Unlocked button and displays the Locked button, indicating that the app is now locked and ready for breadcrumbs to be dropped. Clicking this button will reset everything back to the way it when the app was started. As we’ve already added that code to our Setup procedure we don’t need to repeat the code, we just call Setup
Figure 3
Dropping the breadcrumbs
To make our code reusable and to avoid having to duplicate code blocks, we’ve encapsulated all of the code we need to drop the breadcrumbs into a procedure (See Figure 4 below). This allows us to call the code when we need it, without having to duplicate any code.
Initially the procedure gets called as soon as the Unlocked button is tapped (See Figure 3) to record the initial location in our list. It also gets called every time the user taps to DropBreadcrumbs button.
Our procedure has 3 parameters: The Address we want to record, and the Latitude and Longitude.
It first checks to make sure we haven’t already recorded this location, if we haven’t then it’s a new location and we can go ahead and record it.
Our TinyDb is used to store the locations for us. A TinyDB uses Key-Value pairs to store data, think of it like a To-Do list. On Monday we need to go to School, so we store a Key-Value pair Monday<->School. On Tuesday we need to go shopping so we store Tuesday<->Shopping. Once we’ve built our To-Do list we can do a search for any particular day and return the activity we’re supposed to do.
In our case, we store the text address taken from the GPS_Initial_Address label as the Key, and we build a string using the Latitude & Longitude labels, that we can pass directly to Google Maps to get directions, as the Value.
We then increase the count of Breadcrumbs stored and update the text on the ListView to show the number of crumbs dropped so far. As the text on the ListView component shows the number of crumbs dropped, we can’t use this for getting directions so we disable that Button for now.
Now, as we move around with our device, the LocationSensor will continue to detect movement, the code in Figure 2 above will continue to fire and this makes sure that our group of labels for the Current_GPS stays up to date.
If we want to save another location then we just need to Tap the DropCrumbs button which will trigger the event shown below in Figure 4. This time we just need to call the DropBreadcrumbs procedure with the 3 parameters to store the location.
Note: Depending on the accuracy of your GPS service, the LocationSensor may in some cases return a “No address available” value. Obviously storing this value as our Breadcrumbs is a very good idea as it doesn’t tell us anything.
In this case, we can do either of 2 things. Notice that the GPS_Current_Address_Lbl is actually a text box so we can overtype the “No address available” value with something more intuitive which then gets stored as our Key, or we can just store the Lat\Long values as string


Retracing our steps
So when we’ve finished our walk around and want to start to retrace our steps, we can Tap the ListView component, which shows the address values associated with the list of crumbs dropped so far. Selecting a value from this list changes the display from showing the number of breadcrumbs dropped, to showing the text associated with the entry selected from the list.
Figure 6
Now when we tap the GetDirections button, we’ll pass the value that’s displayed on our LIstView control to another Procedure called ShowMap.


This procedure gets the text value that we associated with the address entry, which is passed to the ActivityStarter component which allows our app to open up a web browser and pass a URL to tell it what page to open.
In our case, we’ve already stored the appropriate URL in our TinyDB, so using the Address passed as a parameter we look up the associated Value in our TinyDB.
This URL is formatted to tell Google maps to get us the directions between our current location and the location that we previously stored in our TinyDb. Passing the URL results in a new page being opened, showing Google Maps complete with a list of directions on how to get back to the location that we selected from our list.
Pressing the back button will bring us back to the app, and allow you to continue with the trail, or to reset and start a new one.


Get the App here


Sharing Apps
Apps are shared in an executable form (.apk) that can be installed on a device, or in source code form (.aia) that can be loaded into App Inventor and remixed. For full details, click here.
Download the Code
⦁ Click here to go to Google Drive and download the source code .AIA file. You can then load it into App Inventor, see how it works, and make your own changes.
Install the App
⦁ Click here to go to Google Drive and download the executable file .APK file to install on your device

NOTE: Installing the app (which is an ".apk" file) will require you to change the setting on you phone to allow installation of non-market applications:
To find this setting on versions of Android prior to 4.0, go to "Settings > Applications" and then check the box next to "Unknown Sources". For devices running Android 4.0 or above, go to "Settings > Security" or "Settings > Security & Screen Lock" and then check the box next to "Unknown Sources" and confirm your choice.

Next steps

Hopefully this tutorial will help you in understanding some of the concepts behind building an app using App Inventor. The app is available to download from the Google PlayStore , and the app code is available to download here.

Here are some possible enhancements
⦁ Save the trail to another TinyDb so you can recall it if you need to
⦁ As well as just saving the GPS coordinates every time you drop a crumb, how about adding some text as well , kind of like keeping a diary!
⦁ If you discover a good trail then maybe you'd like to be able to share it with friends


FAQ for maps


search for Error 515: Not connected to a Bluetooth Device


for bluetooth I recommend you to use only one screen. to simulate different screens, just use vertical screen arrangements and set them to visible ...
... via Bluetooth . by using direction and accelerometer but once i try to lunch my app an error appears "Error 515: Not connected to a bluetooth device.
1) When im on Screen 3 (connected to the Arduino), the app suddenly crashes ( or something), and an alert pops up saying: Error 515: Not connected ...
MIT App Inventor 2. OS: Windows 7 Home Premium. Browser: Chrome. How can I check if the phone is connected to my computer? I have my ...
I have a timer running when the device is connected. It closes the application if the bluetoothClient is not connected. Unfortunately it checks if the ...
I am despairing. I am using the command bluetoothclient1.Sendtext Text:a. to verify if there is a bluetooth device connected or not and although I have ...
The problem Im having is when I turn off the other bluetooth device (hc-05) the text on the android device still says "connected" (in green) instead of ...
... mac address of the bluetooth was given ,connection error 507 occurred where it was asked the device to be connected to be turned on even though ...
While trying to connect using the app I built with App Inventor 2, I receive the error message 515 (Not connected to a bluetooth device). I used list pick ...
Again It works on AI2 when connected to the phone via companion. (it is the packaged, installed apk that doesn't work). I don't get an error code, as I ...
If you have the option of Bluetooth connectivity you must be connected (true or not?). Note that you are send 2 messages for explaining to me that i ...
Since I added this part of the programm, whenever I start my app, there occures " Error 515 not connected to a bluetooth device" if I connect to a ...
Hello. I am developing an App for remote control via Bluetooth. If the devices are not connected, an error reporting text pops up when you press one of ...
The direction button controls work, as well as the accelerometer control, but an error pops up saying "Error 515: Not connected to a bluetooth device.".
... and the connection is verified from the app ,an error( Error 515 : not connected to a bluetooth device) is displayed when i try to send a text or anything.
... mac address of the bluetooth was given ,connection error 507 occurred where it was asked the device to be connected to be turned on even though ...
Another problem is that as soon as I start the app it will pop a series of "Error 507: Bt device not connected" notifications. Ah! And if you guys know who ...
Test 2 (blocks, picture Test 2.png) - As soon as I open the application appears to me "Error 505: Not connected to a Bluetooth device" - As soon as I ...
Hi, I am trying to make an app to when it is paired with a Bluetooth signal and I hit a button, the app closes. My code is correct except when the apk is ...
I did use the AI Companion app on my phone and I connected it via wifi. That did seem to work. Attached is the .aia file that has everything, as well as ...
Excerpt from log file here: DT: 2016-08-17T08:15:23. EV: Connected BT. ME: Command not completed in time. ER:001. DT: 2016-08-17T08:16:07.
i used the "bluetoothclient.isconnected" but when i power down the cane the app thinks it's still connected... this is how bluetooth works. if you send ...
... ReceiveSignedBytes, or ReceiveUnsignedBytes. text ReceiveText(number numberOfBytes): Receive text from the connected Bluetooth device.
Similarly, I'd expect IsConnected to tell me when the device I'm connected to powers down and breaks the connection but again it doesn't do this.
In the timer event, inside the two if statements that confirm that you are connected and have data available,. set global IncomingMessage to ...
i will change that to see if the problem end,. Thank you!! Oh, i was wondering if you hace any idea about the error 515 not connected to a BT device :/