2017년 7월 6일 목요일

Checkboxes as radio buttons


One element of form functionality is the radio button - it provides a user selectable option in answer to a question that cannot be unselected and cannot have multiple selections from the same array.  In App Inventor, we don't have the radio button (at least not yet) but we do have checkboxes, and using checkboxes we can achieve radio button functionality.  This will be a tutorial for how it's done. 

For this example, we will use 8 checkboxes in 2 arrays.  As you can see in the image to the left I have them arranged in vertical arrangements to separate the arrays from each other.  What we want to achieve is that when any of the four boxes is checked in one array, we can't unselect it and we can't select another checkbox in that array.


In order to accomplish this goal, in the blocks editor we need to make sure that the selected checkbox is disabled and that when another one is checked in the array the original one will be unselected and re-enabled.  The first step for this will be to define our arrays, so let's create two global variables and name them appropriately.  We cannot put the components themselves into the defined lists, so both variables will need to be created as empty lists and in the Screen1.Initialize event we will populate them with our checkboxes.  Our next step will be to determine a way to detect which checkbox was selected, disable it, and re-enable & unselect any others in the array.  We will accomplish this using the Advanced Blocks.

For the first step, we need to create our procedure and add two arguments to it; click the blue gear mutator button and add two inputs from the little window that will open and rename them to checkbox and array.  The first block in the procedure will be a for each in list loop that will loop through an array and detect the checked value of each checkbox in that array.  So the list we'll be checking is our array procedure argument.  


I recommend renaming the loop variable to something other than the default, something that better explains what we're checking in the loop (I went with ckb).  Inside the loop, we need an if/else statement that will check whether the current list item (ckb) is equal to the input (checkbox) and if true disable it, else enable it.  For this to work we need to use the advanced blocks for the checkboxes, which can be found in the Any Component > Any Checkbox drawer of the blocks editor.  Drag out two set Checkbox.Enabled...of component...to blocks and place one inside each portion of the if statement.  In the top, if the result of the statement is true, we need to set component ckb to false and, by process of elimination, in the bottom we set the same component to true (meaning it won't be the input of the procedure).  Once that's all setup, the easiest part of the blocks is done.

Now we have to code all of our Checkbox.Changed events.  The easiest way to do this is probably going to be to create one event, copy it, then paste it seven times and adjust the values accordingly.  What do we need to do here?  We need an if statement to check whether this checkbox is checked and uncheck all the others, then disable it.  Remember that our checkboxes are setup in arrays of four, so we only need three set checkbox.enabled to events inside.  Set all three of these to false, then drag out the procedure we created earlier from the procedure drawer and place it underneath the last event but inside the if statement.


The first argument, checkbox, is actually the component we're setting the changed event for (if you're working with Checkbox1.Changed you'll put Checkbox1 into this spot, etc).  The array input will be whichever of the two arrays this checkbox is in (which you set in the Screen.Initialize event).  That's all for the blocks.

The last step is to test it, and make sure that when you select a checkbox you can't unselect it and you can't select two from the same array.  You can download the source code below.

CheckboxRadios.aia


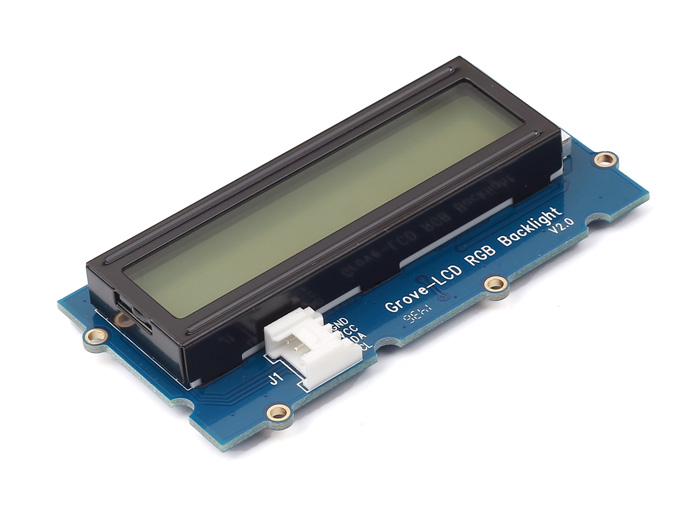
Arduino101RgbLcd


The Arduino 101 RGB LCD lets users communicate information on a liquid crystal display (LCD) with optional RGB LED backlight.

Note: The RGB LCD display requires 5V power rather than 3.3V. If you areconnecting it with the Grove Shield, you will need to make sure the voltage switch is in the 5V position otherwise the display may not function correctly.
More Links
⦁ Download a sample project for the .
⦁ View the how to instructions for the RGB LCD.

Properties

⦁ BluetoothDevice – The BluetoothLE component with a connection to the Arduino 101.

get Arduino101RgbLcd1 BluetoothDevice
set Arduino101RgbLcd1 BluetoothDevice  to

Methods

⦁ GetBackgroundColor – Request the current background color from the device. The color will be returned through the <a href='#BackgroundColorReceived">BackgroundColorReceived event.

call Arduino101RgbLcd1 GetBackgroundColor
⦁ GetText – Get the text currently shown on the screen. The text will be returned through the TextReceivedevent.
call Arduino101RgbLcd1 GetText
⦁ IsSupported – Tests whether the Bluetooth low energy device is broadcasting support for the service. If true, calls to TurnOn and TurnOff should work correctly. Otherwise an error will be reported through the Screen's ErrorOccurred event.
call Arduino101RgbLcd1 IsSupported
⦁ SetBackgroundColor – Set the background color of the RGB LCD connected to the Arduino 101. This method can take any of the color blocks or a color composed using the a href="http://appinventor.mit.edu/explore/ai2/support/blocks/colors.html#make"make a color block. The RGB LCD does not have the same range of colors as a computer screen, so you may not observe changes between similar colors.
  Parameters:
  ⚬ color (color) — The color to change the background color to.
call Arduino101RgbLcd1 SetBackgroundColorcolor
⦁ SetText – Set the text of the display. Text is limited to string with not more than 2 lines of 16 characters each. If a line is longer than 16 characters, it will be truncated.
  Parameters:
  ⚬ text (text) — The text to show on the LCD. This is limited to two 16-character strings separated by a newline "\n"
call Arduino101RgbLcd1 SetTexttext

Events

⦁ BackgroundColorReceived – The BackgroundColorReceived event is run when the background color information is successfully received from the Arduino 101.

  Parameters:
  ⚬ color (color) — The current color of the background.

when Arduino101RgbLcd1 BackgroundColorReceived color do
⦁ TextReceived – The TextReceived event is run when the text currently displayed on the RGB LCD is received from the Arduino 101 in response to a call to GetText.
  Parameters:
  ⚬ text (text) — The text currently being shown on the RGB LCD. Note that this may not match the characters being shown due to a limited range of Unicode support for the LCD.
when Arduino101RgbLcd1 TextReceived text do

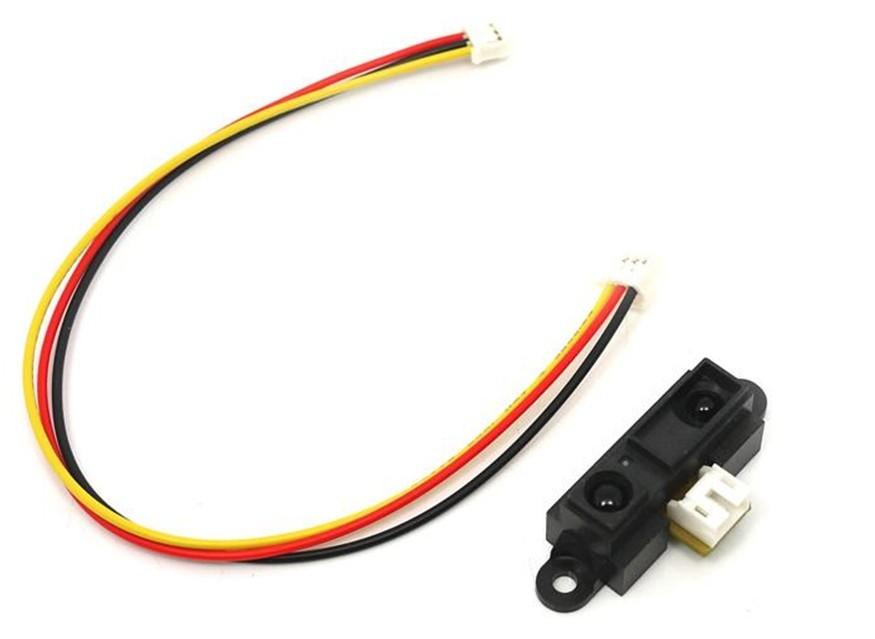
Arduino101ProximitySensor


The Arduino 101 Proximity Sensor lets users receive data from a infrared proximity sensor. Note that the signal wire on the Grove header may be off by one pin. If you are not receiving any reading from the sensor, you may need to increase the pin number by one (A0 becomes A1) to read the correct pin. The Arduino sketch transforms the raw reading from the sensor into a distance in centimeters based on the spec sheet published by Sharp.
More Links
⦁ Download a sample project for the Arduino 101 Proximity Sensor.
⦁ View the how to instructions for the Arduino 101 Proximity Sensor.
⦁ View the hardware data sheet.

Properties

⦁ BluetoothDevice – The BluetoothLE component with a connection to the Arduino 101.

get Arduino101ProximitySensor1 BluetoothDevice
set Arduino101ProximitySensor1 BluetoothDevice  to
⦁ Pin – The Pin on the Arduino board that the device is wired in to.
get Arduino101ProximitySensor1 Pin
set Arduino101ProximitySensor1 Pin  to

Methods

⦁ IsSupported – Tests whether the Bluetooth low energy device is broadcasting support for the service. If true, calls to TurnOn and TurnOff should work correctly. Otherwise an error will be reported through the Screen's ErrorOccurred event.

call Arduino101ProximitySensor1 IsSupported
⦁ ReadProximity – Obtain the most recent reading from the proximity sensor as reported by the Arduino. On success, the ProximityReceived event will be run.
call Arduino101ProximitySensor1 ReadProximity
⦁ RequestProximityUpdates – Request notification of updates for the proximity sensor attached to the Arduino 101. The ProximityReceived event will be run as proximity sensor readings are received from the Arduino.
call Arduino101ProximitySensor1 RequestProximityUpdates
⦁ StopProximityUpdates – Stop listening for notifications of proximity sensor readings from the Arduino. This only has an effect if there was a previous call to RequestProximityUpdates. There may be additional pending messages that will be processed after this call.
call Arduino101ProximitySensor1 StopProximityUpdates

Events

⦁ ProximityReceived – The event is run when a proximity measurement is received from the proximity sensor attached to the Arduino 101.

   Parameters:
   ⚬ proximity (number) — The proximity of an object from the sensor. Due to physical and mathematical limitations, this value will range from 6 to 80 cm.

when Arduino101ProximitySensor1 ProximityReceived proximity do


Arduino101Pins


The Arduino101Pins extension provides a general purpose interface to any hardware connected to the Arduino's digital or analog I/O pins.

Properties

⦁ Analog – Set or get whether the pin is an analog pin (true) or digital pin (false). Default: digital (false).

get Arduino101Pins1 Analog
set Arduino101Pins1 Analog  to
⦁ BluetoothDevice – The BluetoothLE component with a connection to the Arduino 101.
get Arduino101Pins1 BluetoothDevice
set Arduino101Pins1 BluetoothDevice  to
⦁ Output – Set or get whether the pin is an input or output pin. This only applies to digital pins. Analog pins are read-only. See the Arduino 101 PWM extension for treating digital pins as 'analog' outputs. Default: input (false).
get Arduino101Pins1 Output
set Arduino101Pins1 Output  to
⦁ Pin – The Arduino pin to read or write. Default: 0.
get Arduino101Pins1 Pin
set Arduino101Pins1 Pin  to

Methods

⦁ IsSupported – Check whether the feature is currently available for the device connected via theBluetoothDevice property. If no device is currently connected, this method will always return false.

call Arduino101Pins1 IsSupported
⦁ ReadPinState – Read the current state of the pin. After the value is read, it will be reported through thePinStateReceived event.
call Arduino101Pins1 ReadPinState
⦁ RequestPinStateUpdates – Request updates to the state of the pin. New values will be reported by thePinStateReceived event.
call Arduino101Pins1 RequestPinStateUpdates
⦁ UnregisterForUpdates – Stop receiving updates for the pin. Note that there still may be pending notifications to the PinStateReceived event that will need to be processed after this call.
call Arduino101Pins1 UnregisterForUpdates
⦁ WritePinState – Write a new value for the pin. This is only a valid operation if the Output property is set to true. For digital pins, a non zero value will be converted to 1 (HIGH) and a zero value will be converted to 0 (LOW). For analog pins, the value must be between 0 and 1023, inclusive. Any values outside of this range will be truncated. To write analog outputs to digital pins using pulse width modulation, see the Arduino101PWM extension.
   Parameters:
   ⚬ value (number) — The value to write to the pin. Valid values depend on whether the pin is digital or analog.
call Arduino101Pins1 WritePinStatevalue

Events

⦁ PinStateReceived – After the pin is read or an update is received, the PinStateReceived event will be run to inform the app about the state of the pin. The value parameter will indicate the pin state. For digital pins, it will be either 0 for off or 1 for on. For analog pins, it will be an integer in the range [0, 1023].

   Parameters:
   ⚬ value (number) — The value of the pin read from the Arduino. Valid values depend on whether the pin is digital or analog. For digital pins, a 0 indicates LOW and 1 indicates HIGH. For analog, an integer in the range of [0, 1023] will be returned.

when Arduino101Pins1 PinStateReceived value do
⦁ PinStateWritten – After the pin is written, the PinStateWritten event will be run to indicate a successful operation. The value parameter will indicate the value written to the Arduino from the App Inventor app, not necessarily the value passed by the caller to WritePinState. For example, in the case of the analog pins the value will be truncated to fit within the range of [0, 1023].
   Parameters:
   ⚬ value (number) — The value written to the Arduino. Valid values depend on whether the pin is digital or analog. This value is the value written after any transformation by the extension to fit the range appropriate to the pin type.
when Arduino101Pins1 PinStateWritten value do


using Web Viewer to open a website but cannot open video in youtube (only sound)


I need some assistance regarding web viewer in MIT app Intentor 2. I'm using a Web Viewer to link with my site that have video embed from youtube. As result, I can open the site but then when I click to the video, I can only hear the sound with black screen. is there any setting or coding that I need to do. really need assistance 

--
Hi, WebViewer only works with sound, not video. WebViewer with Sound and Video.

-- 
To be able to play Youtube videos in the webviewer, you have to edit the manifest and add android:targetSdkVersion="14" or higher. See this thread how to do it.Thank you Boban!

-- 
Thank you for replying my post. I just try to do so but doesn't worked. My apps crash after installed. There's 2 files with the name AndroidManifest.xml. In root folder and "original" folder. I can edit file in root folder but couldn't edit file in "original" folder. Do you have other solution?

-- 
Thank you replying my post. is there any solution for this kind of problems beside of activitystarter?

-- 

 I just try to do so but doesn't worked. My apps crash after installed.
the answer was not about activity starter, it was about using a third party solution

you might want to ask in the forum of the third party solution you tried, which is

-- 

Problem with shut down python 2.5 on google cloud console


Recently i received a mail from google like advertise me about shout down the application like i created on google console cloud.
I created app for tinywebdb and i created this app with phyton 2.7.
The problem is in a sample code of app inventor of yaml file.
The runtime is python and not phyton27.
This is a response of google:

" Thank you for contacting Google Cloud Support team. My name is Suren and I am going to assist you with this matter.

Alessandro, you might have written the code in Python 2.7, but the runtime specified in the yaml file was "python", which sets Python 2.5. In order to set Python 2.7, the syntax in the yaml file should have been "python27" [1]. If you go to App Engine > Versions, in your Console, you should see "python" under "Runtime", and not "python27". This is why you have received the email notification."
If i change runtime in python27 have a code 2 error.
How i resove my problem?

--
We have received the same warning for our public tinywebdb instance. We will be updating the source code to use Python 2.7 for our public instance and make the code available on-line for you (and anyone else) to use. So standby and check on our website http://appinventor.mit.edu for more information.

--
Ok Thanks!
If you want, when sample code is public, can you post here the link?

--

Create your TinyWebDB Service remote. Very Easy!!!.


Create your remote TinyWebDB in your hosting by PHP. Very easy.

1.- Upload to your hosting the file: mi_tinywebdb.php

2.- In App inventor Design Properties TinyWebDB: 
ServiceURL=http://kio4.esy.es/mi_tinywebdb.php (my example server)

3.- This file php get tag and value and Store in file mi_tinywebdb.htm

juan antonio:"1234 5678":<br>
pedro:"34 987":<br>

4.- You can request tag and GET tag and value in JSON format.

5.- You can read all "database" Click

http://kio4.esy.es/mi_tinywebdb.htm (example with my server)

6.- You can change field separator (:), change name file mi_tinywebdb.htm,...

7.- This code PHP store repeat tag

juan antonio:"1234 5678":<br>
pedro:"34 987":<br>
juan antonio:"78 12":<br>

you get last line.

8.- This is my Spanish tutorial about this "server"


9.- Works for you?


--

1.- This is other versión code PHP: mi_tinywebdb_v2.php

2.- In App inventor Design Properties TinyWebDB change:
ServiceURL=http://kio4.esy.es/mi_tinywebdb_v2.php (my example server)

3.- Now base data file is: mi_tinywebdb_v2.htm

4.- You can read all "database" Click

http://kio4.esy.es/mi_tinywebdb_v2.htm (example with my server)

5.- With this code php file, tag no repeat.

7.- Works for you?

--

Unable to rename Screen name


When I click on Rename for my Screen I cant rename the Screen

--
Screen1 can not be re-named; the screen must always be Screen1.    If you add other screens, those screens can be given almost any name.  One option you might have is to 'copy' Screen1 to another screen name ...there are examples of copying screens in the forum.


Duration of files on customtinyweb and firebase


I would like that the files uploaded to both accounts have an specific duration, how can I do this?

My tags in firebase dont need to exist for more than 4 hours and my files in my customtinydb can exist for 1 month or so (I dont need more than this period of time).

--
Try Taifun's FTP extension: puravidaapps.com/ftp.php
--
I've been reading the info getting in your link but I don't find anything useful to me.
What I want is to manipulate the duration of the files in my customtinydb web and my firebase account, and I think I should do it in Google Cloud Plattform and in Firebase web. I'm the admin so I should be able to configure my web.
Anyway thanks for your answer Nico.


-- 
If you are deploying a custom TinyWebDB, then you can make the eviction criteria anything you want by changing the corresponding Python code. If I recall correctly, for the default shared instance we keep the most recent 10,000 keys and as people write new pairs the older ones are deleted. As for Firebase, the Firebase component does not provide any mechanism for doing this. You may be able to set up a job in Firebase or via another service to go through and clean up files that are too old (or meet whatever criteria you like).


-- 
Thanks Evan for your answer.

I've been checking Python and I didn't find exactly what I was looking for, maybe It's my fault. Anyway I feel like this is out of my league, I mean, I finished a curse of appinventor and i did it because I didn't need the use of commands. Seems I need the use of them to configure the customtinydb and I don't know how to do it. I could use a tutorial for noobs.
I think it's a bit weird that you can't manipulate the life of a tag in Firebase, I'm using a bucket there for a little online gaming so in fact it should be delete right at the end of it. (well maybe Firebase was made for another purposes).


-- 
Any data you put into FirebaseDB with AI2  can be deleted, just write over the pertinent Tag with blank data   or clear the Tag .   There are blocks to do this.  The developer would  use an event handler to clear or overwrite the tag.    If you want the 'files uploaded to both accounts (to) have a specific duration you might be able to 'erase' them from Firebase (but not the TinyWebDB) using the Firebase Console from your PC -- yes you would have to log in and delete the tags manually and not automatically..

You might  use a Clock and a Tag in the Firebase to keep track of when a file starts and when it should become 'stale'.  Check the 'stale' tag on Screen1.Initialize and if it is stale, overwrite it?  or continuously use a Clock in the app to check for 'stale' and if stale delete.  This will not be simple coding.   If you have to have BOTH TinyWebDB and FirebaseDB in use simultaneously, you could do something similar with the TinyWebDB.

You should be able to do something with a TinyWebDB too.  Not necessary to use a TinyDB to check if a 'file' is stale because a Tag in either a TinyWebDB or FirebaseDB could keep the data.  

Your app, your logic.    Look in the forum for examples of how to keep a high score ... the stale data could be handled the same way.  Also look in the forum for Clock examples.   ..and Try to code something but make it a separate test Project before you include it in your fantastic app (so you do not inadvertently mess up its coding).


Regarding "it should be delete right at the end of it. (well maybe Firebase was made for another purposes)."     If you want the file to delete at the end of the game (?), then instruct the DB to overwrite or clear the Tag.  The Tag will not disappear when the app is left by turning off the Android.  If you have an exit button, use that to clear the Tag perhaps.

Here are some potentially useful lings from Abraham's FAQs


--
You will need to keep track of upload datetime and last used datetime for each file.


-- 
Thanks for the answers and the info.

I think I can manage well the Firebase tags with your tips. I'm not still sure about the tags in my customtinydb though because there's no block about clearing tags in tinyweb component.
I got the idea of storing the date of the uploaded file and I could compare it with the current date. 
According to this link 
it's possible to delete a tag in the customtinydb just using the storing block for tinyweb with the same tag and the value "delete". I have tried it and it's not working for me I dont know why.
It says exactly 

Storing a tag with the special value *delete* deletes the entry with that tag.

This could be the answer, can someone tells me what I'm missing right here?


-- 
Have you tried    *delete*  rather than delete  on the TinyWebDB?


-- 
I've tried a lot of them : *delete*, *Delete*, delete, Delete, deleteentry, /deleteentry, etc.

This is the source view

<h3>Store a tag-value pair in the database</h3>
<form action="/storeavaluemethod="post"
enctype=application/x-www-form-urlencoded>
<p>Tag: <input type="textname="tagsize="30"/></p>
<p>Value: <input type="textname="valuesize="30"/></p>
<input type="hiddenname="fmtvalue="html">
<input type="submitvalue="Store a value">
</form>
<br/>

<table border=1>
<tr>
<th>Key</th>
<th>Value</th>
<th>Created (GMT)</th>
</tr>
<tr>
<td>test</td>
<td>hola</td>
<td><font size="-1">July 3, 2017, 6 p.m.</font></td>
<td><form action="/deleteentrymethod="post"
enctype=application/x-www-form-urlencoded>
<input type="hiddenname="entry_key_stringvalue="agtlfnRpbnk0bGFuZ3IXCxIKU3RvcmVkRGF0YRiAgIDAyMWMCQw">
<input type="hiddenname="tagvalue="test">
<input type="hiddenname="fmtvalue="html">
<input type="submitstyle="background-color: redvalue="Delete"></form></td>
</tr>

</table>
</body></html>


It seems like there's an action called "deleteentry" but there's no block for it, just the "Delete" button in the customtinyweb to remove the tags manually.
If I were good with java programing maybe I could make an extension with that "/deleteentry" action.

-- 
Well I finally made it, now I can remove tags in my customtinydb. What I did was to download the zip "alltags-deletable-tinywebdb-fall14.zip" that can be get in this link:


and use it instead of the sample code offered here: 


It's important to type *delete* in the "value" side of the tinywebdb.storevalue block.

Now I have to figure out how to make users to delete the stale files.


--