Chat is the trendy feature on smartphones nowadays. It is more interactive compared to the traditional SMS. Chatting on a smartphone allows you to create a group comprising friends or relatives and then talk to everyone in that group, simultaneously. We see this in most popular chat applications like Whatsapp, Facebook Messenger, Hike, etc.
Since there’s been a lot of interest and enthusiasm among our readers to learn Android app development with App Inventor, we thought of exploring a new advanced topic. In the previous tutorial, we created a Web database using the open source cloud enabled Firebase database. In this tutorial, we will use our previous knowledge to deliver a fully working chat application.
For those who have missed the last tutorial, I would like to go over a few things quickly.
In our application, we are going to use the Firebase cloud database provided by Google, which is open source and freely available.
Features of Firebase
1. Firebase uses a GUI based data centre so that you can visually see and manage all the entries.
2. Being on the cloud, it is accessible on the go to any device.
3. Smart authentication provides secure access.
4. Being a real-time database, it reflects changes as soon as the data is updated.
5. Users can add collaborators, so that multiple people can manage the database.
6. There is no coding for fetching and storing data.

Figure 1: Firebase dashboard
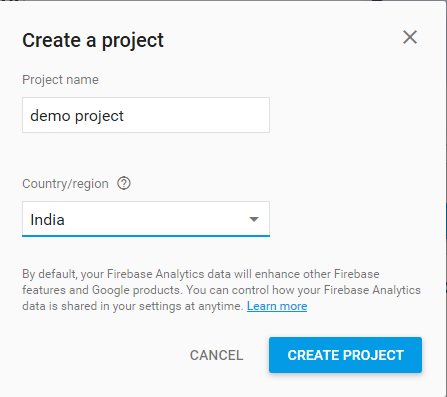
Figure 2: Creating a new project
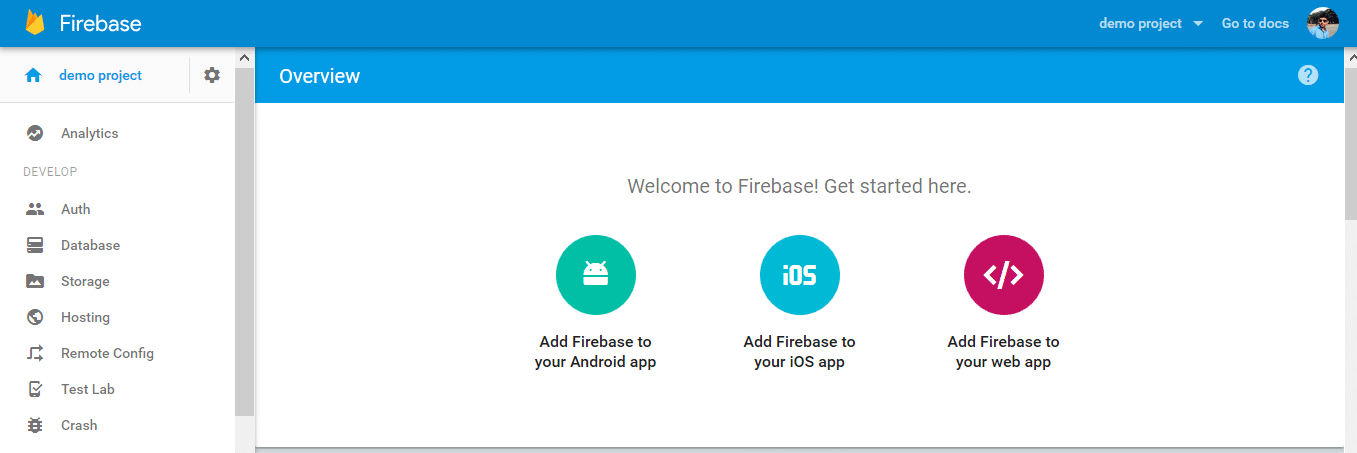
Figure 3: Demo project in the Firebase dashboard
Creating a project in the Firebase database
1. To use Firebase, you need a working Google account, which is also needed to run App Inventor.
2. Type https://console.firebase.google.com/ in the address bar of the browser you are using and hit Enter.
3. If login credentials are asked for, give your Google account credentials and proceed.
4. Follow the on-screen instructions, which generally ask you to accept the terms of usage.
5. Once everything is done, you will see the screen depicted in Figure 1.
6. Click on the ‘Create New Project’ button as shown in Figure 1.
7. Give the name of the project and country/region, as shown in Figure 2.
8. Once your project has been created, you will see the dashboard of your application, which will be similar to Figure 3.
9. Now select ‘Database’ from the left hand palette and then ‘Rules’ from the next page. It will display something like what’s shown in Figure 4.
10. At this point, we want to give all users access to the database; hence, we need to change the rules. You can manually change the rules by typing values, as shown in Figure 5. Once done, click on the Publish button.
You have now successfully created an empty space for your project in the Firebase database, and have given read and write permissions to all the users who have the URL.
If you are new to this Android journey, you are requested to go through a few of the articles for beginners to familiarise yourself with App Inventor. Let’s proceed to the idea behind our application, which we will be implementing in this session.

Figure 4: Reading and writing rules with authentication
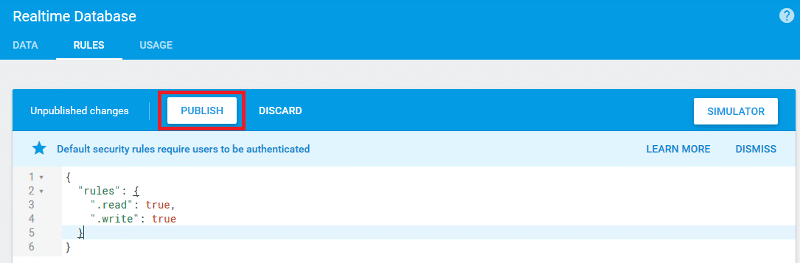
Figure 5: Rules with read and write permission
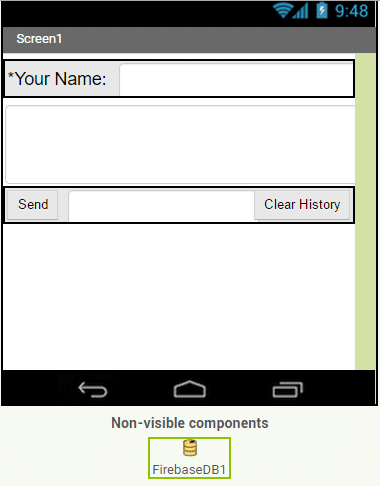
Figure 6: Designer screen
The theme of the application
Most people use smartphones and, on a typical day, use it to browse the Internet, play games, listen to music, watch videos and chat with various people. Have you observed that all your chat records are well maintained, so that you can browse them afterwards as well and can export them via email or to the SD card if you wish? You are already aware of all the components that I will be using for this application — buttons, labels, horizontal arrangement, text box, Firebase DB, etc.
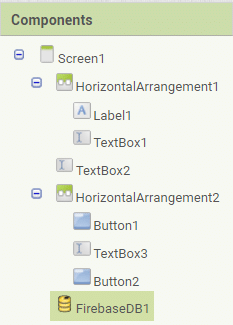
Figure 7: Components view

Figure 8: URL of the project
GUI requirements
For every application we have a Graphical User Interface (GUI), which helps the user to interact with the on-screen components. How each component responds to user actions is defined in the block editor section.
The GUI requirements for Screen1 are:
1. Labels: Labels are the static text components used to display some headings or markings on the screen.
2. Button: A button will let you trigger the event and is a very essential component.
3. Horizontal arrangement: These are special components, which keep all child components aligned horizontally within them.
4. Notifier: A notifier is used to display some instructions or give you control over your existing components. You will see its functionality in more detail as we implement it in our app.
5. Firebase DB: This, as you already know, is the cloud based database from Google. We will use it to store the user’s data on the cloud.
Table 1 shows the components that are required for this application. We will drag them on to the designer from the left-hand side palette.
1. Drag and drop the components mentioned in Table 1 to the viewer.
2. Visible components will be visible to you, while the non-visible components will be located beneath the viewer, tagged as ‘Non-visible’.
3. Labels along with their respective text boxes need to be put within the horizontal arrangement so as to keep them aligned horizontally.
4. If you have dragged and placed everything, the layout will look something like what’s shown in Figure 6.
5. Make the necessary property changes like we did when changing the text property for the label and button components.
6. Renaming the components helps to identify them in the block editor.
7. Your graphical user interface is now ready. Figure 6 shows how the application will look after the installation.
8. The hierarchy of the components that we have dragged to the designer is shown in Figure 7.
If you are confused seeing the designer and the components viewer, let me explain further. Here is the hierarchy that we have placed for our application.
1. We have just placed four text boxes to get the details from the user.
2. For easy reading, we have inserted a label before the text box.
3. We need to configure the Firebase component to connect to the demo project we have created using the steps mentioned above. For that, just assign the URL of your project to the Firebase URL property of the Firebase component in the designer.
Now let’s head towards the blocks editor to define the various behaviours. Let’s discuss the actual functionality that we are expecting from our application.
1. The user should be able to write a name in the top text box.
2. The user should be able to send the chat text by clicking on the Send button.
3. All connected users should see the chat history.
4. Upon clicking the button, chat history should be cleared.
So let’s move on and add these features using the block editor. I hope you remember how to switch from designer to block editor. There is a button available right above the Properties pane to switch between these.

Table 1
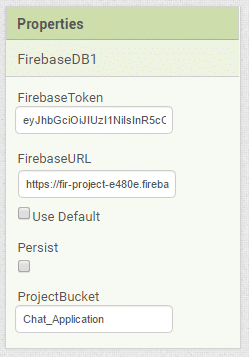
Figure 9: Set the URL to the Firebase component

Figure 10: Block editor Image 1
Block editor blocks
I have already prepared the blocks for you. All you need to do is drag the relevant blocks from the left side palette and drop them on the viewer. Arrange the blocks the same way you see them in the image. I will explain what each does and how it is called.
⦁ On the first line, we have initialised two variables to get the user name and chat history.
⦁ On clicking the Clear history button, all text from the History text box will be erased.
⦁ Upon clicking the Send chat button, we will first validate whether anything is entered in the chat box.
⦁ First, the procedure will check if there is anything entered in the chat box.
⦁ On the next line, it will call the next procedure to check for the name of the user.
⦁ If everything seems fine, it will store the chat message appended with the user name in the Firebase database. You are already aware of the tag and value terms of this database.
⦁ The greatest feature of the Firebase database is its concurrency and real-time updates.
⦁ Now you are done with the block editor too. Next, let’s move to download and install the app on your phone to check how it works.
Packaging and testing
To test the app, you need to get it on your phone. First, download the application to your computer and then move it to your phone via Bluetooth or USB cable. I’ll tell you how to download it.
1. On the top row, click on the ‘Build’ button. It will show you the option to download the apk to your computer.
2. You will be able to see the progress of the downloading process and after that’s successfully done, the application will be placed in the Download folder or the preferred location you have set for it.
3. Now you need to get this apk file to your mobile phone either via Bluetooth or via USB cable. Once you have placed the apk file on your SD card, you need to install it. Follow the on-screen instructions to install it. You might get some notification or warning saying that the install is from an untrusted source. Allow this from the settings and after successful installation, you will see the icon of your application in the menu of your mobile. Here, you will see the default icon, which can be changed and we will tell you how to do this as we move ahead in this course.
I hope your application is working exactly as per the requirements you have set. Now, you can customise various things like the image, sound and behaviour also.
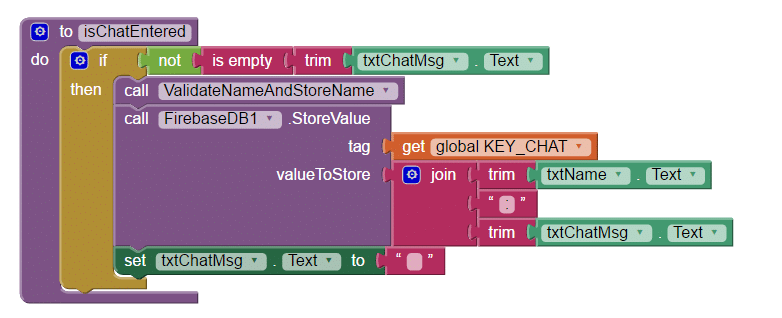
Figure 11: Block editor Image 2
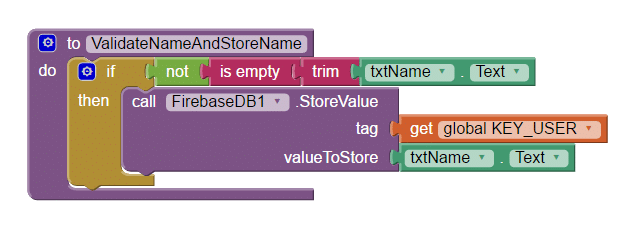
Figure 12: Block editor image 3

Figure 13: Block editor image 4
Debugging the application
We have just created the prototype of the application with very basic functionality and what the user may be interested in. Now come the various use cases that require attention, so that our app does not annoy the user but is able to sustain itself. Consider the following scenarios:
1. What would happen if two users are clicking on the Send button at exactly the same time? Do you think the current implementation is feasible enough to handle the confusion?
2. Can we create multiple groups and store the chats into different project buckets?
3. Can we think of sharing media as well?
4. What if the device of the user is not connected to the Internet? Will it be able to sync all the previous chats upon connecting to the Internet?
These are some of the scenarios that might occur and the user will be pretty happy seeing them addressed. Think about how you can integrate these into the application. Do ask me if you fail to accomplish any of the above cases.
You have successfully built another useful Android app for yourself. Happy inventing!
Feedback on your interests and ideas on how to make Android applications will be much appreciated.