2017년 9월 26일 화요일

Why Firebase is not running ?


Hello, I'm making one app using Firebase and yesterday it was not working. It doesn't connect with the online database. 
Is the firebase service stopped or it is going down only temporarily ? please help me to continue with my project. Thanks

--
Are you experiencing this issue with Firebase when using the default service via the App Inventor companion, or is this in a project with a custom Firebase instance?

--
It's with the default service of App Inventor company. It was working the last week when I was starting one project using firebase and it was working so nice. But three days ago it was not working, and I made a second app when it was working, using a different database name but with the same token and default firebase database. Now it doesn't works with no one app.

--
The Firebase server by Google is working correctly at this moment.  You say firebase is not working; perhaps it is only not working with your Project.  Have you made some recent changes in your project?  Someone might be able to help you if you post your pertinent blocks. By sharing your code, others might be able to provide advice..

I suggest testing a simple Firebase project and testing it and see if that Project works.  A working simple project might indicate your larger project requires some coding changes.

The Firebase server is not an MIT activity.  I find that sometimes it is slow and it can be difficult to code some activities because of the time lag associated with using a database in the Cloud.  I can tell you that at this time Firebase is working with using the MIT defaults without any problems.

--
You can check on the status of firebase here:


--
ok thanks I will check it.

--
Contrary to what I posted earlier;  I have several Firebase Projects using the DEFAULT settings that are no longer working.

--
good idea, I'll try with a smaller one, thanks

--
Thanks all. We are looking into this.
--
It seems that I should have reached the limit, right?


--
may be I used my app too much and I raise the limit.

--
Firebase at google.com is saying there is currently a disruption of the real time database.   This indicates the issue is with Firebase.

--
There was a problem with our Firebase account. It should be fixed now. Try things again.

--
ok, then it wil be working may be in the next days, or not ? what do you think ? it may be solved ?

--
This is a Firebase/Google issue.  Firebase frequently has short outages.   I can't even guess how long it will be unresponsive.   Just keep trying. It was not working on the 22 and apparently today the 25th so try perhaps tomorrow.

--
Firebase is working with the AI FirebaseDB object using the default parameters now.  Thanks Jeff.

--
The "short" outages were actually symptoms of a larger problem. When our Firebase account was "integrated" into Google, they downgraded our paid plan to a "free" plan that had insufficient resources.

We are back on a paid plan (which now costs more then it used to, but it is still pretty cheap so it isn't an issue).

--
Firebase should be back 100% now.

--
Thanks to both, Steve and Jeff by your help, I was worry thinking my job was for nothing, but I see it can work in few time, I'm doing an app to chat with friends in a different way.
I'll make the app delete the messages in a month to don't make a big use. Now I'm using the default account with app inventor but I want to pass it later to an official firebase account in google (when I finish the project and it works good, off course) ;D

--
Yes, it's working now :D perfect

--

2017년 9월 10일 일요일

HOW TO MAKE TOGGLE BUTTON IN APP INVENTOR?


This is my first article on app inventor that is why i have to tell you that what is app inventor? Definitely i will share more articles on this topic.

WHAT IS MIT APP INVENTOR?
App Inventor allows you to make android apps without writing any line of code right from your browser.  This is an blocks based programming tool for developing advanced android apps for non-coders.
Fore more details : Click here
Now, i am going forward assuming that you are familiar with app inventor 2 (yes, it is version 2 released by MIT after its classic version). I hope you have completed tutorials from this book.
Let’s get started. Follow this very simple steps to make your own toggle button.
STEP : 1
Open app inventor designer screen
STEP : 2
Drag one Button and One Label from left hand side user interface palette to viewer section. Then drag one HorizontalArrangement from Layout palette to viewer section and place it in between button and label component. And then viewer section will look like this,
Initial screen
STEP : 3
Now, make the changes to the Label1’s properties

⦁ Text -> “Game is Paused”
⦁ FontSize -> 18
⦁ TextAlignment -> Center
Similarly, make the changes to the Button1’s properties

⦁ Text -> “PLAY”
⦁ FontSize -> 18
⦁ Width -> Fill parent
After doing this, screen will look like this,


STEP : 4
Now, it’s time for logical section. We’ve completed designing and we will add logic to our Toggle Button. Go to Blocks Editor and make the arrangement like this,


Congratulations! You have working toggle button. When you press PLAY button, label text will change to “I am playing” and button text will change to “PAUSE“. Similarly, when you press PAUSE button, label text will change to “Game is paused” and button text will change to “PLAY“.
You can customize as you want. Just put all the blocks in two Procedures logically. If you want to download source code(.aia) file of this app, then here is the link or scan this QR CODE
qr download soucre
Toggle.aia

If you have any question, feel free to comment. I will answer ASAP. This is my first blog article. So, please share it to your app inventor developers because they may learn something from this and help me to spread.

On/Off button with URL links away to the website


Very new to this app making, but i was wondering i followed a few youtube video in creating an on / off button that seemed to work quiet good but i am having issues adding a URL that need to connect once and toggle back to the next state without leading away to that URL 
I dont think this should be that difficult to work out but i am now struggling to find a solution that works.
Something isnt quiet right with my block diagram.
Any ideas please.


--
Probably the best thing to do is incorporate a "first run" variable, you will need a variable and another if/then block.

variable set to FALSE

If button ON then set variable to TRUE then go to url
If button ON and variable = TRUE do nothing

much the same for button OFF

You may need to reset your variable in some way to get back to the default state.

--
I managed to follow this Youtube video seen here Toggle Button In MIT App Inventor 2 | Part 3
☘Hello Guys, In this I have shown How to Make Toggle Buttons In MIT app Inventor 2. This is requirement of many projects For Example you can use Toggle Button to control An LED there is no need to use Two buttons for ON & OFF you can use Only One Toggle Button.☘
which works fine but i am not able to setup the logic as mentioned in your reply.
I have tried a few things with little success I have removed the blocks to one side but i am not sure in what order they go or if this is correct
My diagram is seen here.
I am certain someone here has done this sort of layout before.
Apologies but i am not good at coding.


--
In simplest terms a toggle button can work like this:


Could you explain again exactly what you want to happen with your urls, I may have misunderstood first time around?

--
Thank you for your reply, i really appreciate your help
Sorry for any confusion
I will explain in more detail what i am doing
This is a electronic project that i have and it is a ESP8266  wifi module ( please see image below ) that allows me to toggle a relay to ON and Off state at my home through my router, which i control the opening and closing of my front sliding gate in my driveway.
The program that i have loaded is from an  Arduino sketch  program that allows me to do this and yes it does works as can be expected.
Currently i can control this through my web browsers through my pc at home or anywhere outside my network eg http://myipaddress/gateON   or http://myipaddress/gateOFF

ESP8266 wifi module
Now all i need is the app that goes with it that allows me to toggle this state to ON or OFF without redirecting me away to that URL
So this is what i have been trying to do all along
The Youtube video i have been watching is what i need, but i just need to have the URL toggle once only for each state to have my relay working.
Any ideas how i can set the block diagram to do this.
Please.........?

--
You should be able to do something with the Web component, assuming the urls you send have all the information needed to complete the task
(just using web.get works fine for submitting google forms, so do not see why this won't work)


You may need to do more work with the responses (if any) - would be good to get the feedback that the gate is opening / closing, or that at least the message has been received

--
You might want to add a confirmatory choosedialog notifer in the mix too, just to avoid unnecessary button touches / gate openings/closings

e.g. "Are you sure you want to open the gate?"  Yes/No If Yes > send the url to open the gate, otherwise do nothing. Similarly for closing.

--
I have setup up your block diagram as you just shown..
The circuit turn on but this does not toggle back to off state.
Any ideas.

--
Can we understand the gate process?

From what you say we need to send a "Gate ON" url, followed by a "Gate OFF" url ? then set the button in the app to OFF ?

--
I'm sorry, in my haste I relaise i left some blocks out that change the text of the button. Change to this:


--
Thanks Tim you are a god.
That worked great.
This is egg-zak-lee what i wanted.
With regards to your other suggestion i will take this into consideration and see if i am able to do this on my very own.
But for now i am very happy with what i got.
I can now have this on my android device and this will solve a lot of my issues, making it more convenient switching on and off the relay for my front gate.
I will mark this as solved.

--
Having made a mess of the blocks previously, to make up I provide a couple of examples of an extra step to prevent unintended activation of the relay. :)

Got me thinking though:

How do you know the state of the gate. Can your system tell you if it is open/closed, what state the relay is in?

Also, you might want the gate to close after a set time period? You could automate this after an "ON" by using a clock timer to trigger the OFF event.

Similarly you may want to open the gate at a set time?

-- 

2017년 8월 31일 목요일

Enginursday Detecting Knob Changes


Comparing an ADC value with a previous value can detect a changed state, but what if noise is introduced? See some topologies in action for detecting purposefully changed inputs while rejecting noise. See https://www.sparkfun.com/news/2468 for more information. SparkFun parts used in this video: SparkFun RedBoard - Programmed with Arduino https://www.sparkfun.com/products/13975 Black Knob - 15x19mm https://www.sparkfun.com/products/9998 Rotary Potentiometer - 10k Ohm, Logarithmic https://www.sparkfun.com/products/9940 Teensy 3.2 https://www.sparkfun.com/products/13736 SparkFun TeensyView https://www.sparkfun.com/products/14048 Proto Pedal Enclosure https://www.sparkfun.com/products/13967 SparkFun Proto Pedal https://www.sparkfun.com/products/13124 Code used in this video can be found on github:: https://github.com/marshalltaylorSFE/... The referenced book is called: Design Patterns: Elements of Reusable Object-Oriented Software ISBN-13: 978-0201633610


2017년 8월 30일 수요일

GameClock Visual Countdown for AI2 - Simplified (tutorial)


**Edit  In the mainstartBUTTON the variable called is suppose to be TimeLeft (just realized i didnt set that)
This is from an already working program just copy/pasted and shown what was needed for this, this is why there is red flags....for duplicates.)

Here is a simple count down timer that displays the countdown and stops at 0 for your games or other programs.

1a-  (optional) create a Variable called TimeLeft.  This probably is not even required for the countdown but if your doing more then one board it gives an easy common referral for copy/pasting scripts...or different aspects of control for time when dealing with several clocks that work with or against each other.   You can do without this thou and just do the math with just your TimerValueLabel.
1b- create your count down displayed label.  I called mine TimerValueLabel.  you can establish the starting number while creating the label or define it in screen1 or the start button.
2- create 2 procedures....one for clocks turned on and one for them being off.   (ClockOn) (ClockOff).   Using your clock now.. (Mine is called TimerClock)  I did this after personally having background clocks for other boards conflicting.  Turning all clocks off when it starts and only activating what you need for that board will save you a lot of headaches in larger complex games.  Plus you can create a pause button if needed with this in place.  if your counting down by seconds, then don't even change your clocks interval setting.  1000 = 1 second.
3- Screen1.Initialize - call the clocksoff procedure to make sure it dont start until your ready to begin your game.
4-within your games Start button... call the ClocksOn procedure to start the timer, also reset your time with the starting time you count down from.  I used 120 which means that my TimeLeft variable will have the value of 120.
5-with your clock now, (when its turned on) it will read the script like this:  my TimeLeft variable of 120 is now equal to 120-1 every time the clock fires.   Since we did not change the speed of the clock firing, the clock will fire every 1 second meaning the count down will be every 1 second as well.
The next block under that is to display that count down.  TimerValueLeft is the label we created to display it, and now were defining it to follow suit with the TimeLeft count down.  So now everything changes together as the clock fires every 1 second.
6- the if loop:  Make the TimeLeft less then or equal to 0....not just equal to.   If you have a slight delay, or a jump in the program and it misses 0 for some odd reason...it will go into the negitives and keep going.  make the if results turn the clock off as well.  This is the second backup plan.  by turning off the clock it cannot possibly keep counting.  Also it will not create a background issue in other boards you have.

Notice how each time you start the program, the start button re-defines the clock at its starting value.  This is important too so that it does not start were you left off from a previous game.

--
Thanks Richard, Not had time to try this out yet. Looks like it will do the job. I'll post back later when I have tried it out. Appreciate your help.

--
If You use onlu clocks to countdown seconds after awhile you will get a slight difference in time. you have to use system timer to do a proper and accurate countdowns or time ridings. I have added a picture of a simple example. When the button is clicked it checks the current system time and sets it to a variable, then You can compare system time after a while to that variable to get precise time.The division by 1000 et the end is to get seconds insted of milis.


--
Any chance of uploading the file. For some reason, when I do the TimerClock.Timer control and then add the next blocks I can select the Get Variable block but I am unable to select global TimeLeft. Is this a bug.
also in any other blocks that have drop downs I can't change them.
Will reboot laptop and try again.
Running Windows Vista.
and using App Inventor 2 web version.

--
@casa: which browser are you using?
you might want to provide a screenshot of your relevant blocks

--
using firefox 26. Just tried Chrome and it works ok. So it looks like a Firefox problem.
--
How do you compare this system time to the clock time?  Can you show more, 

--

2017년 8월 27일 일요일

Scroll of the components in the design phase


When I build a screen I do not always see all the inserted objects. For example, if I post a 20 buttons below the other in the screen I see only the top 10 and I do not see the others.
This makes it difficult to take action on those who do not see recognizing them by name only. There is a chance to make a scroll? In addition, if, for example, I put in a very long text label, I no longer see the remaining components.
They are forced in this case do not enter anything in the label, go to the Blocks and write the text in the label. There is a solution to these two problems?

--
to scroll down in the Designer, you can temporally enable the 'Scollable' checkbox in the Screen1 Properties.

If cou can't see components, you can set temporally other components, you can see to 'invisible'  in the component propeties

--
if I post a 20 button

This sounds like a ListView.
Also consider a List Picker, which can save lots of screen space for you.

See the Lists section of this FAQ: FAQ for lists and TinyDB

--
Thanks for your answers. Not good a List Picker because the screen is made up of images, text, buttons, and more that are repeated one after another. On the screen I set Scrollable, but I also set height to 95%... Thanks again. And enjoy your work

--

Maybe Taifun's dynamic table is useful to you: http://puravidaapps.com/editable.php

table3.aia

--

2017년 8월 26일 토요일

WiFi Wireless Endoscope camera and app inventors ??


I'm currently working on my univecity project. I have created my own application usin app invetors to achive most of the functionality now I would like to add live camera to it using wifi endoscope.
Its works by connecting to it by WIfi netowrk and its got application that allows to see camera reading. 
App allows to select connected cammera, affter selecting camera live image will show up:


My qestion is is there any way that I could see those images in my own application using app invetors. Is there any way to read WIFI readings ? 

--
When I enter showed address is taking me to router setting page. So I assume that wifi adaptor on the camera works like a router. 

--

Unfortunately, it's all in Chinese :( 

--
Maybe you could use the app that goes with the device to find out how it connects and what the API is like.

--

How to zoom out page to full site view in web viewer


i have used the search but not found a post give me a idea.

i like to open a web page in web viewer and zoom out to the full size view of the page

is there any code or add for the web viewer to do this automaticly by opening the page ?

hope you can help,

--
What you could do before opening the webviewer is make all other components invisible and set the width, height of the webviewer to width, height of the screen.

-- 
i have it like you wrote, maximal screen size,
but the page is not shown complitly, only a part of and a little zoomed,
so the page can zoomed aou a little more manualy...

-- 
Can you post your blocks, and also your design?

-- 
If they are your own web pages, then you can control how the html fits into the page with css:

<style>
#body {
  width:100%;
  height: 100%;
</style>

<body>
  <div id="body>
    all the text would go here!
  </div>
</body>

for example, but other web pages may not have this code, and what if a web page is designed to be a long one, autofit would make it unreadable.

-- 
Its just a webview with call of URL

So No way

--

open pdf file


can sombody tell me our show me how open een pdf file
my pdf is in my google account
now i get only the html look

see the link thats what i have done

p50B_activity_starter_pdf.aia

file:///mnt/sdcard/AppInventor/assets/acueducto.pdf

https://docs.google.com/viewer?url=

http://kio4.com/appinventor/imagenes/sanctipetri.pdf


●▬▬▬▬▬ஜ۩۞۩ஜ▬▬▬▬▬●
╔═╦╗╔╦╗╔═╦═╦╦╦╦╗╔═╗ 
║╚╣║║║╚╣╚╣╔╣╔╣║╚╣═╣ 
╠╗║╚╝║║╠╗║╚╣║║║║║═╣ 
╚═╩══╩═╩═╩═╩╝╚╩═╩═╝ 
♦ Facebook → http://facebook.com/ludaapps
♦ Instagram → http://instagram.com/luisdanielperez18
♦ Descargar → http://sh.st/4wbnm

★★★★★ ★★★★★ ★★★★★ ★★★★★


♦ Juegos Online Android → https://goo.gl/9st9mh
♦ Mi primer GamePlay → https://goo.gl/CxCExK
♦ Top juegos de fútbol → https://goo.gl/FZUWde
♦ Root cualquier Android → https://goo.gl/Zre5hp
♦ Perzonaliza Whatsapp → https://goo.gl/gI3NDq

★★★★★ ★★★★★ ★★★★★ ★★★★★

--

2017년 8월 24일 목요일

MIT App Inventor Project


Build a Personal Safety Application in App Inventor 2


Astound your friends by building your own Android personal safety app! This tutorial in our on-going series on App Inventor 2 guides the reader in building such an app. Reading previous articles would be a great help to those just joining us in this quest to build Android apps.

Personal safety is of prime concern to each one of us. Many a time we are in difficult and dangerous situations and need a helping hand to extricate us from harm’s way. As the proverb says, Prevention is better than cure. So it is better to be prepared with a solution before a potentially harmful situation arises.

In this article, we are attempting to build a personal safety application, which in times of trouble can help us. Our goal here is to inform the ones who care for us about where we are and the activities we are involved in. We will be building a mobile application using which, on pressing a single button, we can send critical information about ourselves to the people we intend to send it to.

This tutorial series requires some basic as well as a little advanced knowledge about building Android applications with App Inventor. So let’s use the knowledge acquired from the past articles in this series, to build this app.


Figure 1: Designer screen (Screen 1)


Figure 2: Designer screen (screen 2)


The purpose of the application

As explained earlier, the purpose of this application revolves around the need to extricate the mobile device user from a dangerous situation. We hope to build an Android mobile application which will send the location of the user, along with some predefined text, to certain people/agencies and place a call to them to describe the situation. We will enable users to set the contact numbers of the people they wish to contact in case of emergencies. You are already aware of all the components that will be used for this application like the texting component, the phone call component, location sensor, buttons, labels, Tiny DB, etc.


GUI requirements

Every application requires a graphical user interface or GUI, which helps the user to interact with the on-screen components. How each component responds to user actions is defined in the blocks editor section. As per our current requirements, we hope to have a single button which will trigger all the events, and a dedicated screen where the user can fill certain details like phone numbers to contact in case of an emergency. Since we are using multiple screens this time, let's note down their components separately. The very first screen, which will have the trigger button, is Screen1 and the other will be Screen2. How to add a new screen into the application will be explained as we move further.

Figure 3: Component viewer (Screen 1)
Figure 4: Component viewer (Screen 2)


GUI requirements for Screen1
1. Button: The button will let you trigger the event and is a very essential component.
2. Texting component: This is essential to SMS/text message related functionality. It enables you to read and write text messages to the desired phone numbers.
3. Phone call component: This is essential for call related functionality. It can detect your incoming calls and place new outgoing calls, as required.
4. Tiny DB: When you need to store some data persistently within the device, Tiny DB comes into the picture. It enables you to store values corresponding to unique tags, into the phone database.
5. Location sensor: This will sense your current location in terms of latitude and longitude.
6. Notifier: This is used to display some instructions or give controls over your existing components. You will understand its functionality better as we implement it in the app.


GUI requirements for Screen2

1. Button: This will let you trigger the event and is a very essential component.
2. Label: The label component gives you control to write static text or headings. The text of the label component remains as it is until you change it in the blocks editor.
3. Text box component: This allows users to give their inputs as required by the application. As soon as the text box is highlighted, it activates the device keyboard to make it visible on the screen.
4. Tiny DB: When you need to store some data persistently within the device, Tiny DB comes into the picture. It enables you to store values, corresponding to unique tags, in the phone database.
5. Notifier: This is used to display some instructions or give controls over your existing components. You can see how it functions in more detail as we will be implementing it in the app.
6. Horizontal arrangement: This component plays a crucial role in keeping the child components horizontally aligned. Whichever component you put into it will be kept horizontally aligned.


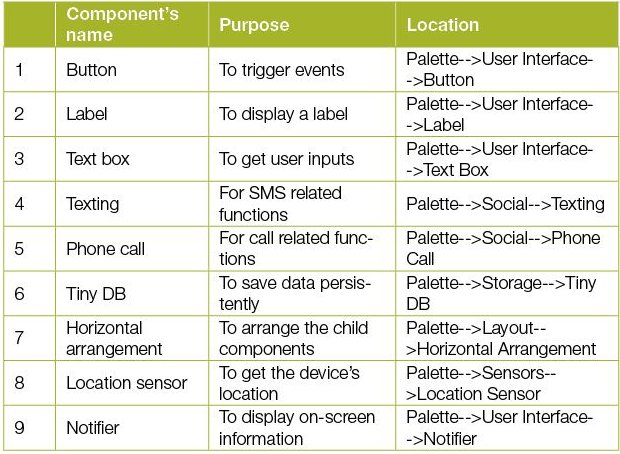
Given above are the components that we require for this application. Lets drag them on to the designer from the left hand side palette.
Drag and drop the components mentioned in the table above the viewer.


Visible components can be seen by you while the non-visible components will be located beneath the viewer under the tag 'non-visible'.


Put separate components for Screen1 and Screen2.


To create a new screen, click on the "Add Screen" button just above the designer viewer.


If you have dragged and placed everything, the layout will look something like what is shown in Figures 1 and 2.


Make the necessary property changes like we did when changing the text properties for label and button components in previous articles in this series.


Renaming the components helps to identify them in the blocks editor.
So now, your graphical user interface is ready. Figure 1 shows exactly how the application will look after the installation.


The hierarchy of the components that we have dragged to the designer is illustrated in Figures 3 and 4.


After having read the previous articles on App Inventor, I am sure you are pretty clear about how to prepare a GUI. It is'nt a complex task, the components just have to be placed on the viewer and a few property changes are required to make them look clearer.


So let's move on and add these behaviors using the blocks editor. I hope you remember how to switch from designer to the blocks editor.

There is a button available right above the Properties pane to do this.
But before we move on, I would like to go over what we want from our application. Listed below are the functionalities that we are looking for:


⦁ On pressing the button, a custom SMS should be sent to the number already saved in the database.
⦁ On pressing the same button, a phone call should be placed to another number saved in the database.
⦁ By any means, the user should be able to change the emergency contact numbers.
⦁ If the people whose numbers have been saved for emergencies are not available, the user should be duly notified.

Blocks in the blocks editor

I have already prepared the blocks for you. All you need to do is to drag the relevant blocks from the left side palette and drop them on the viewer. Arrange the blocks exactly as shown in the images (Figures 5, 6, 7 and 8). I will explain what each does and how it is called.
The blocks in these figures may look a bit daunting; so let me help you understand them.


Figure 5: Blocks editor image 1 (Screen 1)

Figure 6: Blocks editor Image 2 (Screen 1)
Screen1: When the Help button is clicked, the following things will happen (depicted in Figures 5 and 6).

It will generate a custom text message for the texting component, taking the current latitude and longitude values from the location sensor.

Next, it will decide which number the text message should be sent to, and will then fetch the phone number from the database.


Similarly, for the call component, we will need a phone number to which the call should be placed.


It is a good practice to think of all the user scenarios and be prepared in advance; so if such a scenario occurs, the user can be notified to take the necessary action.


The next lines will check whether the fields returned by the DB component are empty. If they are, then the user should be notified to take appropriate action.


If the phone number fields are not empty, we should proceed with the text message and phone call facility.


When the Help button is given a long press, it will open Screen2 where the user has set the emergency numbers.


Don't forget to create Screen2 in advance though.


Screen2: When the Save button is clicked, the following things will happen (depicted in Figures 7 and 8):

1. First, it will check whether the user inputs given are blank.
2. If they are, then nothing will be saved and the user will be notified.
3. If both the fields are filled, it will allow the user to save the numbers into the database.
When the back button is pressed from Screen2, it will close the current screen and will take the user to Screen1.
You are now done with the blocks editor. The next step is to download and install the app on your phone to check how it works.


 Figure 7: Blocks editor Image 1 (Screen 2)


Figure 8: Blocks editor Image 2 (Screen 2)

Packaging and testing

To test the app, you need to get it on your phone. First, download the application to your computer and then move it to your phone via Bluetooth or a USB cable. I'll tell you how to download it.

1. In the top row, click on the Build button. It will show you the option to download the APK to your computer.
2. While downloading this, you can see its progress and after a successful download, the application will be placed in the downloadfolder of your directory or the preferred location you have set for it.
3. Now you need to get this APK file to your mobile phone either via Bluetooth or via USB cable. Once you have placed the APK file on your SD card, you need to install it. Follow the on-screen instructions to install it. You might get some notification or warning saying, "Install from untrusted source." Allow this from the settings and after successful installation you will see the icon of your application in the menu of your mobile. Here you will see the default icon, which can be changed, and we will tell you how to do this as we move ahead on this course.


I hope your application is working exactly as per your requirements. Now, depending upon your needs and customisation, you can change various things like the image, sound and behaviour also.


Debugging the application

We have just created the prototype of the application with very basic functionality. What else might the user be interested in? Now, let’s look at various cases which require serious thought so as not to annoy the user. Then let’s ensure that your app addresses these requirements. Consider the following cases:


1. Wouldn't it be nice to add some background for Screen1?
2. What other ways could we use to trigger the SMS and call functions rather than clicking the button?
3. Wouldn’t it be nice if we could provide a recording feature to capture all that is happening around the user during that period of danger?

These are some of the possible scenarios that could occur and users will be pretty happy seeing these problems addressed.

Think about all these scenarios and consider how you could integrate these into the application. Do ask me if you fail to address any of the above requirements.


You have successfully built another useful Android app for yourself. Happy Inventing!