2016년 12월 10일 토요일

screen.width and screen.height


I already searched the mailing group and the web but can't find a solution for my issue.

I use the "Google Material icons" for my buttons to stay as close as possible to Google's material guidelines.
Depending on phone resolution (dpi), I want to use several sizes.

As such I can easily do that by detecting "screen1.width" and "screen.height" in the "initialize app" via a procedure going through a for/each or if/then cycle.

The problem is in the "screen1.width" and "screen.height" detection.
I tried on 3 phones.
One 720x1280 (portrait) which gives 320 width and 569 height
on a 480x800 (portrait) which gives me 320 width and 533 width
on another 480x800 (portrait)  I get 319 width and 532 as height.
I can get my hands on other phones within a few days but I doubt there will be a difference and I would not understand it anyway.

Why is this not working?

And as a side note: I already unzipped my own apk and detected that the 

<supports-screens android:resizeable=["true"| "false"]
                 
android:smallScreens=["true" | "false"]
                 
android:normalScreens=["true" | "false"]
                 
android:largeScreens=["true" | "false"]
                 
android:xlargeScreens=["true" | "false"]
                 
android:anyDensity=["true" | "false"]
                 
android:requiresSmallestWidthDp="integer"
                 
android:compatibleWidthLimitDp="integer"
                 
android:largestWidthLimitDp="integer"/>

is missing from the (binary) manifest. 

Is that in any way related? And do I need to add that? And can I do that without manually changing the (binary) manifest, rewrite the (binary) manifest, and re-sign my app.

-- 
After further searching on relevant keywords I found a solution in several areas like here and via app2market.

-- 
set the property sizing of Screen1 to responsive
see also Responsive Design in App Inventor


-- 
I already replied but it seems my message is not posted.

Thanks for your reply. 
I rebuilt the app using the responsize setting and on my old 480x800 phone it mentions 365x609

On my 720x1280 phone it mentions 360x640. 

I don't understand. Now my old lowres phone is supposed to have a higher resolution?

-- 
It is even worse. I tried a quick app using an image with resizing based on screen width. The app is built with screen1 set to "responsive".

I load the image and use "set Image1.Scaling to 0". This will make sure the image is resized proportionally.
Then I use "set Image1.Width to Screen1.Width".

This doesn work at all. The images are way too small. Probably based on the weird screen sizes.

I tried 2 images: one of 569x622 and one of 728x709.

I'm begin to think this is a bug in appinventor.

-- 
follow the recommendations is in the document, see again here Responsive Design in App Inventor
see especially chapter 3. Detailed example

-- 
I did read that and very carefully especially as I kept keeping the wrong values. I have no problemsscaling my horizontal/vertical alignements and the buttons in it.
The mentioned article doesn't say anything about 

It is simply that appinventor reports the wrong values also when screen1 is set to responsive.

In my screen1.initialize I simply request the screen1.height and the screen1.width and I always get the wrong values as reported above. On both phones and with screen1 set to fixed or responsive.
Maybe I am to blind to see it, but please let me know what I missed from that section 3 (or the whole article).
I know by now by searching further that many devices report some standard "default make all apps work" value and you have to dig one layer deeper to get the right values. I assume AppInventor also is using the default values as reported by the device, hence also that default value when using "fixed", and a wrong value when using responsive.

I also build apps in cordova with both framework7 or with ratchet. (I switch because sometimes it requires a fewlines of codes to get the same result as with many building blocks from appinventor, and sometimes it is completely the other way round).

If I do something in cordova in javascript like:

var RES = "width is: " + screen.width + "; height is: " + screen.height;
alert( RES);

I get "width is: 360; height is: 640;". So the same as Appinventor reports.

However, if I do:
var RES = "width is: " + window.screen.width * window.devicePixelRatio + "; height is: " + window.screen.height * window.devicePixelRatio;
alert( RES);

I do get "width is: 720; height is: 1280;"

How can I do this in AppInventor without having to fire up some html at app initialization and having the width/height reported back in a webstring? And even if I do it that way: Will I still get the wrong values as AppInventor overrules the normal device values?
(I must admit that I did not try that approach yet as it comes to mind while typing this, but AppInventor should be able to report the correct values).

(And sorry if I overlook something obvious in the mentioned article)

--
Second sentence of my previous mail is: "The mentioned article doesn't say anything about "
and should be "The mentioned article doesn't say anything about getting the right resolution from screen.width and screen.height".

--
I created a quick app. screen1 set to responsive.

Run via AI companion !!!
Appinventor mentions: 640x360

When clicking the button I get;
simple -> width=720; height=1280;
Better -> width=1440; height=2560

html file:
<!DOCTYPE html>
<html>
  <head>
   <script>
    var RES = "Simple -> width= " + screen.width + "; height= " + screen.height;
     RES += "Better -> width= " + window.screen.width * window.devicePixelRatio + "; height= " + window.screen.height * window.devicePixelRatio;
    alert( RES );    
   </script>
  </head>
  <body
  </body>
</html>

To make sure I also compiled the app (after having changed the file path) but the screen resolutions of appinventor and the javascript remain the same.
So when running a html from appinventor it reports different screen sizes as that same html when running from a compiled cordova app.

--
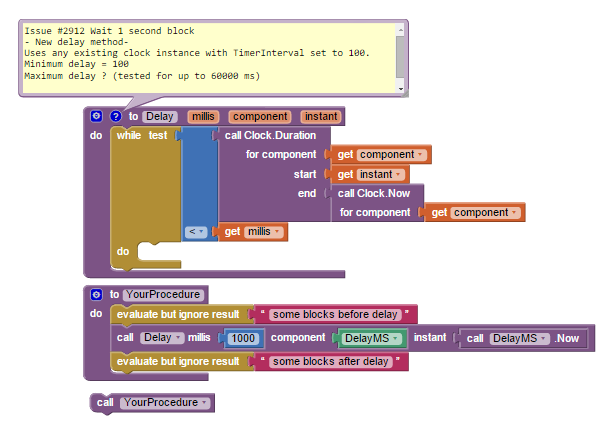
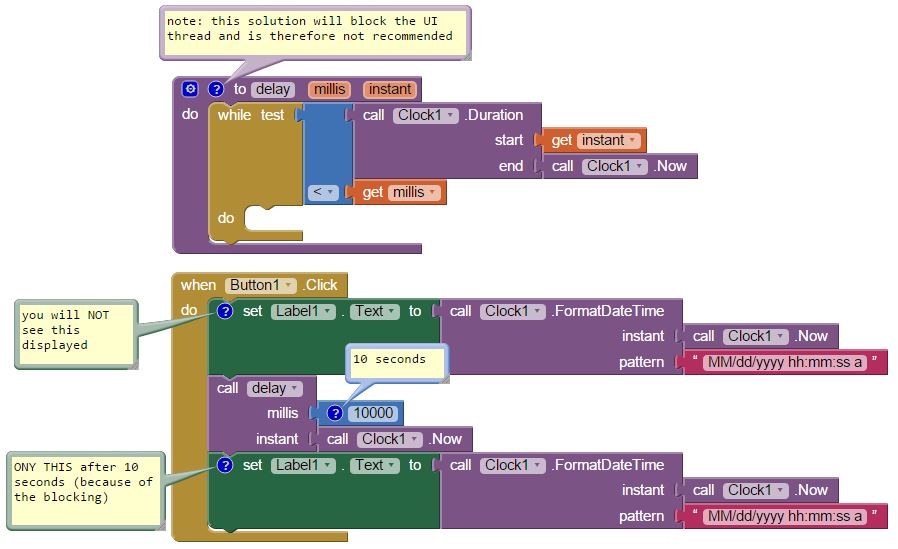
You may try to set a clock at initialize. Then look again when the clock fires (and disable it, it should fire only once of course).
In many apps the screen sizes are only known after a while, due to the slowness of initialization in AI.

--
The behavior you see is an AI2 "feature."   Responsive is a 'trick' used to allow AI2 apps to work reasonably well on ALL phones/tablets. Responsive is not a panacea because it attempts to get it right but it can't.    The Java based compilers require developers to provide a 'suite' of images etc. of different sizes and that is how Eclipse and Android Studio users get their apps to work with different dpi Android hardware.  I think the 'wrong' values you see are the values AI2  defaults to (what it uses).  Similar but not perfect.

Version 145 of AI2 in about August 2015  introduced options of Fixed versus Responsive Screen mode .  It was necessitated when Google discontinued support of software that permitted MIT apps to run similarly on small phone versus Tablet screens.  Essentially MIT took advantage of code that allowed them to 'scale up' an app designed for a 320x480 pixel screen to Tablet size.  That allowed AI2 apps to run on tablets with a noticeable deterioration of image quality (that most users never noticed).  Otherwise it worked reasonably well though developers with special Tablet requirements had to use additional coding to get some apps to run on Tablets with a pretty screen.  Google announced it discontinuing the features used by MIT effective ((Aug/Sept 2015?).   MIT had to come up with a solution to be compliant with the new coding requirements for Android.  That solution is Fixed mode; Fixed mode attempts to "reproduce" the pre-Version 145 Tablet response....it almost does that but not quite perfect with apps that have lots of Layouts.  Fixed/Responsive is here to stay. That means AI2 apps that are no longer perfect on Tablets need to have their layouts 'tweaked' using the standard tools  ... Automatic, Fill Parent and Fixed Pixels along with spacers using Labels/Buttons/etc.  If you want your images etc. to respond to the actual 'image size' you could try experimenting with  Fixed screen stuff Harry. Yes, you also said you tried that.

What your example shows as different screen sizes is a result of this  'built for as a teaching/programming learning tool"   trying to keep things simple for nascent developers. The MIT development team is VERY aware of the imperfect 'translation' of screen images in App Inventor.  A fix it all solution probably is not possible.

It is important for developers to be aware that the tool AI has to deal with multiple screen sizes and dpi differences on devices is imperfect and to deal with it.  The alternative is to use one of the Professional compilers like Eclipse and Android Studio (which have their issues too).  You said "but AppInventor should be able to report the correct values", but it can't. AI2 is filled with compromises to help the majority of student users make some really neat apps.

Once again, what we know about how AI2 handles dpi is in the article Taifun pointed you to:  Responsive Design in App Inventor  

--
Thanks you for the hints, tips and explanation. It makes it much clearer now.

I have been using appinventor for quite some apps ranging from pretty simple to rather complex and until now I never had to bother about screen resolutions.
So that's the reason I was frustrated and mentioned "AppInventor should be able to report the correct values".
Appinventor makes it dead easy to use a tinyDB in several screens which I (also) needed for this app.

It simply means that in this case I need to write some code to handle an sqlite DB in cordova.

It's another good example of "use the right tool for the right job"  :)

--
So that's the reason I was frustrated and mentioned "AppInventor should be able to report the correct values".
follow Ghica's hint and use a clock component to get the screen size a few milliseconds later after the screen initialized

It simply means that in this case I need to write some code to handle an sqlite DB in cordova.
there also is a SQlite extension available in App Inventor...
SQlite Extension to access the local SQlite database

--
Yes, I did see that. Nice work.
However, I wanted to use the simple tinyDB for its simplicity, but now that my graphic demands supersede the appinventor possibilities I have to move back to cordova. I don't want to specifically use sqlite, but on cordova I have to.
Still thinking what to do.

--

Change Heading When Edge Reached.


This should be easy, but I am not figuring it our.  I have a sprite moving in heading 180.  When it reaches the edge, I don't want to bounce, I want to change heading to 0.  then when it reaches the next edge, I want to change heading again.  The problem is...I don't know how to tell it "when reaching the right edge...change heading to "x"  when reaching the left edge....change heading to "x".   Like I said, this should be easy, but I am new to this an just can't figure it out.

-- 
Actually, although that would have solved my issue, I simply made an invisible sprite...when my animated sprite collided with it I was able to change the heading based on that event. 

-- 


Wenn Button geklickt: App direkt im Play Store öffnen (When button clicked: Open app directly from the Play Store)


I have the following problem:

I want that when one is on a button click an app directly from the Play Store opened, which actually should go with "intent".
When I enter the "intent-URL" in the Web Viewer, I get an error message stating that the browser does not know the URL format ....

You have a solution?

-- 
bwt.PNG 표시 중
-- 
Post screenshots of your BLOCKS not the layout

-- 

I multLline NOT WORKING


1-CHAT APPLICATION

2- USING TEXTBOX MULTILINE OPEN

3-WHERE WRONG CONSTRUCTION

image1.png 표시 중

image2.png 표시 중

-- 
From your post I cannot understand why multiline would not be working.
Do you have an example of what you would like the text to look like and what it looks like instead when you are testing?
Also, be aware, if you want to put something on a next line, you have to insert \n in the text.

-- 
I did not write down the textbox sub-alta writes from the textbox 
I added      /n
Where am i making mistakes

resim1.png 표시 중

-- 
Yes lower bottom ok
 But is it possible that I can always sub-altta like chat?

resim 2.png 표시 중


-- 
OK  
 
resim 2.png 표시 중

-- 

Wait or delay method fail


A common request is a 'wait' block to cause a delay in the app.
What is usually recommended is a Clock Timer event block to delay for the amount of time required.

The attached snippet attempts to simplify this by eliminating the Timer event block and the global variables usually required.
It uses an existing Clock instance in the app.
Upon cursory examination it appears to work as the delay happens as expected.
However, the blocks before the delay procedure will not execute as explained by Taifun's analysis in this thread.
So follow his recommendations in this thread which use a Clock Timer event block.
 delaynew.png
--
What is usually recommended is a Clock Timer event block to delay for the amount of time required.
yes, exactly, the reason is to not block the device, this is also explained here 


but why are you using an advanced clock block?
you also could have done it like this
--
my recommendation is to use Scott's "Please Wait" solution, which uses a clock component to wait for several seconds without blocking the device here https://groups.google.com/d/msg/mitappinventortest/m8i32I2m200/-cz21HLcvv4J
--
Let's make this a counter-example, then.
I should have used your blocks for testing output before the delay.
My focus was on getting the delay to work with fewer blocks.
I should have known better and forgot about the posts that you cited which are simple enough.

--

"Call (sprite). MoveTo" block will not move sprite. So confused.....


So I'm trying to simply set the coordinates for a sprite to go to, but after trying everything nothing is happening. The code simply does this. When I press button1, the background changes, the sprite appears and is send to the coordinates (200,1). When I do press the button, the background changes and the sprite appears, but it stays at (1,1). I have tried using the "Set sprite X to" command as well but it will not work either. Furthermore, if i right click the block and press "do it" the sprite DOES move to the specified coordinates. I have no clue why it will not work in the program. Please help....

*btw I've played with the switching the last two blocks as well (the "MoveTo" and "Set visible" blocks) but it does not affect anything..

-- 
do you need the 2 blocks Canvas.WidthPercent and Canvas.HeightPercent in the Button.Click event?
you might want to move them to the Initialize event and try again

-- 
Wow it worked. Why is it that those blocks affect it? I just started using App Inventor. Those two blocks probably aren't necessary I just put them there because I thought they might be. Thank you

-- 
this is a timing issue
after changing the canvas size you have to wait little bit before moving the sprite
Please Wait method by Scott


-- 

suggestion on splitting lists


hi, i have a simple list made by two elements called TAG NAME and TAG VALUE, that i insert in two different textbox

I join the two values with a §, then i can see it in a listpicker

now, the problem is that sometimes, i need only TAG NAME (maybe i don't need a value but only a name)
when i set the list picker, since i want to see well separated the two elements TAG NAME and TAG VALUE, I split the item list formed by  TAG NAME§TAG VALUE, and i add (as you can see it below) a "\n" and "--------------" to see in a good way
the problem is that if there is only a TAG NAME without a TAG VALUE, the listpicker give error, since there is not the 2nd element of the list, so i used a if to see if in the element there is a §

you have a better way? 

 Cattura.png
 Catura2.png

-- 
After the split, test if the split result list has list length > 1, otherwise ignore the 2nd list item.

-- 
i made it, but your way is far better. as usual

-- 


In android emulator, whenever I call camera.TakePicture , the camera app crashes


I'm trying to make a basic app that uses the camera to take a picture and then display the picture taken. However, I am unable to test my app because in the Android emulator, the camera app crashes whenever I have code that calls camera.TakePicture

How do I fix this?

-- 
The android emulator doesn't have a camera to open, so it's not going to work, I guess. Use the companion or package your app and try it on your phone.

-- 
I also cannot find any code to handle this error of the camera crashing and not returning an image like it should. (Don't know how to detect the crash)

Screen.ErrorOccurred and Screen.OtherScreenClosed do not get triggered.

-- 
Thanks for the help. What's companion? 

-- 
I don't own an android phone. What should I do?

--
There's an emulator named Genymotion, which I think let's you configure a webcam as the device camera. Try it.
Also I know BlueStacks let's you use your webcam as the device camera, but you can't test it in real time like an emulator. You will have to create the apk and install it everytime you need to try it.

-- 
Genymotion isn't free but I'll definitely try bluestacks

-- 

Error: http response was too large: 35350691. The limit is: 33554432 (Error: http response was too large: 35350691. The limit is: 33554432)


When attempting to download the application via QR code, the error "response was too large http: 35350691. The limit is: 33554432" (picture in attachment) and not allow me to download the app to pc (no error occurs, only NO download)

Thank you for your help and collaboration


NOTICE: Mail Services ecci.edu.co are technologically supported by © Google for the whole community of the ECCI University (Administrtivos, Teachers and Students), the opinions that contains this message are solely those of the author and do not necessarily represent the opinion University of ECCI. The ECCI University does not warrant the use of a virus as mentioned services are supported © Google, if your antivirus detects an abnormality please report it and remove, the University is not responsible for damage caused by any virus transmitted by this email .

The information contained in this message and any attachments is confidential and confidential and is intended solely for the addressee, without the intention to be known by others, therefore, in accordance with legal regulations, interception, theft, loss, reproduction, reading or use is prohibited any different person. They are expressly requires the ECCI community (Administrtivos, teachers and students) who do not make defamatory statements and not infringe or authorize any infringement of intellectual property laws or any other legal right by email communications electrónico.La University ECCI not guarantee save a backup of files, e.

If by mistake you have received this message please excuseus , please notify us and delete it .


NOTICE: Mail Services ecci.edu.co are technologically supported by © Google for the whole community of the ECCI University (Administrtivos, Teachers and Students), the opinions that contains this message are solely those of the author and do not necessarily represent the opinion University of ECCI. The ECCI University does not warrant the use of a virus as mentioned services are supported © Google, if your antivirus detects an abnormality please report it and remove, the University is not responsible for damage caused by any virus transmitted by this email .

The information contained in this message and any attachments is confidential and confidential and is intended solely for the addressee, without the intention to be known by others, therefore, in accordance with legal regulations, interception, theft, loss, reproduction, reading or use is prohibited any different person. They are expressly requires the ECCI community (Administrtivos, teachers and students) who do not make defamatory statements and not infringe or authorize any infringement of intellectual property laws or any other legal right by email communications electrónico.La University ECCI not guarantee save a backup of files, e.

If by mistake you have received this message please excuse us , please notify us and delete it .


-- 
did you upload loads of assets into your project?
are you aware, there is a limit of 10 MB for your app?
see also these general tips


1. Use different screens wisely
Before starting to create another screen, first you should think about is it really necessary? See also Building apps with many screens and SteveJG's post about advantages/disadvantagesbecause in only one screen you also can use vertical arrangements to simulate different screens, just set the arrangements to visible = true/false as needed... See also Martyn_HK's example about how to use Tabs in App Inventor and another example from Cyd

2. App Inventor works best if you use images whose size matches the size you want them to appear on your screen. If you import larger images into your app, your app may run out of system memory. Using Images with App Inventor

3. Avoid redundancy
Probably it helps to read chapter 19 - 21 in Dave's book http://www.appinventor.org/book2 to get an idea how to do DRY programming with App Inventor Don't repeat yourself 


--  


calc result (always the same,and i change the numbers)


I´ve made a simple calc program, and i have always the same result.
I made the calcls in excel or by hand and they are ok, in MITappInventor dont give error but it's always the same result . 
What i've made wron ? can anyone helpme ?


-- 
I do not know what the calculation should have been, but your calculation always amounts to 8900/10500=0.84761
Maybe it is clear to you when I format the blocks differently (click on a math block and choose external inputs to see it the same way).

-- 
Agree with Ghica. I worked the formula through in a spreadsheet and always got 84.761 - unless textbox 2 and textbox 3 have the same number in which case you get 0/0 = infinity or error

-- 


Permanent Sprites


I'm building a Snapchat/ paintpot type app for a school project. 

I've created a basic stamp button where the user can pick from 3 characters and place them on the canvas when the user touches the canvas surface, in additional to a pencil element.

• The stamps aren't permanent and will move if the user clicks somewhere else on the canvas

• Only one stamp can exist at a time- no duplicates

Do you have any tips on how I can make the stamp function work?

--
Every time the user drops a stamp, save the canvas and set that file where you saved it as the new background of your canvas. Now, there's a limitation in doing this because each time you save it, the compression algorithm decreases the quality of the image. Try it and see for yourself if it's ok for your project.

--


dtmf tone genration


i want to make a android app so that it could play dtmf tones by pressing buttons on screen 
can anyone tell me how to configure that or how to enable dtmf

-- 
App Inventor doesn't "make" sounds. It can only play them. So you will have to upload the pre recorded tones as wav or mp3.
Or (I'm not sure if it possible) make your own extension to generate those tones.

--