2016년 12월 9일 금요일

Help with Bluetooth Pong


Hey guys! So I am building a Pong game that can connect to another phone with Bluetooth. My menu and all other functions are working, but when I open my Bluetooth screen it always pops up with the error message I programmed in (the Error--Disconnecting text). Is there any errors you guys can see/ ways to improve my code? Thanks!


-- 
If you are asking for help, I recommend you to make it as easy for others to be able to help you ...
You probably will get more feedback then...
which means in your case post a screenshot of only your relevant blocks...

-- 
The error is arising when you initialise, from what i can see from your first two screenshots is that you are trying to start the game before you have setup player 2 (I presume the remote player?)

Suggest test out the bluetooth connecting and player assignment code on its own to debug the problem

-- 


Creating a Custom TinyWebDB Service updated on November 23, 2015.


Note: these instructions were last updated on November 23, 2015. 
TinyWebDB is an App Inventor component that allows you to store data persistently in a database on the web. Because the data is stored on the web instead of a particular device, TinyWebDB can be used to facilitate communication between devices and apps (recommendation systems, multi-player games, etc.).
By default, the TinyWebDB component stores data on a test service provided by App Inventor, http://appinvtinywebdb.appspot.com/. This service is helpful for testing, but it is shared by all App Inventor users, and it has a limit of 1000 entries. If you use it, your data will be overwritten eventually.
For most apps you write, you'll want to create a custom web service that isn't shared with other App Inventor apps and programmers. You don't need to be a programmer to do so --- just follow the instructions below and you'll be able to make your own web service.
To create your own web service, follow these instructions:

1. Review the page describing two TinyWeb DB services and download the .zip file(s) from that page corresponding to the particular service(s) that you want. This .zipfile contains source code for your custom TinyWebDB web service. You do not have to understand this code in order to use it. Below, for concreteness, let's assume that you have downloaded alltags-deletable-tinywebdb-fall5.zip. (But you could instead use alltags-deletable-list-tinywebdb-fall5.zip.)


2. Unzip the downloaded alltags-deletable-tinywebdb-fall15.zip file (typically by double-clicking on its icon). This will create a folder named alltags-deletable-tinywebdb-fall15. You can rename it if you want.


3. Download the installer for Google App Engine for Python from https://cloud.google.com/appengine/downloads.  When you visit this page, you will see several buttons; click on the one that says Google App Engine SDK for Python.


4. After you've clicked on the button, you will have an option to download the installer for you your operating system:


5. Run the downloaded installer (typically by double-clicking on its icon). When it's done, you should have a folder like the following:


6. Follow the installation notes you get by clicking on the button for your platform at https://cloud.google.com/appengine/downloads:


7. Note: these installation notes assume that you have administrative privileges on your computer, which you might not have. If you don't, then it is not necessary to copy GoogleAppEngineLauncher application from the folder to your Application or ProgramFiles folder; copy it to your Desktop instead. Also, it is not necessary toMake commands symlinks to succeed at the following steps. The key thing is that you have this executable GoogleAppEngineLauncher application icon on your computer:


8. At this point, you can safely delete the installer program/folder. 

9. You need to make sure your computer has Python version 2.7 installed. See the installation notes at https://cloud.google.com/appengine/downloads for your platform for how to check this. If you have an older version of Python, install Python version 2.7 from the Python web site.


10. Run the GoogleAppEngineLauncher by double-clicking its icon. If you are prompted to Make command symlinks, you can say OK, but it doesn't really matter if this step succeeds or not.  This should result in creating an empty GoogleAppEnginerLauncher window:


11. In the GoogleAppEngineLauncher menu, choose File>Add Existing Application.


12. Click Browse


13. Navigate to the alltags-deletable-tinywebdb-fall15 folder you unzipped above, and click Choose

14. (for the folder itself, not any of its contained files).


15. Do not change the port numbers, and click Add.


16. This alltags-deletable-tinywebdb-fall15 service has now been added to your GoogleAppEngineLauncher:


17. In the GoogleAppEngineLauncher, click the Run button. This will launch a test web service that runs locally on your computer (not remotely on the web). The app has correctly launched if you see a small green circle icon containing a white right triangle at the far left of the selected line.


If you instead see a warning icon --- a yellow triangle containing an exclamation point --- most likely GoogleAppEngineLauncher is confused about which version of Python to run. Fix this in GoogleAppEnginerLauncher>Preferences by setting the Python path to be the executable for Python 2.7


18. You can test the local test web service by opening a web browser and entering localhost:8080 as the URL. You'll see the web page interface to your web service. The end-goal of this service is to communicate with a mobile app created with App Inventor. But the service provides a web page interface to the service to help programmers with debugging. You can experiment with your web service through this local web page. You can invoke the store and get operations by hand (by clicking on /storeavalue and /getvalue), view the existing entries, and also delete individual entries.


19. Your web service is not yet on the web, and thus not yet accessible to an App Inventor app. To move it to the web, you need to upload it to Google's App Engine servers using a Google account. 

✰ You should first try using your Wellesley gmail account to do this. In the past, Wellesley's gmail accounts have sometimes not been able to use App Engine, but they appear to work as of Nov. 23, 2015. 


✰ If your Wellesley gmail account does not work for the following steps, you will instead need to use a Google/gmail account that is different from your Wellesley account. In this case: 


✰ If you do not already have a non-Wellesley gmail address, create one now at https://accounts.google.com/SignUp?hl=en

✰ Before the following steps, in a new browser window, visit gmail.com and sign in at your non-Wellesley gmail account.

20. In a browser window logged into the gmail account from step #16, visithttps://console.developers.google.com/start. This will bring you to your Google Developer Console start page. There may be a button at the top of the page encouraging you to sign up for a free trial. DO NOT PRESS THIS BUTTON. Instead, click the DISMISS button.  


21. At subsequent points in this process, you may be asked again to sign up for a free trial. DO NOT DO THIS.

22. On the Google Developer Console start page, click the Create an Empty projectoption.


23. In the resulting New Project window, you'll need to specify a Project Name. We recommend that your project name has form yourGmailName-alltags-deletable. The window will also specify a Project ID that may be different from your Project Name. E.g., in the window below, the Project name is gdome-alltags-deletable, but the Project ID is gdome-alltags-deletable-1138. Remember the Project ID because you'll need it later. Click Create to create your project. You'll now have a new empt project on Google's servers.


24. Visit your Google Developer Console home page at https://console.developers.google.com/home. You should see the project created in step #19 on this page:


25. Now go back to the GoogleAppEngineLauncher window and click the Edit button.


26. This will open a text editor for the app.yaml file within the alltags-deletable-tinywebdb folder:


27. In the text editor, modify the first line so that application: is followed by the Project ID (which is not necessarily the same as the Project Name) from  step 19.


28. Save the changes to this file and close the editor window. The name of the project within the GoogleAppEngineLauncher window will change:

 google-app-engine-local-service-renamed.png


29. In the GoogleAppEngineLauncher, click on the Deploy button.


30. A new browser tab should open requesting you give Google App Engine certain permissions. Before you click Allow, make sure that the gmail/Google account in the upper right is the same as that from step 16. If not, close your browser application, restart it, visit the desired gmail page, and log in with the desired address before repeating this step.


31.


32. Your browser tab may now change show something like this:

33. Your service will now be uploaded from the GoogleAppEngineLauncher to an App Engine server in the cloud. The progress of this upload is tracked by the Log window:


34. Once the deployment succeeds, you have your own active TinyWebDB service at the URL yourProjectID.appspot.com. For example, the above deployment creates a service at http://gdome-alltags-deletable-1138.appspot.com.  The web page at this URL should look the same as when you ran it on the local test server, except that now its in the cloud and accessible by anyone with using this URL.


35. In the GoogleAppEngineLauncher window, if you press the Dashboard button, it will bring you to a page with details about the monitoring of your new service. Note that your service is completely free. However, it does have some resource restrictions, and if you exceed a quota for the number of accesses to your database during a particular day, the service will shut down until the end of the day, at which point the quota will be reset.


Your App Inventor apps can store and retrieve data using your new service. Just do the following:


✰ Drag in a TinyWebDB component into the App Inventor Designer window.

✰ Change the ServiceURL property from the URL for your service. Using the example above, this would be  http://gdome-alltags-deletable.appspot.com 

✰ Now any StoreValue operations (blocks) will store data at your service, and anyGetValue operations will retrieve values from your service.


Making Custom TinyWebdb at 2016.12


I've read many articles about how to make custom TinyWebdb server using Google cloud.
However all those instructions seemed out-dated.
The latest instruction I found is 2016.9.17.
The instruction used GoogleAppEngine-1.9.40.msi.
But now I can't find the GoogleAppEngine program.
Anyone knows what happened??


--
GoogleAppEngineLauncher program in not working now.

--
see Lyn's guide here TiniWebDB

-- 
Here are some more recent instructions for setting up a TinyWebDB server, updated on Nov 23, 2015. Please try these newer instructions and let me know if you encounter any difficulties: 


-- 


TinyDB


I am so sorry for adding another thread but my other ones are marked as completed already. To be honest, why is TinyDB always hard?

I am now having another issue with TinyDB but this time with the check-box. I have attempted to do the blocks for the check-box but for some reason, as soon as you exit the app when it is ticked or un-ticked, it automatically sets it to ticked. I have looked at all the tutorials on check-boxes but they are all tutorials just based on the original App Inventor or either use more than one check-box. I am ONLY using one check-box; I have attached the check-box and my blocks for it, maybe there is something incorrect i'm doing or maybe it is completely wrong, please inform me!

-- 
The problem is not TinyDB. The problem is that you do not know how to use checkboxes.
 Capture.jpg
-- 
Thank you.


-- 

Recorder is not supported from other devices


I 've created an app which resembles a voice recorder. I 've tested on my phone (Vodafone Smart 2, Android 2.3.3) and is working properly.
But when I share my app with better devices (I don' t may it's the higher android version >3.5), my app just crashes when I press the Record Button.

What would be responsible for the crash? And how can I tackle it?

-- 
my app just crashes when I press the Record Button.
what exactly means "crashes", any error message?

to find out more about the Runtime Error, you can use Logcat

I normally use Eclipse and Logcat there, but if you have installed the App Inventor Software (see also http://appinventor.mit.edu/explore/ai2/setup-emulator.html), you already have everything you need to use logcat...

How to use Logcat

1. connect your device using USB with your computer

2. in File Manger go to the App Inventor directory, which is  C:\Program Files\App Inventor or similar

3. press Shift and right mouse click the subdirectory commands-for-Appinventor to get the context menu

4. select "open command window here" and you will get a command window of that subdirectory

5. enter adb logcat and the logcat will start running

To copy your log, right click, click "select all" and enter to copy the complete log into the clipboard, then open Notepad and paste it using ctrl-v.

-- 
Thank you for answering!

Let's say I've what said... what next?

Where would this be useful to?

-- 
well, before being able to think about a solution, we should know more about the error...
to only say "it crashes" does not help very much


you also can try my snippet How to use the Sound Recorder
does that work for you on the other device?

-- 
It is almost the same thing. There is not problem in the code it just does not work on other devices. App inventordoes not provide options for memory handling or even adjust your app for the currrent system. You just build the puzzle and that's it! I asked if someone around the globe knew about this issue and had solution. What if the appdoes not have any problem? Or if it does have an error and I am 100% sure I am not able to change it from the App Inventor environment.  But I don't need that kind of advices. They are seemingly pointless! Even if I follow your steps I am not sure I'll get the error, because it depends on how the app you proposed concieves code. Moreover the snippest you sent me is more less the same code. Start Recording....Pause recording....Stop recording.

-- 
I now did a search for you in the forum and found this thread https://groups.google.com/d/msg/mitappinventortest/0klBjdq9hdk/6OexGFvVcrMJ
there seems to be an issue for Android 4.2.2. devices

-- 
Thank you Taifun. Those who have that edition of Android will certainly deprive of my app!!! 

-- 

Adding components through blocks


Adding components through blocks:
Ex: pressing an add button to add a new component such as adding a class to a list. 
Can someone please help me with this?

--
you can't add components dynamically in App Inventor
you have to define the components in the designer, hide them and as soon as you need them, set them in the blocks editor to visible = true

--
okay thanks!
guess I'm back to copying and pasting stuff

-- 
You may also want to revisit your design and see if you can reuse same component, but change some properties on it.
If you explain your requirements OR post screenshot of your blocks, we may be able to help you.

-- 
My question is similar. I'd like my users to upload images and associated text to a drive/fusiontable, then be able to get a user's uploaded data and display it in a list-like display (image and text). This means that the amount of image and label components for each user will vary. Does anyone know a way to call components (i.e. more image components) with blocks? Any pointers would be much appreciated!

-- 
I See...
I'm trying to make a grade app where there is a list of assignments, then I press add assignment and it adds an component but I'm not so sure how to change the content of one component. Either way, I want a list not one single assignment

-- 
How should the assignments be organized? By student? By date?
What needs to be stored for each assignment? Description, student id, etc.
You may need to just use lists and TinyDB, no components.

-- 
@Don1: you might want to start a new thread instead of hijacking another thread...
see also the thumbnail listview here https://puravidaapps.com/listview.php

-- 
My apologies everyone for interrupting the thread.

-- 

Implementing emotion analysis using Microsoft Emotion API using web component.


I am trying to do emotion analysis on the picture taken using my camera . I dont know how to make an api call with the image for this task .Please help

-- 
this might help
and if you are able to provide a link to that API, probably someone can offer more advice

============
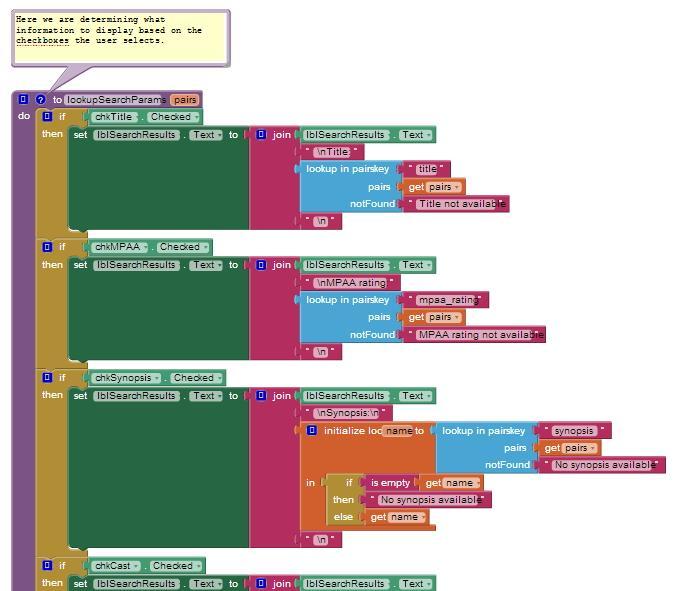
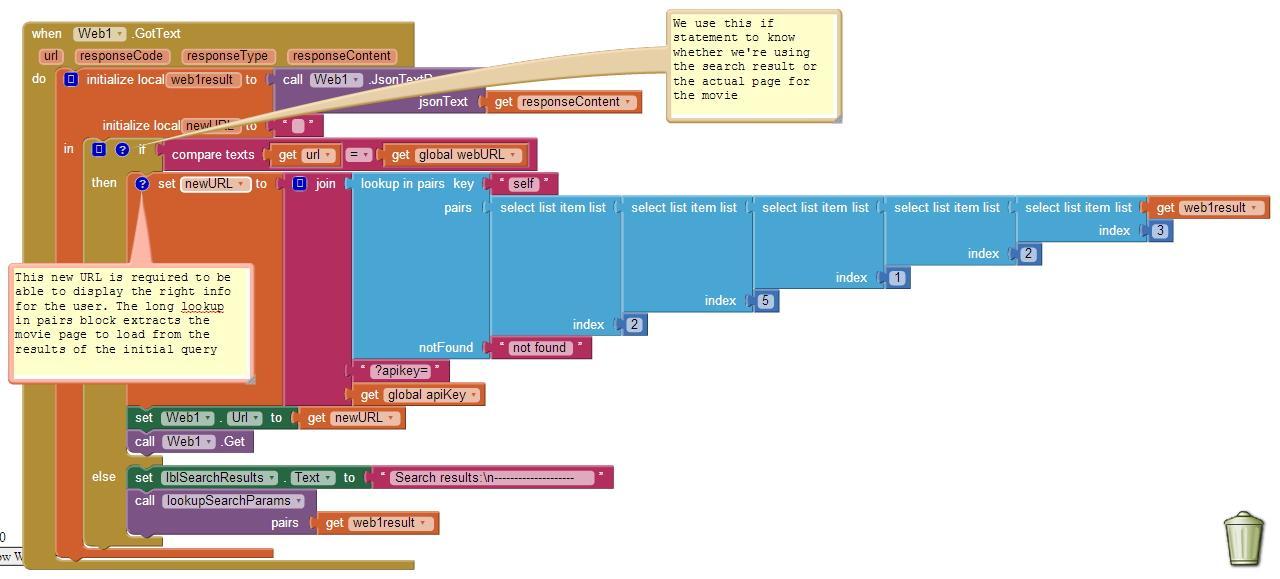
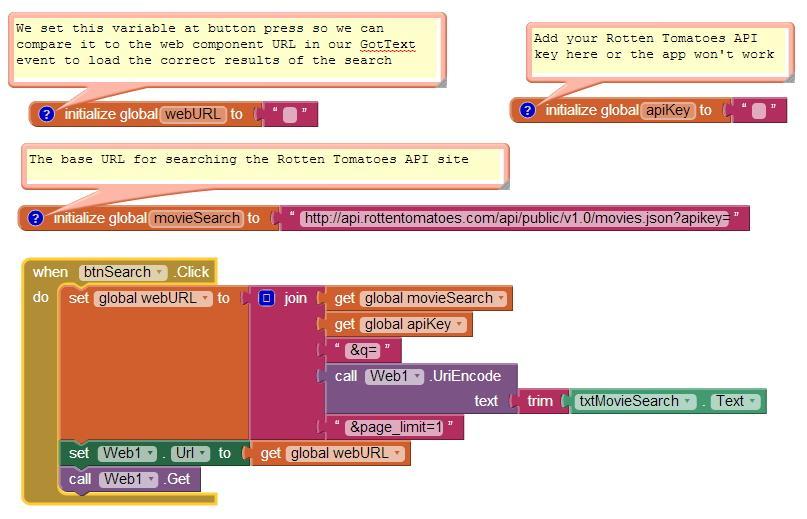
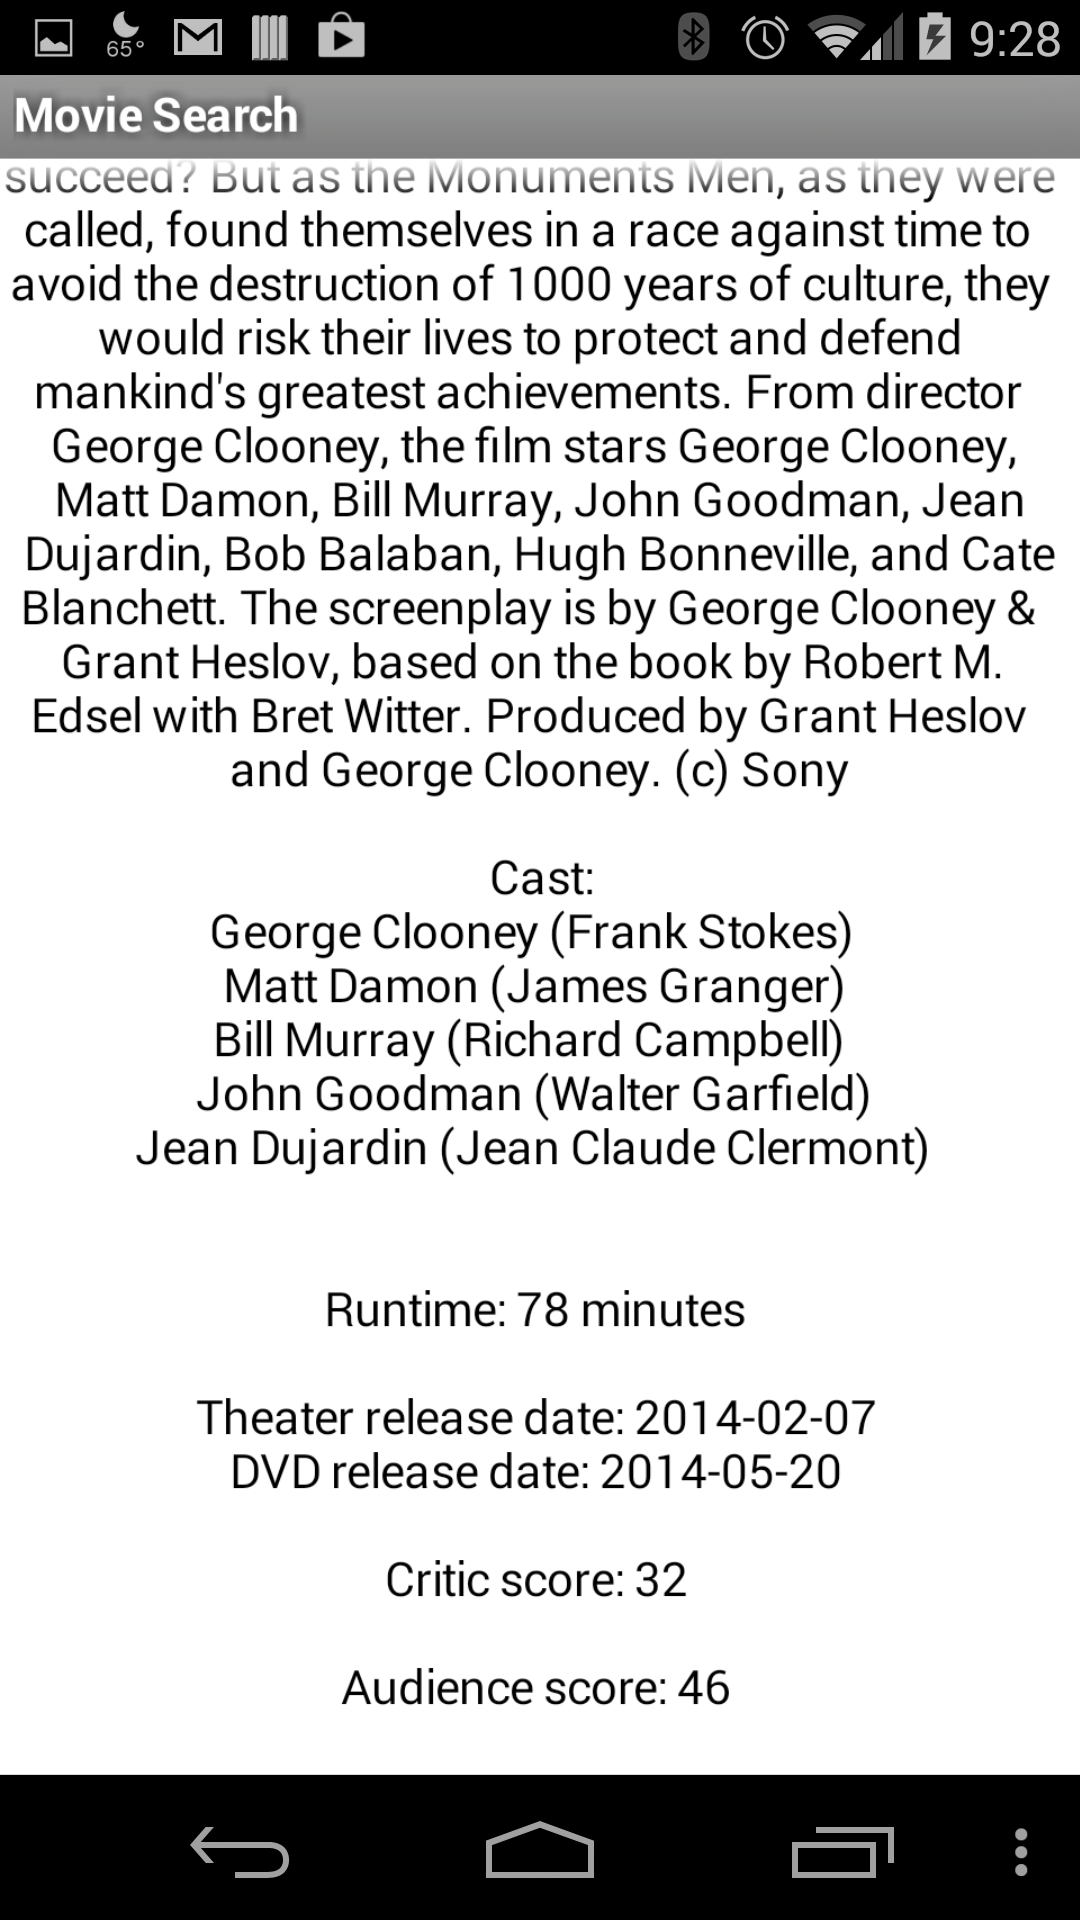
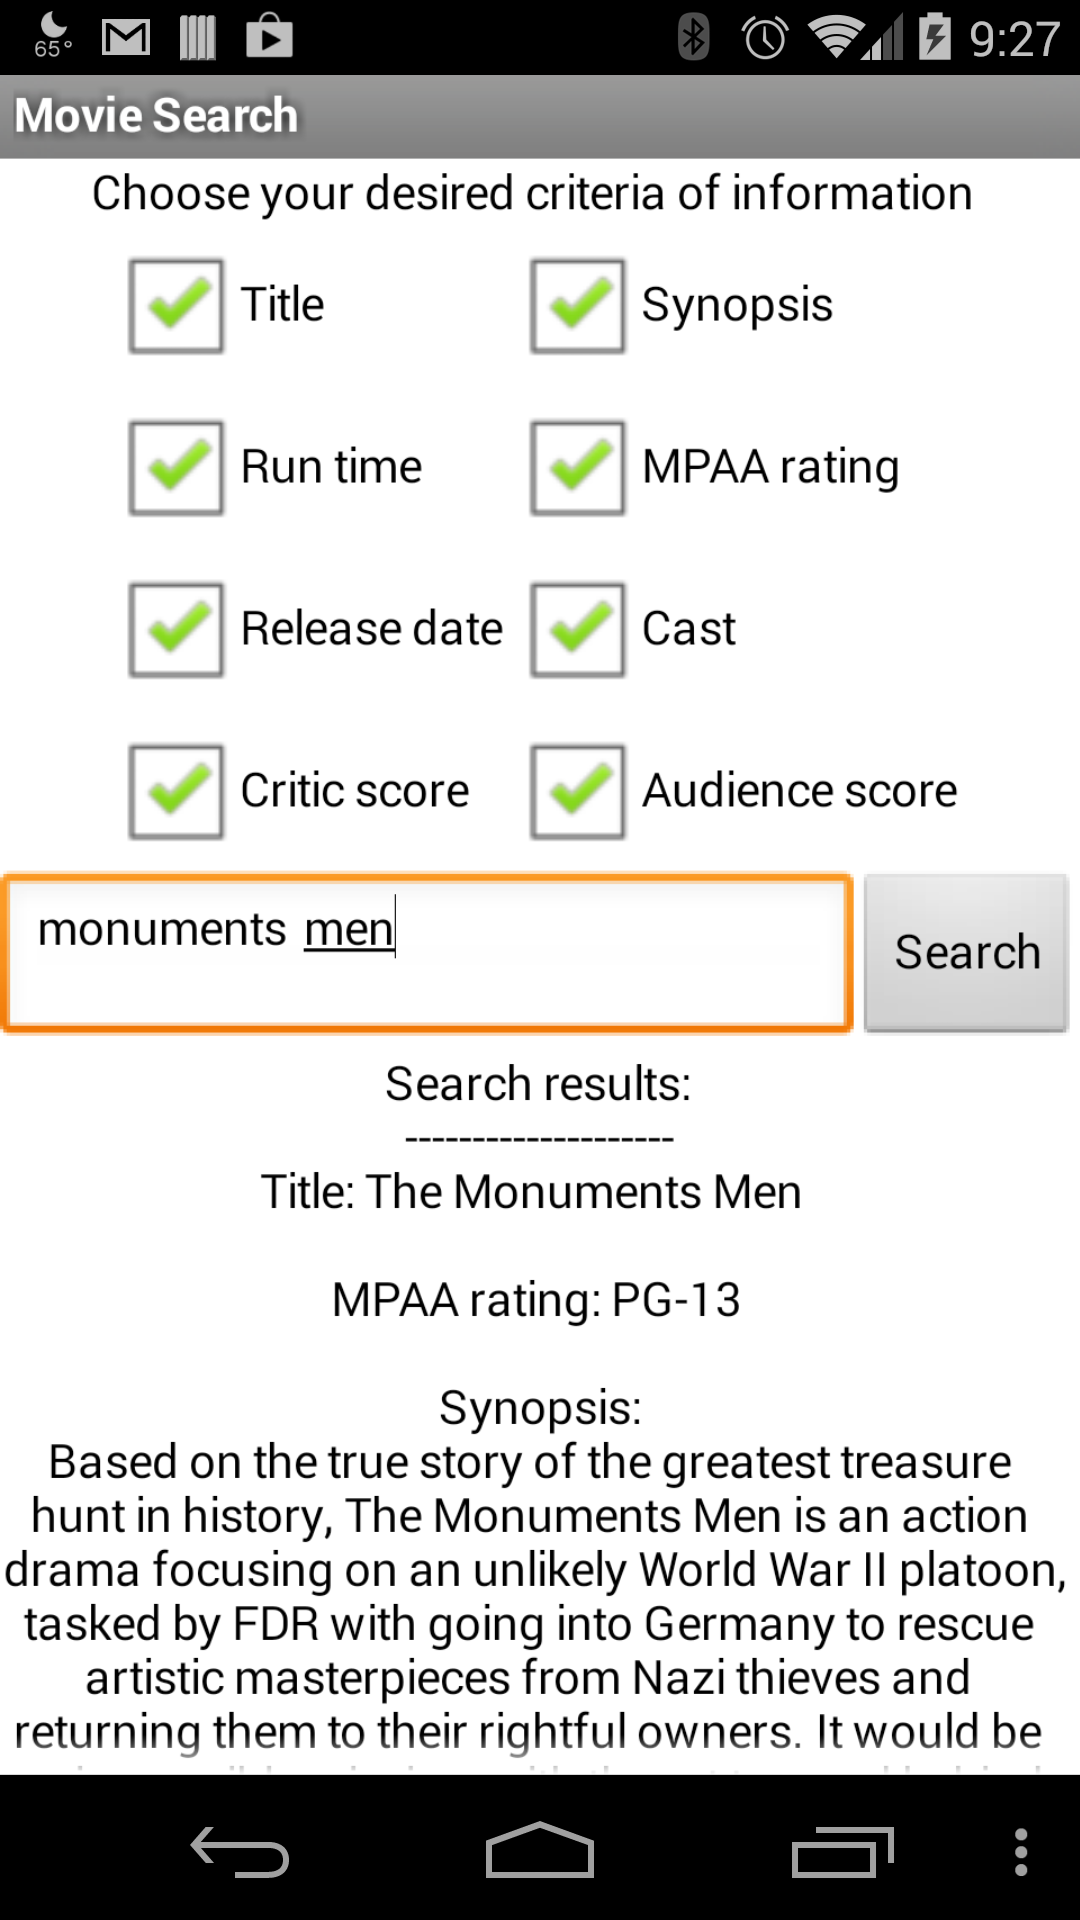
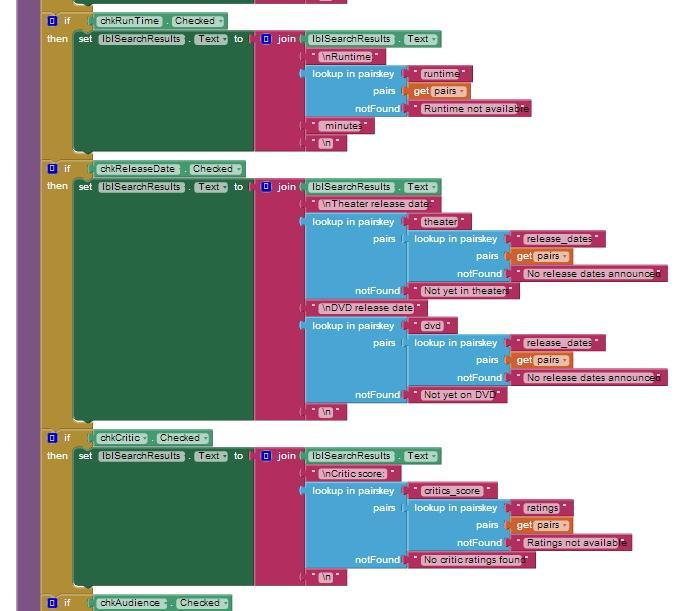
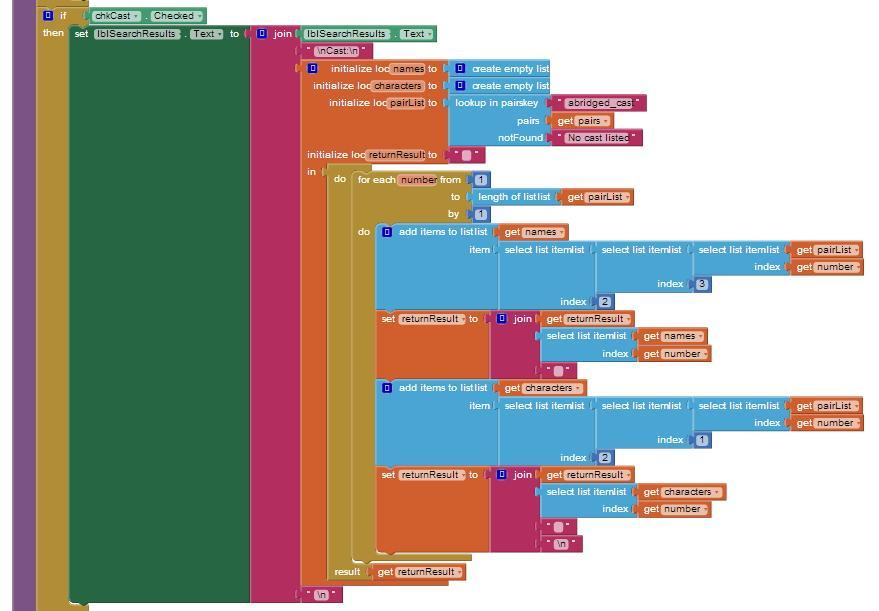
Attached is a movie search app I developed using the Rotten Tomatoes API (overview here).  The nice thing about Rotten Tomatoes over Fandango is that they offer more movie results; I believe Fandango is restricted to the most recent and in theaters.  If you're wanting an app for your job at a theater, that makes more sense.  However, Fandango doesn't offer their API in JSON, but RT does so that's what I went with.

This app isn't perfect, and it would probably need some refining for error catching as well as to fit your needs at work (which is what you can do with this if you like).  As of right now, if the API doesn't return the right information in the right spot you'll get an error when you search.  It also doesn't work well for movies with the same title (Bourne Identity, Supremacy, etc).  Right now it returns one result, and that result is because of the placement of a URL in the API at a specific spot.

Take a gander at the screenshots (including from my phone for how it looks at runtime) and when you've done the tutorials, load the aia file into your AI session to see it and have some fun making it work how you want.


 movie3.jpg

 movie2.jpg


 movie1.jpg
 screen02.png

 screen01.png

 movie6.jpg

 movie5.jpg
 movie4.jpg
how would you do the "now showing" part? like, you pull up the app, put in a date and it shows you what is showing at what cinema...and at what time.

According to the Rotten Tomatoes API forum, it's not possible.  They use a 3rd party service on their website which they don't have permission to put into the API for other's usages.

It is possible, however, to see what movies are in theaters.  You would just need to use the API for In Theaters Movies rather than the search API.  
============ 

-- 
Can you try making an extension for implementing emotion recognition ? 

-- 


open gallerry


i want to open my built in gallery app from my appinventor app ..i believe i have the right action class and package ..but i keep getting a 601 no corresponding activity was found error
blocks (1).png 표시 중
-- 
Why not just use the ImagePicker component?

-- 
Be sure to input vaild cases. It isn't case-sensitive.

--


Overview: Different App Inventor Distributions and Versions


Meanwhile there are several App Inventor server available online and offline. This thread tries to give an overview....

The main App Inventor version is provided by MIT online, which you can find at ai2.appinventor.mit.edu 
In case of questions, please ask in the MIT App Inventor forum

App Inventor is Open Source, so everybody can use the sources, add additional features and provide a server for the community online or offline.

There are the following App Inventor Distributions available, which offer additional features:


⦁ AppyBuilder, more information see http://AppyBuilder.com in case of questions, please ask in the AppyBuilder forum


⦁ the Punya framework, more information see this forum threadIn case of questions, you can reach the Punya team at punya...@csail.mit.edu, There is no Punya forum available. The framework has been updated on May 6th 2017, but  unfortunately does not support extensions...


⦁ Thunkable, more information see this article at i-programmer.info in case of questions, please ask in the Thunkable forum


⦁ Mad Robots mod, more information see here http://madrobots.wix.com/themadrobot in case of questions, please ask in the Mad Robots forum

Note: unfortunately, the Mad Robots AI is outdated meanwhile!
Important Note: If you use another server, you always have to think about
1. is it a reliable service?
2. will it be updated (bug fixes and new features)?

because once you create a project using another server, which uses other blocks, you will not be able to import your project back into MIT App Inventor anymore!

There are the following offline App Inventor personal server available (1:1 copy of the MIT online version)

⦁ App Inventor Offline by Hossein (latest version as of June 22, 2016, which is identical with MIT App Inventor Version nb149 as of June 15, 2016),

⦁ in case of questions, please ask in the the AppToMarket/Appybuilder forum (fomerly also known as AiLiveComplete offline) Note: unfortunately, App Inventor Offline is outdated meanwhile!

⦁ AI2 Ultimate by krupong (latest version AI2U 4.1 as of May.3, 2017, which is identical with MIT App Inventor Version nb155 as of March 5, 2017).

⦁ in case of questions, please ask in the Ai2U forum

Both are  1:1 copy of the MIT version without additional features. The main advantage is, that you do not need internet connection and you can build larger projects (> 10 MB). The disadvantage is, it takes time for the authors to build a new version, so the offline version is not always identical with the current MIT version. Therefore if you use one of these personal server, make sure, you use the most recent one, this will be the version most similar to the current MIT version. 

There also is the FTC App Inventor version, which runs offline using Virtualbox,  but is not a "1:1 copy of the MIT online version"
This version for the FIRST Tech Challenge robotics competitions has additional features for controlling FTC robots. FIRST's download page is here: http://frc-events.firstinspires.org/FTCImages/2015
In case of questions related to FTC, please ask in the FTC App Inventor Forum

Build your own personal server 
in case of questions, ask in the Open Source group


Taifun
(updated on May 17, 2017)