2017년 1월 21일 토요일

PicCall for App Inventor 2


PicCall shows you how you can use App Inventor to make apps that do actual things, like calling friends.
This tutorial assumes that you have completed the Set Up process.

Before starting

To run PicCall, your phone must be set up and activated for making phone calls. If it isn't you can still build PicCall for practice, but the phone won't actually make the calls.
Warning: PicCall does not work on all Android phones in the current implementation of App Inventor: you'll get an error notice on some phones when you try to pick a phone number. Also, you won't see all your contacts — only those created from Gmail. These limitations will be removed in the future.
In this tutorial, unlike HelloPurr, you'll give names to components, rather than just using the default names that App Inventor provides (like "Button1"). Using meaningful names is good programming practice: it helps you keep your programs straight in your own mind, and it helps others understand your programs.
Your phone should also contain a few contacts with pictures. You can use the Contacts app to save pictures for your contacts. You can also click on Contacts in your Gmail account on your computer and add pictures there.
Make sure your computer and your phone are set up to use App Inventor. Start a new project in the Designer window. Name it "PicCall" and change the screen Title to PicCall. Open the Blocks Editor, click Connect to Companion, and check that the phone has started the App Inventor app.

Getting started

Start out just like in HelloPurr by placing a button on the screen. Make the button 150 pixels wide and 150 pixels high. Set button's Image to a picture. You may as well use the picture of the kitty if it's handy -- you'll be changing the picture soon. Set the Text of the button to "Press to Call", although you'll be changing that soon as well.
Change the name of the Button component to "TopButton" (you'll make one called "BottomButton" later in the tutorial). To change a component's Name, click the Rename button in the Components panel and enter the new name.
In this tutorial, unlike HelloPurr, you'll give names to components, rather than just using the default names that App Inventor provides (like "Button1"). Using meaningful names is good programming practice: it helps you keep your programs straight in your own mind, and it helps others understand your programs.Don't confuse the Name of a component with the Text of a component. The Text is what appears on the screen. The Name is the name your program uses to refer to the component. You'll see the name in the Components structure list in the Designer and on the drawers in the Blocks editor.

Making phone calls

In HelloPurr, you made the phone play a sound when the button was clicked. PicCall in almost the same, except that instead of playing a sound, the phone makes a call.
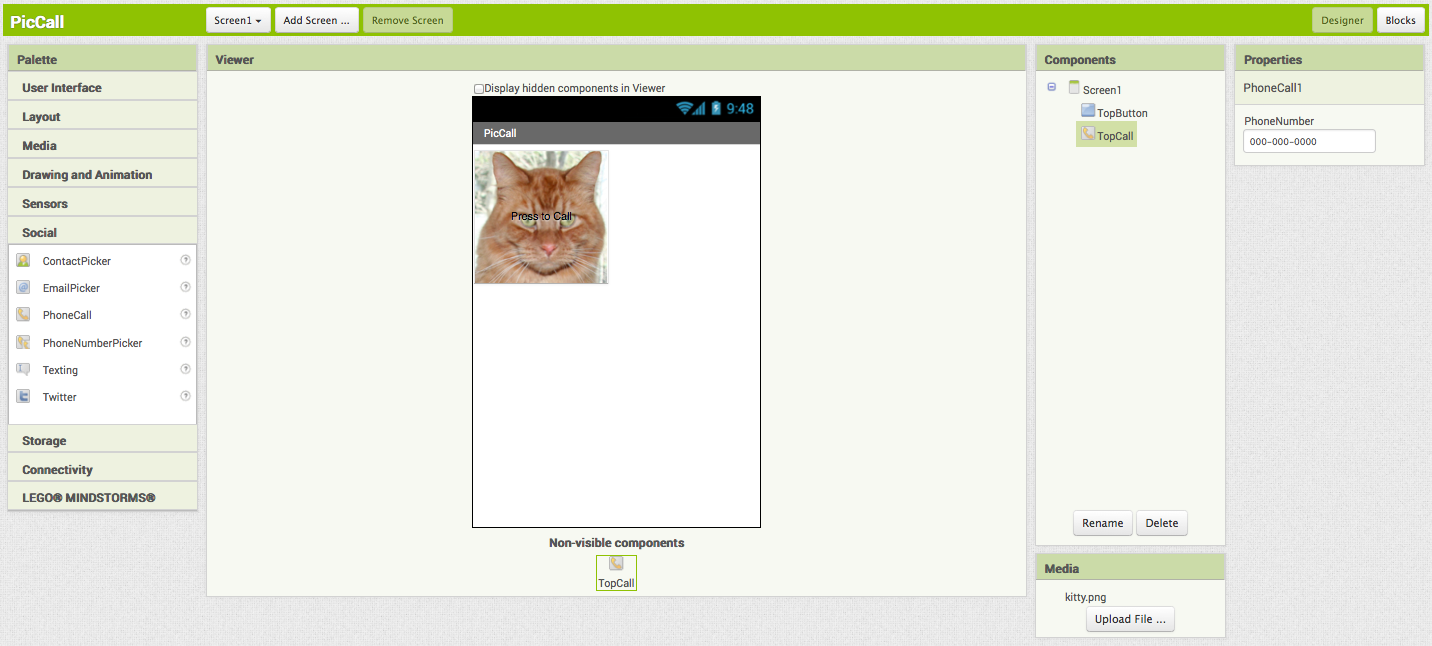
App Inventor's PhoneCall component makes phone calls. You can find PhoneCall in the Social section of the Palette. Open that section and drag out a PhoneCall into the viewer. It will go into the Non-visible components area. Name it "TopCall". The PhoneCall's PhoneNumber property determines the number to call. Set that to some 10-digit phone number you'd like to call. Here's how the Designer should look:
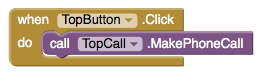
Now switch to the Blocks Editor and pull out the when TopButton.Click do block. In the do slot, place a call TopCall.MakePhoneCall block from the TopCall drawer, so that the event handler looks like this:
Go ahead and test what you have so far on the phone: Press the button and make the call. You could package this up as an app right now. It would be a pretty limited app, always calling the same fixed number, some people might find that useful.

Phone contact information

In addition to making phone calls, App Inventor apps can also get information from the phone's contact list. You do this with the PhoneNumberPicker component.
Pull out a PhoneNumberPicker component from the Social section of the Palette, place it under TopButton. A PhoneNumberPicker is a kind of button: when you press it, it brings up your phone contacts list and lets you pick someone. Change the name of the PhoneNumberPicker to "TopPick", and change its Text to "Press to pick a number to call". Try it by pressing the picker on your phone: you should see your contacts come up, and you can pick one. Nothing will happen after you pick, because you haven't yet told the components to do anything. You'll do that next.

Using the picker

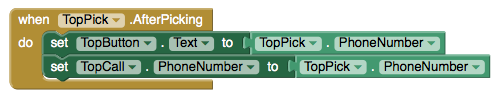
Switch to the Blocks window and open the drawer for TopPick. Drag out the when TopPick.AfterPicking do block. This lets you define an event handler that says what to do after you've picked a number from your contacts.
Now open the TopCall drawer and drag out set TopCall.PhoneNumber to and fit it into the slot in the when TopPick.AfterPicking do block. Now drag out TopPick.PhoneNumber from the TopPick drawer and plug it into the empty socket. Here's how your event handler should look:
Try it on the phone: Press the picker, choose a contact and a phone number. Then press the phone call button to make the call. Add a command to the event handler to set TopButton's Text property to TopPick.PhoneNumber:

Pictures

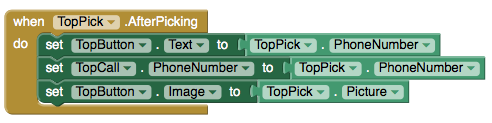
If you have a picture stored with your contacts, you can make the button show that along with the phone number, rather than always using the picture of the kitty. To do this, add an command to the event handler, to set the Image property of TopButton to be the the Picture property of TopPick:
PhoneNumberPicker has two properties that are easy to confuse: Picture and Image. Picture is the picture associated with the contact that's picked. Image is the image of the PhoneNumberPicker component as it appears in the Designer and on the phone.

Enhancements

Here are some variations for you to try: 
⦁ Add a second button, BottomButton, and a second PhoneNumberPicker, so that your app gives you the choice of two numbers.
⦁ Add a label with instructions on how to use the app.
⦁ Show the name of the person being called in addition to the phone number. Use an extra label to show the additional information.

Using PicCall

You can package PicCall and download it to the phone so you can use it when you're not connected to the computer. But there's a big limitation: Every time you restart PicCall, it starts fresh and does not remember what you picked last time. Later, we'll see how to use the TinyDB component to create apps that can remember information from one time to the next. Such information is called persistent data.

Review

Here are the key ideas covered in this tutorial:
⦁ You can name components by means of the Rename button.
⦁ App Inventor has components that can use information stored on the phone. The PhoneNumberPicker can get phone numbers and pictures for your contacts, and PhoneCall can make calls.
Tip: The list that comes up when you run the phone number picker does not show the pictures associated with your contacts, on some Android systems. Even though the image isn't shown, the "Picture" property will still return a picture that will show up when you run the app, provided that the phone has a picture for that contact.
Scan the following barcode onto your phone to install and run the sample app.

Download Source Code

If you'd like to work with this sample in App Inventor, download the source code to your computer, then open App Inventor, click Projects, choose Import project (.aia) from my computer..., and select the source code you just downloaded.
Done with PicCall? Return to the other tutorials here.
Tutorial Version:  App Inventor 2
Tutorial Difficulty:  Basic

Mini Golf: Fling, TouchUp, TouchDown Gestures for App Inventor 2


This Mini Golf App demonstrates how to use the Fling, TouchUp, and TouchDown gestures for Sprites
Note that these event handlers are also available for the Canvas.
To play this mini golf app, the player first positions his/her ball within the confines of the tee, and then flings the ball toward the hole. The ball will bounce off of the rectangular obstacle and the sides of the course. For each fling of the ball, the stroke count goes up by one. The total score is the number of strokes it takes to complete the entire course.
This tutorial covers:
⦁ Using the Sprite component and the TouchUp, TouchDown, and Flung events
⦁ Using a Clock component
⦁ Dynamic Positioning of sprites on a canvas, based on the size of the screen
⦁ Sprite Collisions
This tutorial assumes you are familiar with the basics of App Inventor-- using the Component Designer to build a user interface, and using the Blocks Editor to specify the app's behavior. If you are not familiar with the basics, try stepping through some of the basic tutorials before continuing.


Part I: Start a new app and make a ball that responds to fling events

We'll build this app in stages, adding a little bit of the game at a time. Log into App Inventor and start a new project. Name it "MiniGolf". When the Design window opens notice that App Inventor automatically names the screen "Screen1", but you can set the Title of the screen, which will show up in the top bar of the app. Think of a title related to Mini Golf, or feel free to use the suggested title "Fling It Mini Golf", and type it into the Properties pane on the right side of the Designer.
In the Screen Properties (shown in right-hand pane): Uncheck the checkbox labeled "Scrollable" so that the screen will not scroll when the app is running. Screens that are set to scroll do not have a height. We’ll need our screen to have a defined height in order to set up the golf course properly.
Add the following components in the Designer:
Component Type
Palette Group
What You'll Name It
Purpose
Properties
Canvas
Drawing and Animation
Canvas1
The canvas serves as the golf course
Height: 300
Width: FillParent
BackgroundColor: Green (or whatever you like!)
Ball
Drawing and Animation
GolfBall
This is the ball the player will fling to try to hit the Hole
Radius = 10
Color: White (or your choice!)
Speed: 0
Interval: 1 (ms)
Z = 2 (when sprites are overlapping, the one with the higher z will appear on top)
Ball
Drawing and Animation
Hole
This will be the target for the GolfBall
Radius = 15
Color: Black
Speed: 0
Clock
Sensors
Clock1
The clock will fire continuously to control the movement of the ball
Timer Always Fires
Timer Enabled
TimerInterval: 100
Open the Blocks Editor
Program the behavior of the Ball:
First, use the GolfBall.Flung event handler to move the golf ball when it is flung. Notice how this event handler takes in 6 different arguments:
⦁ x, the x position on the Canvas grid of the user's finger
⦁ y, the y position on the Canvas grid of the user's finger
⦁ speed, the speed of the user's flinging gesture
⦁ heading, the direction (in degrees) of the user's fling gesture
⦁ xvel, the speed in the x direction of the user's fling
⦁ yvel, the speed in the y direction of the user's fling
Essentially, you want to set the GolfBall’s speed and heading to match the speed and heading of the player’s fling gesture. You may want to scale up the speed a little bit because the speed of the fling is a little slower than how a golf ball would move. You can play with this "scaling factor" to make the ball more or less responsive to a fling.
 
Program the behavior of the clock:
 Use timer event to slow ball down so it doesn’t bounce around forever.
Each time the clock fires, it will reduce the speed of the ball slightly. Notice that if the ball is not moving then these blocks will do nothing. If you don’t have this then the ball will just bounce forever.
You'll need to use the if mutator function to change the if block into an if-else block. For a summary of mutators, check out the Mutators page
Program a new procedure called SetupNewHole:
This procedure will be called when a hole is scored and the ball has to be placed back at the starting point. Note that the Hole.MoveTo block sets the hole up in a new random location for the next play.
Program the Behavior of the Hole: When the ball collides with the hole, the ball disappears and resets at the bottom of the screen.
Note: When you first drag out the GolfBall.CollidedWith event handler, the named parameter is called "other". Notice that the if then block tests to see if the object involved in the collision with the golf ball (other) is the black ball sprite representing the hole. You can't just put a text block with the word "Hole" in it, you must use the Hole block, that can be found in the drawer for the Hole image sprite. Do not use a text block here.
Test this Behavior. Connect your device to AppInventor, or start the emulator to load your app. When you fling the ball it should move in the direction of your fling, with a speed similar to the strength of your fling. The ball should slow down as it moves, eventually stopping. When the ball hits the hole, the ball should reset at the bottom of the screen and the hole should move to a new random location.

Does your ball get stuck if it hits the edge?
This is easy to fix with the when EdgeReached event. Note that you can find the "edge" value block by using a get block and selecting "edge" from the dropdown.
Double check to make sure your code is right: fling the ball a few times and see that that ball now bounces off the edges of the course.

Part II: Keeping Score

Games are more fun if you have a way to see how you’re doing. Let’s add a stroke counter. In mini golf your score goes up as you take more strokes. The goal is to have the lowest score possible. Let’s show the player how many strokes she or he has taken on this hole. Let’s also show the number of strokes taken during the whole game.

Go back to the Designer and set up the following components:

Component Type
Palette Group
What You’ll Name It
Purpose
Properties
Horizontal Arrangement
Layout
HorizontalArrangement1
Contains LabelScore and LabelStroke
Place at top of screen
Label
User Interface
LabelScore
Displays the total stroke count for the entire game
Label
User Interface
LabelStroke
Displays the stroke count for the hole the player is currently on
In the Blocks Editor, you can program updates to the Score and Stroke labels. First, set two new global variables called StrokeCount and Score, and set their initial values to 0.
Then add the following blocks to the GolfBall.Flung event (red rectangle indicates new blocks):
Next add the following blocks to the Event that handles the ball hitting the hole:
Test the behavior. With these new changes, you should have a "Total Strokes" count and "This Hole" count at the top of the screen. When you fling the ball, the "This Hole" count  and "Total Strokes" count should both increase by one, and when you make the ball go into the hole the "This Hole" count should reset to 0.

Part III: Positioning Ball on Tee using TouchUp and TouchDown events

Ok, so now you’ve got a working game! Now let’s make it a little more interesting and fun. First we’ll add a Tee and let the player position the golf ball on the tee before they fling the ball.
Go back to the Designer and add three new image sprite components:

Component Type
Palette Group
What You’ll Name It
Purpose
Properties
ImageSprite
Drawing and Animation
Tee
A rectangular area in which the player can position their ball before teeing off.
Upload the Tee image (right click on this link, or see below).
ImageSprite
Drawing and Animation
LeftSprite
This is a left pointing arrow that the player will use to move the ball to the left on the tee
Upload the left arrow graphic (right click on this link
ImageSprite
Drawing and Animation
RightSprite
This is a right pointing arrow that the player will use to move the ball to the left on the tee
Upload the right arrow graphic (right click on this link
Program the size of the canvas, and the placement of the ball and image sprites on the canvas:
First, program the setup of these components on the screen. It’s best to accommodate all different screen sizes by placing the sprites on the screen relative to the size of the screen. The blocks below show how to set up the screen dynamically so that everything fits the right way. We start off by making the canvas size based on the screen size, and then we place each sprite in relation to the width and height of the canvas. We'll make a procedure to do this for us. Try to understand all of these blocks before you move on.
Position the Golf Ball on the Tee using TouchUp and TouchDown on the Arrow sprites:
To handle this, first set up two global variables that are toggled each time an arrow is pressed.
Program the behavior of the Right and Left Arrows
The left and right arrows are image sprites, so they come equipped with the ability to know when the player is is holding his/her finger down on them. The following blocks toggle the global variables based on whether the user is pressing either of these arrows.
Procedure MoveBallOnTee:
Make a new procedure moveBallOnTee that makes the golf ball move left or right on the tee depending on the global variables. Although the math here looks complicated, it’s pretty simple. If the ball is supposed to move left, you first check to make sure that moving the ball 2 pixels left will not exceed the left-most coordinate of the Tee. If moving the golf ball to the right, you first check that moving the ball right 2 pixels will not move it past the right-most coordinate of the Tee.
Note: if blocks look different in this image than on your own screen, this is because they were aligned differently. If you right click on the blocks, a list of options will appear and one of them is external inputs. When you select this, it will change how the blocks are configured. It does not change how the blocks function. If you want to change this, right click again and select internal inputs.
MoveBallOnCourse Procedure
Note that the blocks that we had inside the Clock1.Timer event are now moved over to a new procedure called moveBallOnCourse:
On each new course, players can position the ball on the tee before attempting to fling the ball toward the hole. To program this, you first have to check to make sure this is a new course and the ball has not been flung yet. If StrokeCount = 0 then we know this course is brand new and the player has not yet attempted to get the ball into the hole.
As the blocks above show, after verifying that the StrokeCount is 0, you then want to proceed to move the golf ball left or right depending on which arrow is being pressed.
Test the behavior. Make sure your app is doing what you expect: play the game on your device or emulator. Before you tee off, are you able to move the ball left and right on the tee by using the left and right arrows? After you tee off, you should no longer be able to use the left and right arrows (pressing them will do nothing). After the ball goes into the hole and the screen resets, you should then be able to move the ball left and right on the tee before teeing off again.
Keep track of the number of holes played, and allow a game reset
The game is working pretty well now, but what about giving the player a way to reset the game? Also, it would be nice to give the player some instructions so they know how to play the game. While we’re at it, let’s also give an indication of how many holes the player has completed. Add the following components in the Designer:

Component Type
Palette Group
What You’ll Name It
Purpose
Properties
Horizontal Arrangement
Layout
Horizontal Arrangement2
Contains the NewGame button and the HoleNum label
Button
User Interface
ButtonNewGame
Resets the game to Hole #1 with a score of 0.
Text: "New Game"
Label
User Interface
LabelHoleNum
Displays the current hole number, increments by one each time a hole is completed.
Text = "Hole # 1"
Font: bold, 28, blue
Label
User Interface
LabelInstruct
Displays instructions
Text = "Use arrows to position ball on tee. Hit the ball by flinging it with your finger."
Define a new global variable to keep track of the Hole Number:
Add the following blocks to the setupNewHole procedure: set global HoleCount and set LabelHoleNum.Text...
Program the "New Game" button’s behavior, which is pretty simple. When the button is pressed, set up a new course and reset both the hole stroke counter and total stroke counter to zero. Also set the hole number back to 1, by displaying "Hole #1" in LabelHoleNum. The blocks look like this:
Test the behavior.
Go back to your device or emulator and play the game some more. Now you should see the Hole # displayed in the lower right. Hitting "New Game" button should reset the game, returning both scores to 0, resetting the screen, and setting the Hole number to #1.

Part IV: Introduce an Obstacle

Most mini golf courses have obstacles on them. Let’s add a simple rectangular obstacle that will randomly position itself on the course somewhere between the Tee and the Hole. Each time a new course is presented, the obstacle will move, just the same way the Hole moves each time a new course is set up.
Add the following component in the Designer:
Component Type
Palette Group
What You’ll Name It
Purpose
Properties
ImageSprite
Drawing and Animation
ObstacleSprite1
This sprite will be somewhere between the golf ball and hole and will make it harder to get the ball into the hole
Upload the obstacle (rectangle) graphic (right click on this link, or see below).
Program the behavior of the obstacle in the blocks editor. First, set the behavior for when the ball hits the obstacle.  *Note: Using Heading = 0 - heading works because we are dealing with bouncing off of horizonal surfaces, this will not work for bouncing off of vertical or inclined surfaces. For our purposes, it works all right. See Challenge #2 below for more information.
Each time the course is reset, position the obstacle will be positioned randomly. Add these blocks to the setupNewHole procedure:
Test the behavior. Play the game again. Notice that the ball bounces off when it hits the obstacle. When the ball goes into the hole, or when the New Game button is pressed, the obstacle appears in a new location somewhere between the tee and the hole.
That’s it! Share your game with friends by building an APK or by downloading the source and sharing the zip file with other App Inventors!

Part V: Challenges

Here are some extra challenges to make your game better.
Challenge 1: Program the Ball to Hole collision so that the ball only goes into the hole if the golf ball’s speed is not too fast. In real mini golf, the ball will bounce right over the hole if you hit the ball too hard.
Challenge 2: There is a slight bug when the ball hits the vertical sides of obstacle. Figure out how to program the ball to obstacle collision so that it bounces the way you would expect when the ball hits the vertical sides.
Challenge 3: Limit the number of holes per game. Keep track of the number of holes and end the game after a set number. (A typical mini golf course has 18 holes.)
Below is a summary of all of the components:
Scan the following barcode onto your phone to install and run the sample app.

Download Source Code

If you'd like to work with this sample in App Inventor, download the source code to your computer, then open App Inventor, click Projects, choose Import project (.aia) from my computer..., and select the source code you just downloaded.
Done with Mini Golf? Return to the other tutorials.
Tutorial Version:  App Inventor 2
Tutorial Difficulty:  Intermediate
Tutorial Type:  Sprites Clock Timer Game