BY EDWARD M · JANUARY 23, 2015
This tutorial covers basic App Inventor Bluetooth communications code. Subsequent tutorials will add additional features. To implement and test this sample code, you need access to two Android devices – one to act as a Bluetooth “server” and the other to act as a “Bluetooth” client.
I tested this code using an old LG smart phone running Android 2.2 and a new Nexus 5 running Android 5.0.1. I also tested this code using the Nexus 5 paired with a Nexus 7 tablet.
This tutorial is lengthy – it introduces Bluetooth communications, then presents the user interface and blocks code for both the server and client programs, and then discusses how to set up the Bluetooth Communications link using “pairing”.Downloadable App Inventor source code for the client and server is at the end of this post.
This is the first of several posts on Bluetooth. This first post covers basic connections and the sending and receiving of text between two Bluetooth devices. The two halves of the link – client and server – are kept in separate apps to keep this simple, however, it is possible for a single app to act as both a client and a server. A subsequent post will show how to send other types of data, such as numbers, and introduce additional features for using Bluetooth communications.
Related:
⦁ Part 2: Sending Numeric Data using Bluetooth
⦁ How to connect App Inventor apps to Arduino using Bluetooth
⦁ Part 2: Sending Numeric Data using Bluetooth
⦁ How to connect App Inventor apps to Arduino using Bluetooth
Introduction to Bluetooth
Bluetooth is the communications technology with a funny name.[1] Bluetooth is actually named for a long ago Danish king who worked to unite groups of people, which is similar to Bluetooth’s goal of interconnecting different devices. The King’s real name was “Harald” but he had a nickname that translates as “Bluetooth” – no one knows for sure why he had this nickname but one thought is he had one dark tooth that may have appeared black or blue. And that is certainly an obscure way to choose a name for new technologies!
Bluetooth establishes a very low power, short range (up to 10 meters) communications link between two devices. Bluetooth uses the same frequency band (2.4 Ghz) as Wi-Fi, but uses different technology. Both Bluetooth and Wi-Fi use forms of spread spectrum radio links that result in signals moving around within a wide band in ways that enable sharing of the spectrum by multiple devices. But the two technologies serve different purposes, are not identical, and cannot communicate with one another.
Bluetooth applications include common wireless headsets for wired and cellular phones, and in-ear cordless adapters for phones. Bluetooth is also used by cordless headphones and to exchange address cards between devices, and for industrial applications where sensors collect and send data into a network.
There are two forms of Bluetooth – classic Bluetooth, which we use in the sample applications, and a newer version known as Bluetooth low energy, Bluetooth BLE, Bluetooth LE or Bluetooth Smart – all referring to the same new technology. The newest Android devices running Android 4.3 or newer, usually support the newest Bluetooth Smart technology. Regardless, we use classic Bluetooth which is backwards compatible to older phones, and is the technology supported by App Inventor.
Setting up a Bluetooth devices involves “pairing” the two devices and establishing a connection. This will be covered later in this tutorial.
Footnote:
[1] Actually there is another communications technology with a funny name called TWAIN, which is an acronym for “Technology without and interesting name” (really!)
The Designer View
There are two separate apps for Bluetooth communications – one is a “server” app that runs on one device, and the other is a “client” app that runs on a second device.
Bluetooth must be enabled on both devices, and the devices need to be paired before running these apps. (How to do this is explained near the end of this tutorial.)
The server must be run first on one device and then the client app on the 2nd device connects to the server before data can be sent between the two devices. More on this later in this tutorial.
The server user interface is shown here:

The main components of the server interface design are:
⦁ Accept Connection Button – press this to set the server to accept a connection from another device. Connections are not possible until the AcceptConnection service is started.
⦁ Send the following text Button – the text is the following text box is sent to the other Bluetooth device.
⦁ Disconnect Button
⦁ Status messages – Status about the communications link, and any messages received from the other device are shown on the display
⦁ Non-visible components – The apps use a clock to cause activities to occur at a preset interval. The Notifier1 component is used to display error messages (see tutorial on the use of Notifier), and BluetoothServer1 provides the Bluetooth support. The BluetoothClient1 and BluetoothServer1 components are located in the Connectivity section of the Designer palette.
How each of the buttons and components are used to run the program are explained later, in a section on setting up Bluetooth on your devices and running the apps.
The client user interface is shown here:

The Connect to device button is actually a ListPicker component and not a standard button.
For both the client and server apps, the TimerInterval of the Clock properties is set to 1000 milliseconds or 1 second. Other small values may also be used. This value determines how frequently to check the Bluetooth link for incoming data from the other device. As shown, each app will check the link once per second.

Blocks Code
Bluetooth Server app
We start with the server app implementation. The client app is presented after the server app.
The first step is to check that Bluetooth is activated or switched on. If not, an error message is displayed reminding the user to open Android’s Settings and then switch Bluetooth to on.
The Initialize event occurs when the app is launched – and this is a good place to check whether or not Bluetooth is enabled on the device.

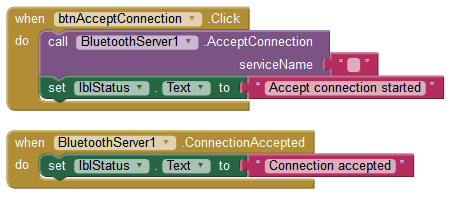
Assuming that Bluetooth on the device is currently “on”, the next step is to accept a connection from another device when the btnAcceptConnection button has been pressed. This causes Bluetooth to begin listening for an incoming connection.
Once a connection request has been received and processed, a ConnectionAccepted event occurs. In our basic app, we update the status message on the app screen.
The Timer Event Handles Receiving of Data
Receiving data sent over Bluetooth takes place in the Clock1.Timer event handler. Remember, the clock is set so that the Timer event happens once per second. Every second, the app will check if any data has been received.
To prevent reading data when Bluetooth is not connected (this would cause an error), an if-then statement checks the IsConnected property of BluetoothServer1. This value is set to true when the devices are connected and false if the connection is not currently available.
IsConnected should be true if a connection has been accepted. But because this is a wireless connection, a device might go out of range or be turned off, breaking the connection. It is good programming practice to check that the connection is working before trying to send or receive data.
The property BytesAvailableToReceive tells us how much data is available (one text character is equal to one “byte” of data). If this value is zero, then no data is available. But if the value is greater than zero, then our app may read the incoming data and update the status and messages to the app display.

The Send Text button event handler is similar to the receive code located inside the Timer event except that data is sent using the SendText method to transmit the data to the other device.
The Disconnect button handler is self explanatory!

Error Handling
One thing to know about wireless communications is that errors happen. For most of our App Inventor apps, we ignore potential errors – if errors occur, the app stops running and Android displays an error messages.
Rather than letting that occur, our app can intercept the error condition by adding an error event handler to the main screen, Screen1. The ErrorOccurred event has four parameter values (local variables) that contain information about the error. The error handler displays the error values on the screen, rather than shutting down the app.

Bluetooth Client App
Now that the server app is complete, we present the client app that runs on the other device. In many ways, the client app is a mirror image of the server, but refers to the BlutoothClient1 component instead of the BluetoothServer1 component.
App Initialization
Same as the server, except it uses BluetoothClient1.

Connecting
When the two devices are running, the server app is set up first to accept connections. Then, on the client side, the user selects the Connect ListPicker button and selects the device name from a list of available Bluetooth devices. Because the list of devices is in the form of a list, the ListPicker is a great interface component to display the device list and handle the selection. (See my earlier tutorial on ListPicker.)
Before the list is displayed, the list is filled with the list of Bluetooth devices (AddressesAndNames). The set lblStatus.Text block may be deleted as it was used during my testing and is not needed in the final version of the client.

After the device has been selected with the ListPicker user interface, the Connect method of BluetoothClient1 establishes the connection. The method returns a value of true if the connection was successful; in which case a message is sent to the server app.
Disconnect is self explanatory.

Receiving Data
Like with the server, the reception of data is implemented using a timer. Once per second, the client checks to see if data is available, and if it is, reads and displays the data on the app display.

While the server must be running prior to the client making a connection, once the two devices are connected, either app can send data to the other app, at any time.
Error Handling
The client’s error handling is identical to the server’s error handling.

Setting Up A Bluetooth Connection
Before you use the Bluetooth communications apps, do the following:
1. Use Build .apk or other method to obtain the server app, download and install on your first Android device.
2. Use Build .apk or other method to obtain the client app, download and install on your second Android device.
3. Go in to the Android Settings and turn on the Bluetooth feature. The user interface for the Bluetooth configuration varies slightly depending on which version of Android you have. On 2.2, for example, you need to select Wireless & Networks, and then choose Bluetooth, while on Android 5.0, Bluetooth appears in the topmost Settings menu.
4. In newer versions of Android, when the Bluetooth Settings menu is active, your device is broadcasting its availability to other nearby devices. On older versions, you may need to click an option to make your device “discoverable”. (Note – my Nexus 5 is not visible on my very old LG 2.2 device – however, the Nexus 5 sees the LG and the two can be connected from the Nexus 5 side).
5. Once your two devices see each other over Bluetooth, you may be prompted to “pair” the devices, or (depending on Android version), you may have to manually choose the device and then choose pairing. Follow the on screen instructions.
6. Once the two devices are “paired”, launch the Server app and select Accept Connection.
7. On the other device, launch the Client app and select Connect. If all goes well, you should see a “client connected” message on the Server app.
Key Features Shown
⦁ Introduction to Bluetooth wireless
⦁ User interface for a Bluetooth server and client app
⦁ Use of the Bluetooth Server and Client components to set up a link
⦁ Use of error handling
⦁ Setting up devices for Bluetooth communications
⦁ More features in future tutorials!
Downloads
⦁ BTClient1.aia App Inventor source file (App Inventor source code files have the filename extension .aia)
⦁ BTServer1.aia App Inventor source file
⦁ Download the source code to your computer. Then, in App Inventor, go to the Projects menu and select “Import project (.aia) from my computer…”
⦁ BTClient1.aia App Inventor source file (App Inventor source code files have the filename extension .aia)
⦁ BTServer1.aia App Inventor source file
⦁ Download the source code to your computer. Then, in App Inventor, go to the Projects menu and select “Import project (.aia) from my computer…”
댓글 없음:
댓글 쓰기