Grove - Relay
Introduction

The Grove-Relay module is a digital normally-open switch. Through it, you can control circuit of high voltage with low voltage, say 5V on the controller. There is an indicator LED on the board, which will light up when the controlled terminals get closed.

Specifications
- Parameter v1.1 v1.2
- Product Release Date 27th Jan 2013 9th June 2014
- Operating Voltage 5V 3.3V~5V
- Operating Current 60mA 100mA
- Relay Life 100,000 Cycle 100,000 Cycle
- Max Switching Voltage 250VAC/30VDC 250VAC/30VDC
- Max Switching Current 5A 5A
Tip
More details about Grove modules please refer to Grove System
Platform Support
| Arduino | Wio | BeagleBone | Raspberry Pi | LinkIt |
|---|---|---|---|---|
Getting Started
With Arduino
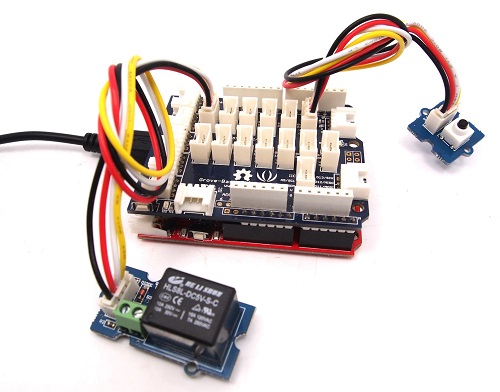
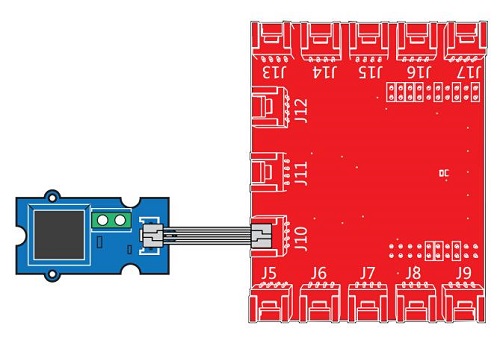
Below is a demo that shows you how to control a Grove - Relay with a Grove - Button. When the button gets pressed, the relay will close.
// Project Five - Relay Control

void setup()
{
  pinMode(1, INPUT);
  pinMode(2, INPUT);
  pinMode(6, OUTPUT);
}

void loop()
{
  if (digitalRead(1)==HIGH)
  {
    digitalWrite(6, HIGH);
    delay(100);
  }
  if (digitalRead(2)==HIGH)
  {
    digitalWrite(6, LOW);
  }
}
With TI LaunchPad
Controlling other electronics (Relay)
This example showcases how to use the Grove-relay module to control larger load, i.e. a desk lamp light. A 3V voltage signal can cause the relay to switch on, allowing current to flow through the connected appliance.
/*
Relay
The basic Energia example.
This example code is in the public domain.
*/

#define RELAY_PIN 39

// the setup routine runs once when you press reset:
void setup() {
         pinMode(RELAY_PIN, OUTPUT); // initialize the digital pin as an output.
}

// the loop routine runs over and over again forever:
void loop() {
         digitalWrite(RELAY_PIN, HIGH); // turn the relay on (HIGH is the voltage level)
         delay(1000);   // wait for a second
         digitalWrite(RELAY_PIN, LOW);   // turn the relay o by making the voltage LOW
         delay(1000);   // wait for a second
}
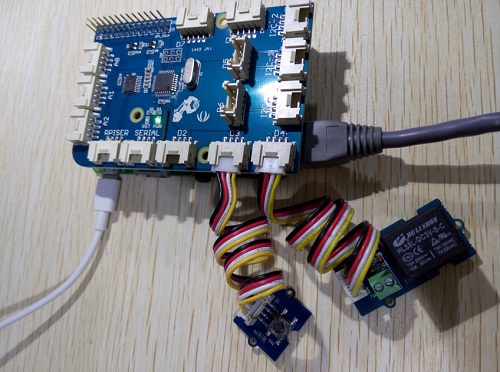
With Raspberry Pi
This sample is show you how to use Grove - Relay by Raspberry Pi . The demo below will show that the relay be control by Grove -Button.
# Raspberry Pi + Grove Switch + Grove Relay

import time
import grovepi
# Connect the Grove Switch to digital port D3
# SIG,NC,VCC,GND

switch = 3
# Connect the Grove Relay to digital port D4
# SIG,NC,VCC,GND

relay = 4
grovepi.pinMode(switch,"INPUT")
grovepi.pinMode(relay,"OUTPUT")
while True:
    try:
        if grovepi.digitalRead(switch):
            grovepi.digitalWrite(relay,1)
        else:
            grovepi.digitalWrite(relay,0)
            time.sleep(.05)
    except KeyboardInterrupt:
        grovepi.digitalWrite(relay,0)
        break
    except IOError:
        print "Error"
Run the program
- Find the path to the file(According to your own path)
cd GrovePi/Software/Python/ - Run Program
sudo python grove_switch_relay.py
Resources
Help us make it better
Thank you for choosing Seeed. A couple of months ago we initiated a project to improve our documentation system. What you are looking at now is the first edition of the new documentation system. Comparing to the old one, here is the progresses that we made:
- Replaced the old documentation system with a new one that was developed from Mkdocs, a more widely used and cooler tool to develop documentation system.
- Integrated the documentation system with our official website, now you can go to Bazaar and other section like Forum and Community more conveniently.
- Reviewed and rewrote documents for hundreds of products for the system’s first edition, and will continue migrate documents from old wiki to the new one.
An easy-to-use instruction is as important as the product itself. We are expecting this new system will improve your experience when using Seeed’s products. However since this is the first edition, there are still many things need to improve, if you have any suggestions or findings, you are most welcome to submit the amended version as our contributor or give us suggestions in the survey below, Please don’t forget to leave your email address so that we can reply.
Happy hacking
댓글 없음:
댓글 쓰기