I have a question about an app that I'm writing.
I have to send via bluetooth, through Arduino, the two sensors reading (DHT22 and BMP180) and visualiazzarli on the monitor screen. So everything is right, I managed to do what I want. But if I want to send the reading of DHT22 sensor in a label, and that of the BMP180 to another label, how do I?
I enclose the block diagram of my app

--
Can you show what a typical message that you receive would look like?
The idea is that you split the text using the text blocks in two parts, for example split: http://appinventor.mit.edu/explore/ai2/support/blocks/text.html#split
Or, if you receive the values comma separated, then you could use: http://appinventor.mit.edu/explore/ai2/support/blocks/lists.html#listfromcsvrow
If you would like more help, you could post the part of the sketch that generates the messages.
--
here is the sketch. I colored differently blocks of text that I want to share. Can you help me because not understand how to do?
void loop()
{
while (!BTconnected) // verifico se è attiva una connessione tra modulo bluetooth e smartphone/tablet. Se attiva // procedo con il resto del programma
{
if ( digitalRead(BTpin) == HIGH) {
BTconnected = true;
};
}
Serial.println("HC-05 è connesso"); // messaggio di avvenuta connessione
if ((millis() - tempo) > 5000) { // intervallo di chiamata lettura sensori ogni 5s
delay(dht.getMinimumSamplingPeriod()); // chiamata sensori per richiesta lettura
float humidity = dht.getHumidity();
float temperature = dht.getTemperature();
pressione = bmp.GetPressure() / 100.0;
temperatura = bmp.GetTemperature();
/*aggiungo 9 hPa x ogni 100 m di altitudine del luogo d'ubicazione della stazione meteo,
allo scopo di traslare la pressione letta alla corrispettivo valore di pressione slm.
Es. la stazione si trova a 100 m slm aggiungere 9, se si trova a 200 m slm aggiungere 18 e così via */
pressione_slm = pressione + 21.6;
temp_media_sens = (temperature + temperatura) / 2; // faccio la media della temperatura letta dai due sensori
bluetooth.print("Umidita' = ");
bluetooth.print(humidity);
bluetooth.println(" %");
bluetooth.print("Pressione SLM = ");
bluetooth.print(pressione_slm);
bluetooth.println(" hPa");
bluetooth.print("Temperatura = ");
bluetooth.print(temp_media_sens);
bluetooth.println(" C");
tempo = millis();
}
}
--
I see from your Arduino code that you are using println() at the end of each reading,
and sending identifying text before each reading.
That's helpful.
There's a Delimiter facility in the Designer's BlerTooth client component that will
(with proper blocks) feed you only one reading at a time, between one LF and the next LF.
Set your BTClient Delimiter to decimal 10 to use LF as the delimiter.
(See an ASCII table to confirm)
Define a global variable, IncomingData, iniially blank text.
Also, in Clock1 Timer, code:
IF BTlient1.Isconnected THEN
IF BTlient1.BytesAvailable > 0 THEN
set global IncomingData to BTlient1..ReceiveText(-1)
(notice I asked for -1 bytes. This means ask for everything up till the next delimiter, LF in this case. See the block tool tip for confirmation)
If global IncomingData contains 'Pressure' THEN
set LabelPressure.Text to IncomingData
ELSEIf global IncomingData contains 'Temperature' THEN
set LabelTemperature.Text to IncomingData
ELSEIf global IncomingData contains 'Humidity' THEN
set LabelHumidity,Text to IncomingData
ELSE
set LabelCrapData,Text to IncomingData
In my Clock routine, I did not trim off the identifier text before dropping it into a label.
You can do that using a text split at '=" and selecting item 2 of the result.
Look in the text blocks group for the "contains" block.
--
Thanks Abraham, but unfortunately I did not understand. For example, the variable IncomingData I define it in Arduino?
You could draw me blocks of code?
--
Global variables come from the brown Variables section in the AI2 blocks editor.
See the Bluetooth and Arduino section of this FAQ for plenty of examples ...
--
I identified the variable, but I can not go because I can not understand the flow of operations to do and I can not find all the blocks. Some help?
--
They are blocked as an image attachment. I do not know how to set this line:
If global IncomingData contains 'Pressure' THEN
then I did not understand how to set the last else:
set LabelCrapData,Text to IncomingData

--
Abraham, I corrected the above code, I attach a picture.
Can you tell me if it is correct and that is what you mean? Also could you explain better this step:
There's a Delimiter facility in the Designer's BlerTooth client component that will
(with proper blocks) feed you only one reading at a time, between one LF and the next LF.
Set your BTClient Delimiter to decimal 10 to use LF as the delimiter.
(See an ASCII table to confirm)

--
I have corrected your BlueTooth ReceiveText block to ask for -1 bytes.
Receive text from the connected Bluetooth device. If numberOfBytes is less than 0, read until a delimiter byte value is received.


I also moved label updating logic to trigger only if data is available, to prevent premature label erasure.
See attached blocks and .aia file.
You can use the Backpack to copy across projects.
Load the backpack in one project, then switch to the destination project,
then pull from the backpack there.
See http://www.asciitable.com/ around decimal 10 for the connection between Line Feed (New Line) and decimal 10.
text ReceiveText(number numberOfBytes)
I see you set the Delimiter to 10 in the Designer,
so with the new blocks you should be ready to test.
I do not have BlueTooth equipment, so I could not test.
I am working from common understanding of data transfer.
Let us know how it works out?
--
By the way, I also renamed Button4 to btnDisconnect, for clarity.
--
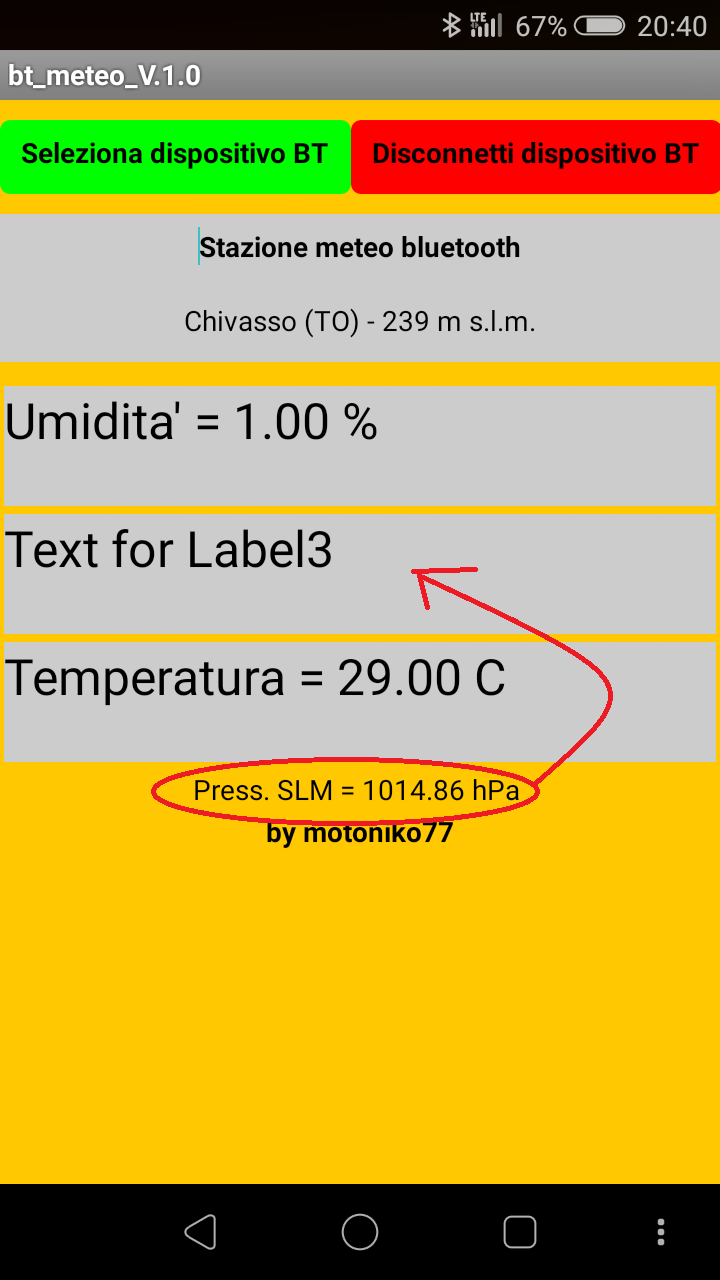
Wow, thanks a lot Abraham, your app so it works correct almost completely. Only the reading of "Pressione_SLM" is translated in the label crapdata. Because?
I show a screenshot.
--
Your text for comparison of pressures doesn't exactly match what was being sent (". " vs "_" after the word Press).
Just check for "SLM" or for "Press" and you should be okay.
--
False alarm Abraham, everything works perfectly (there was an error in the sketch side Arduino) .Sorry. Just one question, but the last else, the one with the label crapdata it is essential? You can remove? If I do I do?
Thank you very much for your availability. If you can to please the final part of the app name will ABG :)
--
the last else, the one with the label crapdata it is essential? You can remove? If I do I do?
Do you remove the batteries from your smoke detector when there is no smoke?
You can use a Notifier instead, but keeping the test is a good safety feature
to speed up diagnosis if things go wrong.
Thank you very much for your availability. If you can to please the final part of the app name will ABG :)
I only added the ABG for version control, to give you two separate versions to work from.
I don't need any credit in your app.
--
Perfect I did Abrahm.
Now you dispose of the individual sensor readings, I'd like to save the data with the TinyDB tool and create a graph to show the trend of temperature, pressure etc etc.
Do you know if it is a possible thing, and if there is any tutorial?
--
I'd like to save the data with the TinyDB tool and create a graph to show the trend of temperature, pressure etc etc.Do you know if it is a possible thing, and if there is any tutorial?
TinyDB is only needed if you want to save readings between one run and the next, or to pass data to another screen.
See this FAQ, specifically the sections on Lists, Lists of Lists, TinyDB tutorials, and Graphs.
You would need a Start/Stop button, a Graph button, and Save and Load buttons to control TinyDB saving/loading.
You will also need two global variables:
Readings, initially CREATE EMPTY LIST, and
StartMS, initially 0.
Readings could be a list of lists, (a table), with one row per reading:
(millliseconds, temp, pressure, humidity)
where milliseconds counts time since the Start button click, and the other 3 items are the readings at that time.
The entire table could be stored under a single TinyDB tag, "READINGS".
The Start/Stop button click routine would be:
if btnStartStop.Text = "Start THEN
enable Clock1
set btnStartStop.Text to "Stop"
set StartMS = MillisecondsFromInstant(Clock1.Now())
set global Readings = empty list
ELSE
set btnStartStop.Text to "Start"
disable Clock1
In Clock1.Timer, extra code would:
(in section that runs only if new data has arrived)
(get reading)
initialize local variables:
ms = MillisecondsFromInstant(Clock1.Now()) - global StartMS
temp = 2nd item in split (temp reading, "=")
press = 2nd item in split (press reading, "=")
humidity = 2nd item in split (humidity reading, "=")
add item (Make list(ms, temp, press, humidity) to global Readings list
The Save and Load buttons would be single TinyDB blocks, using the aforementioned tag, for Readings.
The graph routine in the FAQ works on two lists, x and y, which you would have to strip out from the Readings table with loops.
--
I try, thank you, but it seems very complex!
--
ok, I give up, the chart is too complicated for me.
Is there a way to automatically save the last 5, 10 readings of the three parameters:
- pressure
- temperature
- humidity
and then recall them with a single button, and show them in a canvas?
--
Abrahm then, I try to move on.
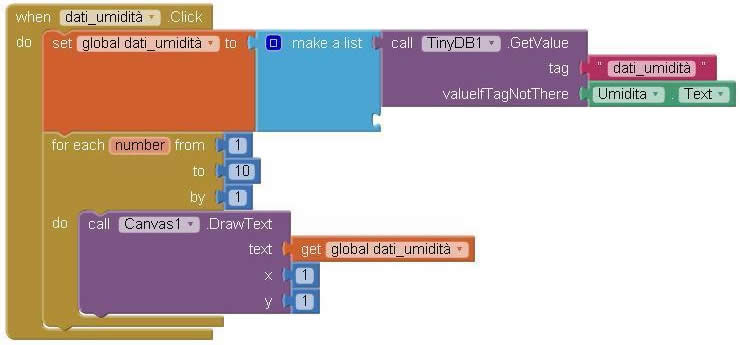
The goal is to read and store the previous 5/10 readings from the three sensors (humidity, temperature and pressure). To do this I used the tiny component db. I hope it is right. About it only uses one or three?
Then at the bottom of the screen I placed 3 buttons, one per sensor. When I press the corresponding button, through a canvas I want to see the readings.
I am attaching the image of the block (to be multiplied x 3) and .aia file. Tell me what you think please.
--
The way you are trying to store the data is that you are storing only ONE value. You need to use a list, retrieve the list add the latest data to it. I made a procedure that saves the latest 10 values read. And a call to it for each type of data in your timer routine. Then, when you press the button, it dispalys the 10 values in a label (the last is shown first).
When you have this ok for all your data, think of a way to display a graph. The whole idea of having success in programming is doing little pieces at a time.
And try to learn something about lists:
Chapter 19 of the App Inventor book:
http://www.appinventor.org/bookChapters/chapter19.pdf
Displaying a list:
http://ai2.appinventor.mit.edu/reference/other/displaylist.htmlbt_meteo_ABG_copy_GvEB.aia
--
Here's a YouTube video with links to source code for a real time graph.
Learn lists first, though.
--
wow, thanks a lot Ghica, your intervention was decisive. I see that you save the list to a label and not in a canvas. Because?
Also I would like to ask you if it is possible, and how, to enter a condition, type of Arduino millis -> if millis () - time> 24 h (last BT connection) saves the data in the list, so that the last 10 readings, correspond to the last 10 days.
1000 Thanks!
--
I thought, is it right to put a when clock after the when button?
--
Because labels are for text, on a canvas you could draw a graph. For now you are not able to do the graph, because you do not know whether the data you receive are right. Once you checked that, you could start to figure out how to do the graph.
I do not understand the rest of your questions. You want to save the data of ten days?? Not possible with the setup you have now. You are sending data from the Arduino every 5 seconds, that would be 12x60x24x10 = 172800 readings in10 days, times 3 for all data. Actually, your phone could probably handle this amount of data, but how are you going to draw it? What do you want to use it for?
--
Now Arduino sends data every 5 seconds (because they are in testing and I need to figure out if it works), but I intend to increase this range to 120 seconds or more. The idea is to store the TinyDB reading component only once every 24 hours no matter how many times you open the app in the day.
Now Arduino sends data every 5 seconds (because they are in testing and I need to figure out if it works), but I intend to increase this range to 120 seconds or more. The idea is to store the TinyDB reading component only once every 24 hours no matter how many times you open the app in the day.
This is because, to have an idea about the trend of the weather must think in days.
However, I duplicate the code for the other buttons / sensors, and everything works fine. Your code is correct.
I added a clock2 in the project and set a time to enable true with 86400000 ms (24H). Does it make sense?

--
A timer works only when your app is active, and the time starts at the time you enable it. So, a timer for 24 hours would mean that you would need your app to be running permanently and not in the background.
I suppose that you want to use your phone sometimes for other purposes too. So you need to find another solution.
With the present App Inventor, your app cannot run in the background. There is an extension by Taifun which allows you to send a notification at a specific time, so that is something you could try, but that still needs your app in the background. http://puravidaapps.com/notification.php (there is a test version of App Inventor that offers services, but it is not ready).
Another problem you have is at what time of the day are you going to measure your Arduino data? If one day you measute at 9 in the morning and the next at 9 in the evening you will have a strange set of data in the end.
And, how to make sure that you set the data in the TinyDB only once per day?
--
the data in Arduino are always available. passed the first if statement on the presence of at least one of connected smartphones, sensors read every few seconds according to another if based on millis function. I thought I was using about 120/180 seconds because I think that no one will hold the app turned on longer than this time. Then once back in the background, and the Bluetooth connection will be lost, stops Arduino sketch. Everything works well.
Why would that TinyDB save a reading per day (does not matter what time, as this depends on who uses the app) is because it is more interesting to know how the data have fluctuated in the previous 10 days.
I thought, if it is impossible to reason as a timer instead you can make a comparison with the day of the week. A bit like a wired RTC works with Arduino. I fetch the current date and compared. App inventor, can you?
--
If your Arduino device is better able to stay up for 10 days than your Android device,
why not pile up all the data in the Arduino device and blast it all out on
request from the Android device?
I don't know how long a single BlueTooth message can get, though.
You would have to decide on a set of column, row, and message-end markers,
like "," NL, "|" ?
--
Alternatively, if you have a Web Server and WiFi capability in your device,
you could collect and periodically write full hour's readings into multiple files
available for download by date/hour using the Web block.
--
One of the most used Arduino boards, the Arduino Uno has a whopping 32 kB of flash memory, just enough to load your sketch. The new Arduino 101 has 196 kB.
This is not a whole lot of space to store temperature readings and if power is lost, you lose everything.
If Nicola would want to build a scientific weather station, he would do better to use a Raspberry Pi, which has a Linux operating system, megabytes of memory and storage possibilities via USB. He could use an USB connection to the Arduino, or Bluetooth, or Wifi (but that would require a Wifi module on the Arduino board, a network, etc. He could even attach his sensors directly to the Pi.
This requires a completely different set of skills and there is no way to play around with App Inventor, although, on the Pi there is Scratch, which is closely related.
Nicola, what you could do, is the following:
Replace your storeData procedure by this one below.
What it does is, instead of storing a single value for each reading, it stores a list with as first element the today date and as second element the value. But before storing it, it checks whether there is already a value for the date, and if there is, the value is not stored. This insures that you get 10 values for different dates. But if you skip a day opening the app, there will be no value for that day.
I leave it to you to display the data in a nice way.
--
Just a remark: before using the new procedure, you should clear the tags you used for the TinyDB, or use other ones, like humidita_con_data etc.
--
wow Ghica hello and thank you again for your help. This code is just what I wanted. In fact I do not need a scientific weather station but something that gives you an idea of the type of day that you are getting. When I finish the project, the idea is to give the app to all who live in condos in my building.
But unfortunately doing exactly as you suggested, changing the name to 3 tag of tiny component, the function to record 10 data does not work, I just get on the field related to the set ibl.dati to text then nothing.
I have some doubts:
as a clock, I expected a second clock, I was right? and designer side settings I left the default settings.
I attach the file .aia
--
You do not need a second clock, you do not need another timer event, just its calculation facilities.
(By the way, you also do not need 4 notifiers. One is enough)
Your blocks look all fine to me. Realize that you must wait 10 days to see 10 items of data. Today it will store only one. Therefore you will see only one.
What were you exacly seeing? Can you click with your right mouse button on one of the TinyDB.GetValue blocks, and choose DoIt and tell what you see?
I cnanot really test your app, because I do not have an Arduino with the same setup.
--
I do not see anything, not even memorized reading today.
--
Did you try to reset the Companion connection, restart the Companion and restart the Arduino?
And delete that second Clock (or at least disable it in the designer)
It sometimes helps. If not, could you drag out the call TinyDB1.GetTags block, just somewhere on the work space (you may see a yellow triangle, ignore it). Click with your right mouse button on it, choose DoIt, and tell me what it says.
--
Shame on me!
If the list is still empty, you should insert an item, and it does not do that right now.
This the updated .aia
Try it please!
If the list is still empty, you should insert an item, and it does not do that right now.
This the updated .aia
Try it please!
--
Do not worry, I alone would have done less than zero. Anyway I tried the updated code and unfortunately does not go yet. Same problem does not save the data today. What can I try?
I attach the image with the error that I find if I click on the TinyDB doit.

--
You cannot use DoIt on this block, because tag is a local variable and indeed when you do DoIt you are not within the procedure, therefore tag is not bound.
And it would be better to do DoIt on a GetValue block, so you can see what is in the TinyDB. You could try one of these two (just have them not connected in your workspace)
And it would be better to do DoIt on a GetValue block, so you can see what is in the TinyDB. You could try one of these two (just have them not connected in your workspace)
--
ok:


--
Nicola, did you clear your TinyDB?
Was your BT-device connected when you tried the DoIt?
Was your BT-device connected when you tried the DoIt?
--
how to delete it? however bt is connected well.
--
No, I did not say that you should clear the TinyDB, I was wondering if you cleardd it because I am very surprised that there is nothing in it. At least the stuff you had before should be in there. Therefore something strange happened. What did you do?
This is very hard, debugging without hardware! Could you please do a DoIt on a "get global IncomingData" block? And report it here?
Could you also post your sketch, probably I can modify it in such a way that I can run it on one of my boards and test.
I also noticed that the timer delay of Clock1 is 10 seconds, which seems very long to me. What is the delay now in your sketch?
--
I did as you asked me. Furthermore you paste the threshing of the project file. Currently I have only slightly modified design and added another reading (heat index, which does not read anything because missing piece of Arduino code). For the rest of the blocks I am unchanged.

--
I think it should work now. There were 2 bugs (mine). The list should be stored the first time and the list should really be empty, because if the dates are the same, the if will fall through also.
The corrected part of storeData is below.
I did one other thing: I deleted the Bluetooth server component. I do not think you are using it.
I keep my fingers crossed...
The corrected part of storeData is below.
I did one other thing: I deleted the Bluetooth server component. I do not think you are using it.
I keep my fingers crossed...
--
Great Ghica, now works perfectly. I like that in addition to the sensor value, the TinyDB, also saves the date thereof. Beautiful!
Thank you very much, the help and patience. Thanks so much! Now I can go and finish my work.
If you have a blog or a website, I would be happy to support it.
--
I am really glad it works now. Have fun with it.
--
Ghica Hello, I'm sorry but I have to bother you again. I'm doing the last test and I noticed that the stored readings are beyond the right edge of the display. Is there a solution?
If you see more prints for the same date it is because I try to vary the format of the date and the app has repeatedly printed.

--
Use ∖n instead of , in set lblDati.Text
How comes that you have 3 times 2 ago as date?
How comes that you have 3 times 2 ago as date?
--
in this way?

for double readings is my fault, I was playing with blocks, but it is just as I played I discovered the bug ... now everything is ok 1 save per day
--
Instead of asking me, you could have tried first.
--
i did it, it works. Thank you
--


