2016년 12월 21일 수요일

AI2: copy screens manually using 7zip


You do not need the 7zip (www.7-zip.org) archiving utility to copy screens, but it can simplify things a bit.


Note: to copy screens manually using Windows Explorer see: AI2: copy screens using Windows Explorer

If you don't need to change the name of the screen in the source aia project before copying the screen files to the destination aia project you may be interested in this shortcut:

You can open the source aia project that you are copying screens from in one instance of 7zip
and the destination aia project that you are copying screens to in another instance of 7zip.
Open both projects src folders all the way to the .scm, .yail and .blk files.
Then just drag the needed screen files from the source folder to the destination folder in the other 7zip instance.
Also copy any assets from the assets folder that your screen will need.
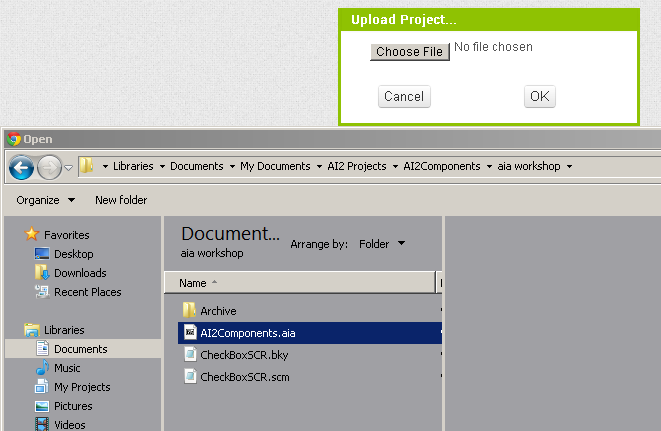
Close both 7zips and upload the destination aia project to AI2.

--
To copy screens manually the general process is:

1. save the project in a folder on the PC
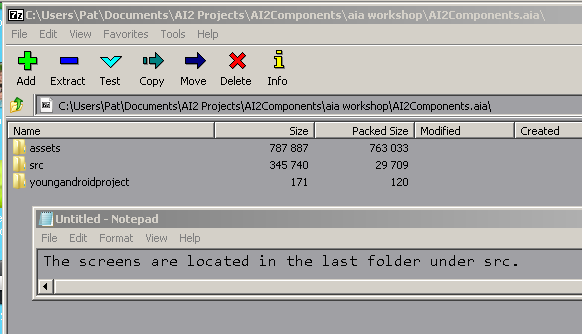
2. open it with an archiving utility
3. navigate to the bottom of the src nested folders
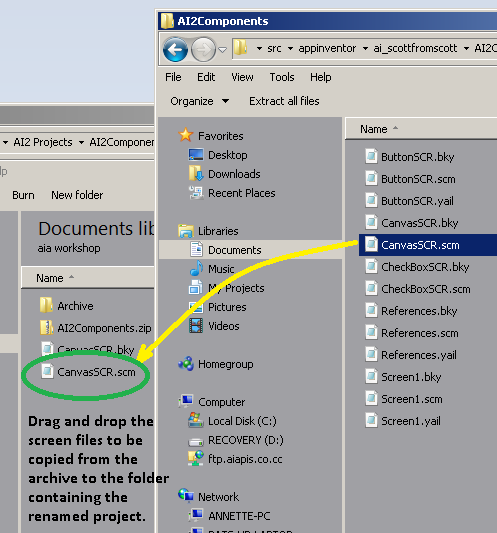
4. drag out the screen files to be copied
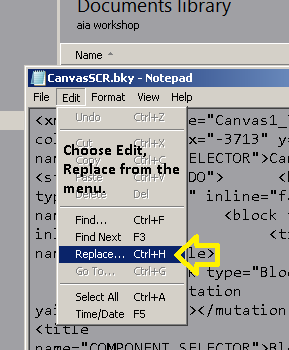
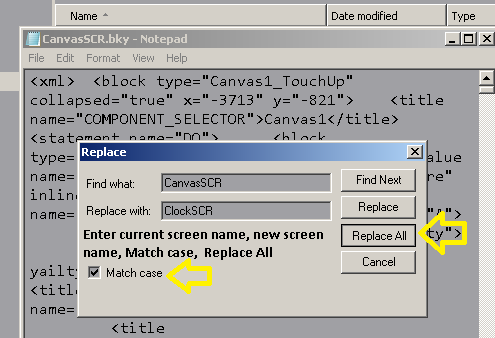
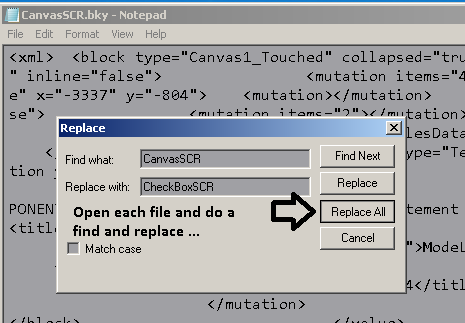
5. open each file with a text editor and do a find and replace from old screen name to new screen name
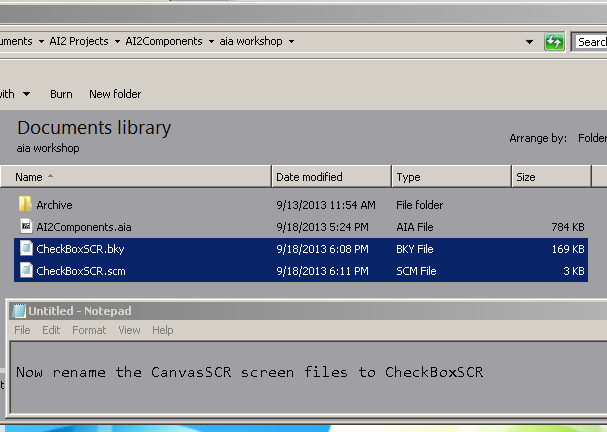
6. save each file and rename them to the new screen names
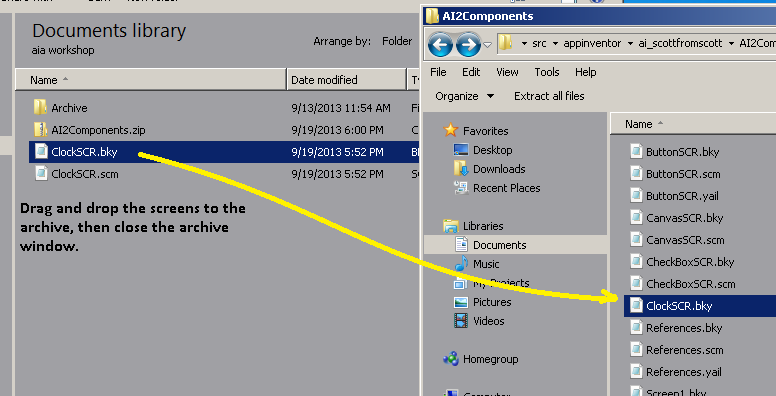
7. drag and drop them back in the archive folder/window
8. open that project in AI2

Now screen captures of these steps using an actual project:

-

-
-
-
-
-
-
-

-
-
-
-
-
-

-

AI2: copy screens using Windows Explorer


This technique of copying screens in an AI2 project uses Windows Explorer to add new screens to an AI2 project. 

When copying screens manually, be careful not to use keywords such as 'Button' for your new screen names as 'button' is one of the words used in component definitions in the screen files. Manually copying a screen named 'Button' will cause any button definitions to be corrupted by replacing 'button' with the new screen name and the new screen will not work. I add an SCR suffix to my screen names to insure that this does not happen. Alternatively you could make sure that you avoid those keywords.

Also, when copying screens from one project to another, be sure to also copy any assets needed by those screens from the source project to the destination project.

Screen CanvasSCR will be copied and named ClockSCR. I captured the screens for each step of the process below: 

Export your project to a folder on your computer.
Then place a copy of it with the original name in another folder for adding the new screen to.

Replace the aia extension on the copy's project name with a zip extension:
Open the project with Windows Explorer:
Navigate to the folder containing the screen files:
Drag the files with the screen name to be copied out of the archive:
-
Edit each file:
Replace all instances of the old screen name with the new screen name:
...then save each file.
Rename the Screen files to the new screen name:
Drag a copy of the the renamed screens to the archive:
Change the project extension back to aia:
When you import the project into AI2 it will contain the new screen. If you have an <old screen name>.Initialize block in the original screen it will now be named <new screen name>.Initialize in the copied screen.
END
--
I tried similar steps as explained below for creating duplicate screen. But while upload I am getting below error 

"The selected project is not a project source file! Project source files are aia files. "

But I renamed the zip file back to .aia 

Could you please help on this

--
Email me a good copy of the project with instructions on what you want done and I will do it for you.
You can also try the 7zip method.
7zip is free software.

--
When I Rename the files back to .aia it stays as a .zip file causing it to not be able to be imported into App Inventor. How do you change the file back to a .aia file?

--
Make sure you followed the steps exactly as said.
Important : 
1. create two copies of the aia project. Say xyz.aia and xyz_copy.aia.
2. rename both files to .zip.   ==> xyz.zip and xyz_copy.zip
3. unzip xyz_copy.zip file. create copy of the screen as explained above.
4. move the newly created ( copied and then renamed ) screens from xyz_copy folder to xyz.zip
  move here is drag from copy folder to zip file using windows explorer 
5. rename xyz.zip to xyz.aia

upload this file

--
Thanks for that explanation, vasista :)
Also, I have a method that uses a third-party utility called 7zip.
It makes the process a bit easier - you don't have to rename your aia to zip then back to aia with that.
It works directly with the aia archive and recognizes it as such.
That is the method that I use.
I made the Windows Explorer method so users would not have to install 3rd-party sofware, but 7zip is safe to use.

--
Is there a way to do this from a mac?

--
Good question!
I will post this question in the MIT forum as I would like to know the answer also: https://groups.google.com/forum/#!forum/mitappinventortest
--
Is there any way to do this with the new version of App Inventor (nls-251-gc1bdb77) and the new .apk files?
When I open up the file "appname.zip", I only get a meta-inf, res, manifest, and classes.dex, all of which either lead to unhelpful things or I can't open.

--
you only can copy screens for project files (zip for App Inventor Classic or aia for App Inventor 2), not apk files!

--
Thanks seems so obvious now *facepalm*

--
Hi, I just tried this method in AI2, but it doesn't seem to work right. The new page is there, but if I attempt to click on any of the components, I get an internal message error. I was wondering if you knew what I might be doing wrong.

--
This method works with aia project files only.

--
I followed the steps for your method, but in the end I couldn't convert the zip file back into a usable aia. Whenever I try to change the extension it changes the name to having .aia at the end, but it is still a .zip folder that I cannot upload. Any ideas?

--
Work directly with the archive -- in other words you open it but -- do not do an extract. That messes things up.
I am hoping that is the problem, if not, I don't know what else to suggest.

--
That, exactly, is the problem. See here: AI Screen Manipulation

--
Nice tutorial. I need to start referring users there :)

--
Thanks Scott
--
That didn't seem to change anything. Also, I can drag the new files in to the zip folder, but from there I can't get them to the right place in the SRC folder. 
--
That didn't seem to change anything. Also, I can drag the new files in to the zip folder, but from there I can't get them to the right place in the SRC folder. 
why don't you navigate to the correct folder first before dragging the new file?

example screenshot of project basket.aia

--
That helped, but I still can't convert the zip back into an aia by renaming it, even if I don't extract the files from it

--
are you saying, you are not able to rename a file?
btw. in the example above I opened the aia file using 7zip without renaming into zip!

--
I can rename 'file'.aia into 'file'.zip as a zip folder, but when i try to rename that back into 'file'.aia I get 'file.zip'.zip as a zip folder.
Trying out the 7zip method gets more tempting as this continues to not work

--
That solved my problem, everything works now. Thank you very much for the help

--
Nice catch.

--
Can confirm this works using linux with built in archive utilities, Leafpad and Thunar

What other edits are necessary to copy only blocks/components into an existing screen. I have many situations where I have a discreet set of code, blocks and components to perform a function in a project. So this all lives in Screen 1 of the source project and I want it in Screen 1 of the target project. Generally the source code will not impact on the target pre-existing code?  ( I tend to use the old school method for multiple views, as opposed to multiple screens ;) )

--
I would recommend making multiple copies of the project that has Screen1 with the source code. Leave one untouched and build the apps that need the code from the copies. If you have already written code for the app and need to add the source code, that would be more complicated to do automatically, and you may have to add it manually.

--
Thanks for letting us know--
I don't have Linux or Mac so could not test on those.

As a follow up to your question, you can ony copy a whole screen.
That is not to say someone cannot figure out a way to add xml text representing blocks in the .bky files but they seem to contain serialized id tags that I would not know how to generate.

--

You probably have file name extensions hidden.  Since "aia" is not a recognized extension, it shows up.  When you change it to "zip", it disappears.  Then when you change it back to "aia", it reappears, but "zip" is still there, hidden.  So the file extension is really "zip" even though what you see is "aia".  Get it?
  
--
I tried this technique with an AI2 project.  It worked fine, except that, in the AI2 Designer, in the copied screen, the image (a .png asset) does not display on the canvas in the new, copied screen.  It displays fine in AI Companion on the device.  It also displays fine on the original screen (Screen1) in the AI2 Designer.  Both screens list the image file in the Designer and in the canvas backgroundimage property.

Using the technique in this thread, I took the tutorial project "PaintPot", and copied "Screen1" to a new screen "Meow_scr".  I discovered this problem when I imported the new project into the AI2 online development environment.

To test it on the device, I added a "Go to Meow_scr" button to Screen1.   It works perfectly on the device.  The cat image displays on both screens, "Screen1" and "Meow_scr" (which is an identical copy of Screen1 with all occurrences of "Screen1" having been changed to "Meow_scr" and filenames changed to the new screen name).

I also tried using a different image file in the canvas on Meow_scr.  That did not help the situation.

The bottom line is that this technique appears to work fine in AI2, but there is a quirk in how it displays in the Designer.

Any suggestions or explanations?

--
My only thought is to be sure to copy your assets if copying from one project to another.
Assets already contained in a project where the screens are being copied/added should be available automatically to the copied/new screens.
--
don't forget to change the name of the screen in Screen1.scm. e.g.

#|
$JSON
{"YaVersion":"140","Source":"Form","Properties":{"$Name":"Screen1","$Type":"Form","$Version":"18","AppName":"FileByFile_copy","Icon":"icon.png","Title":"Webprefetch File by File","Uuid":"0","$Components":[{"$Name":"Label1","$Type":"Label","$Version":"3","HasMargins":"False","Height":"-2","Uuid":"1990261919"},{"$Name":"varDownload","$Type":"VerticalArrangement",
etc.

--
That is correct if you are replacing Screen1.scm's text with <another name>.scm's text since the first screen must always be named 'Screen1'.

--
I created an application that will Copy and also Rename screens very easily.  See screens below and Link beyond that.


-- 
Looks great.
When I run the executable on Windows 10, I get a blank dialog and it goes no further:

It passed my Avast antivirus scan and Windows allowed me to run it, but not without warning.
So users may have to tell it to 'run anyway'.

--
I looked in the github link, and did not see any source code.
Am I missing something here?

--

It was done with Auto-It 3, Abraham.
He just included the executable, I think.
But he is working on a bug fix which includes the missing image files this afternoon.

--


Bluetooth Low Energy


I have tried using the extension of BluetoothLE(Bluetooth Low Energy) 
with a pulse oximeter device and a blood pressure but the read data were is not visible.I want to ask, if in addition to the connection withArduino who has no problems,
some of you managed to read the data with other tools (such as heart rate monitor wrist or other...)

--
There are quite a few examples of people who were successful using BLE.
Maybe you can post your blocks and tell what the API of the oximeter etc. is, such as UUID's and so on.

--
I purchased  this oximeter:


the blocks for the app i got them from this discussion:


The oximeter is coupled to the smartphone
but there are no data read.

Someone managed with other pulse oximeters models
to read the data?

-- 
This has not much to do with oximeters possibly, but with your use of the API it provides,
You should study their docs. For example I found this: https://github.com/Medisana/vitadock-api/wiki/Bluetooth-Access-of-the-Devices
And some other Github stuff. It seems that they have an app that collects the data and that you can process these data from there, for which you may need an access token and for which you need to write a very different type of app. It seems though that direct access to the devices is possible, but that they will not provide support.

This is totally beyond my expertise and has not much to do with APP Inventor.
Anyway, you did not tell why you did not receive any data and what you tried. Show some blocks!

-- 


Updating button status stored in TinyWebDB


I have been working on TinyWebDB lately. I was able to update the status of one button, but when I added one extra button the app acts weird. 
Hope i'll be able to explain it properly, 

There are two buttons. When I click the first one the image changes, but when I click the second one the image of the second button gets updated on the first button.
Both the buttons status are saved in different tags. I'm not able to figure out where I have gone wrong.

Here are my blocks:

-- 
for each tag you have to use its own TinyWebDB.GetValue block


also you did not understand, how asynchronous calls are working: 
first get the value and in the GotText event then do something with the received value


-- 
I understood what you trying to say also I did the changes accordingly but still doesn't solves my issue. 
The data is still updating on the first button not on the second. 
I have gone through the tutorials and read it too. Will saving the tags in a list help??

-- 
I made the changes as you said, main issue was that I was updating both the buttons on same name. I fixed it and it works well. 
But now I get "Runtime Error" which says "width must be >0" . as I went through the forum people have discussed about this issue regarding the canvas component. 
But I'm using just Image property to change the button image.

-- 
This image is the modified version of the buttons, All the buttons update are working fine but when I refresh the app only the "AC" button is updated rest of them are not, they appear to be blank.


-- 
so how does your GotValue event look like?
you should do some tutorials about TinyWebDB to understand the basics...

A very good way to learn App Inventor is to read the free Inventor's Manual here in the AI2 free online eBook   http://www.appinventor.org/book2 ... the links are at the bottom of the Web page.  The book 'teaches' users how to program with AI2 blocks.
There is a free programming course here http://www.appinventor.org/content/CourseInABox/Intro  and the aia files for the projects in the book are here:  http://www.appinventor.org/bookFiles  
How to do a lot of basic things with App Inventor are described here:  http://www.appinventor.org/content/howDoYou/eventHandling  .

Also do the tutorials http://appinventor.mit.edu/explore/ai2/tutorials.html to learn the basics of AppInventor, then try something and follow the
 Top 5 Tips: How to learn App Inventor

You will not find a tutorial, which does exactly what you are looking for. But doing the tutorials (not only reading a little bit) help you to understand, how things are working. This is important and this is the first step to do.

-- 
I tell you! you are a "GEM" Thank you for so much of patience. Problem was with my getblock I accidentally put all the condition in one if loop. oopps! my bad.

Thank you a lot really!!!


-- 

orientation sensor works on some devices , and doesn't for others


i'm just starting with app inventor , made a small test app that shows device orientation angle .
when i connect via wifi using samsung galaxy S5 all works ok , orientation sensor updates pretty fast .
when i connect LG G2 via wifi nothing works 
when i download apk to LG G2 still not working .
when i download apk to LG G3 it works , orientation sensor updates pretty slow compared to galaxy S5 .
when i download apk to lenovo tablet , again , not working .

is app inventor works only with specific IMU models ? 
image of the blocks added.  (one of the variables was used to "reset the angle" , i deleted this part from block to make it simpler)

 apk.jpg

--
try the compass example and let us know, if it works for oyu
How to build a simple compass app with App Inventor


➠ compass.aia


-- 
tried the compass app
works on galaxy s5 .
downloaded apk to lg g2 - not working . only shows the image , nothing moves .
android ver. on lg is 4.4.2 , is it too old ?

-- 
Did you try another compass app the phone that did not work?
There could be some reasons for it not working:
- the phone does not have an orientation sensor
- the sensor is not initialized, or enabled

Long ago I read of problems with it on some phones, but I forgot what it was exactly. You can try to google yourself.

--
i checked with accelerometer sensor - same . works on galaxy but not on lg .
i wrote simple code to see if sensor enabled , and it is or both devices .
how can i initialize orientation or accelerometer sensors?
found nothing googling

-- 

You did not tell me yet whether you tried to download a simple compass from the Playstore and see if that works on both phones.

-- 

-- 
sorry , it looks like the issue fixed . i downloaded sensor kinetics app from the app store . at first it didnt show data from the accelerometer and orientation .then i chose different settings in this app , like "rate :normal" or "rate:fastest" and it started to work .
now my app works also .
i restarted the phone and the app continues to work , without opening the sensor kinetics app .
strange .
maybe the sensor need some kind of initialization .

--
That would have been my next recommendation: restart your phone.
I am happy it worked!

--


Deleteing with Mit App Inventor 2 App TAG and Value create on Web with TinyWebDB


I created lists on TinyWebDB, I read the lists saved on TinyWebDB but when I try to delete them, only the gate LIST in my app but not the TAG On Web.
There is a way to clear it through the app and not connecting me to the web? .
Auto Generated Inline Image 1 표시 중
-- 
Somehow I do not understand your question. You want to delete a tag in your TinyWebDB without connection to the web?
The TinyWebdb is on the web and you can only access it when connected to it by definition.
Although you cannot really delete a tag in a TinyWebDB, you could set it to (for example) an empty string. When you find such a value, you now that it is in fact not there.

-- 
I try to use a empty string and if i must delete the TAG , i connecting by browser .

-- 


Javascript problem


I made this tutorial: https://puravidaapps.com/math.php
➠ math.aia
Everything was right, I downloaded .aia file and tested in both way, Ai companion to connect to phone, and yes it worked. Then I changed global development to false and made the build, everything was fine.

But, i made this again from scratch, made my own blocks (exactly same as original, copying the html code from tutorial page). With Ai companion way this works also but not when I made build.

What can be wrong? Page is not available it says, those times of course comes to display but it shows wrong information.

--
probably this:

Yes, you also can upload html files as assets into App Inventor! There is only one special thing to consider: 

During development, you have to use the development path to the embedded html document:
file:///mnt/sdcard/AppInventor/assets/<NAME OF YOUR HTML FILE>.html

Before packaging the app, use the production path.
file:///android_asset/<NAME OF YOUR HTML FILE>.html

-- 
Understood

I followed the tutorial and I understood there is a variable which is handling this issue and as I described with the downloaded .aia files this works fine, changing the flag is handling this path issue.

Could You tell where else those path must be fulfilled?

Have You tried made this again from zero? With a different naming of those .html files?

--
It would really help if you provided a screenshot of your relevant blocks, so we can see what you are trying to do, and where the problem may be.

-- 
 blocks_with_build.png

 blocks_ok_with_ai_connect_yhd.png
Here is my blocks&screenshot from my device&html file:

Unfortunately those pictures are before text, I don understand how to modify the page lay-out to be clever outlook...


-- 
in the designer, set clock enabled to false

-- 
Doublecheked, it was false and it is false, same error still.

-- 
this seems to be a small timing issue
try to set the timer interval  a litte bit higher

-- 
Maybe some timing issue.

I believe there is some bigger problem.

I made a tiny app where I have animated gif (showing it on webviewer). Everything is OK until I make this production to my device, It not working anymore.

Is it only me who has this kind of problem with webviewer?

I am running with ubuntu 14.04 +firefox 49.0+Asus tablet&Sony phone.

This html usage with Ai2 would be nice and expands the possibilities but because it is broken I cannot use it...

--