I've been working with Scott's calculator, following this great tutorial but I got an issue , well for me.
You press N1 + N2 = N3 and works great. But if you try something like this : N1+N2+N3 = calculator just remember last 2 numbers so in this case I just get the result of N2+N3 . So calculator it's not working with more than 2 operands (the last 2) . So it's necessary you click equals after 2 operands. SO how can I fix this? I've thinking and trying but nothing seems to work. Any help would be extremely appreciated :)
--
With the Math Blocks basic operands,display with block + block or block - block or block x block. By left clicking the blue box on the control, you can change that to allow: block + block + block or block x block x block x block x block Knowing that might help.
You may have to save the result of the first to calculations, then do the second. For instance, consider putting the result of N1+N2 into a global called TemporaryStorage. Initialize TemporaryStorage to zero at the beginning of a calculation session. so any the result of N1+N2 = N1+N2+temporaryStorage ; now temporaryStorage has the result of N1+N2 so, when you do +N3, you might get temporaryStorage + N3.
This is just a idea of how your logic might go. Try some things. When you arrive at a solution, come back and tell us what works.
Perhaps will read the post and have some ideas too?
Was this helpful?
--
Hey Steve,
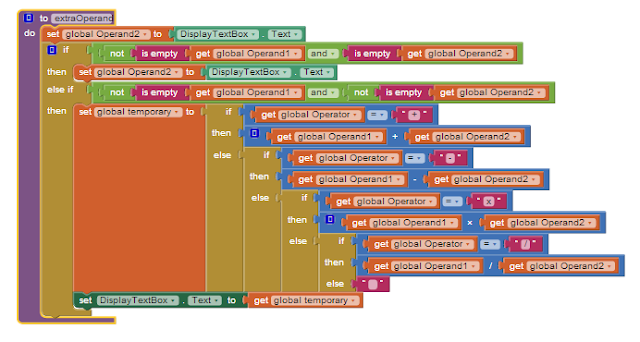
Thank you for your help, you gave me some ideas (the temporary result).. I guess I fixed this I added a new procedure
I add this procedure to each operator button :D and it's working. Thank you a lot. So now I'm able to get the result of adding any numbers when I press equals . So I can N1+N2+N3 -N4-N5=N6 or whatever jeje Remember please to check Scott's tutorial to fully understand this procedure :D
--
Yes, Eduardo I had to figure out how to work around that.
So to do 3 + 4 + 6 you would do it this way:
3 + 4 = (7 displays) + 6 = (13 displays) etc.
--
Hey Scott, that worked very well. I replace "," with "." and fixed the problem, So I took a pic if anyone want to see the blocks to use them :D, thank you very much Scott!
Thanks for posting the app and tutorial - it's helping me learn alot. I've used your code as a launching pad to stretch myself a bit. I am stuck on one point (there may be more under that) but lets say one for now. would you be willing look at my .aia and see where I went wrong?
--
Sorry, my support for this site is on hold for at least the near future.
--
Hi Keith,
I may be willing to help you out (not this week though). But it would help if you could point out what your problem is.
--
Hi! Is possible delimit the number of digits of a text box? For example, when the number of digits exceed the screen limit, then the next digit to go to the below line?
I know this is possible with the label, as in Scott's calculator, but I need the text box .. Thanks.
--
I was just wondering if you knew a fix for when you press 0 as the first digit it doesn't repeat itself when you click it again??
--
Just check if the label.Text = '0' then you will know not to let it put another 0 there.
When a digit is entered after equals buton is pressed, the result is cleared before displaying the digit.
This fixes the bug where the digit was appended to the result.
2013-11-23:
Added C (clear) button explanation.
---
This calculator is a good exercise in using some of the basic features and blocks of App Inventor 2.
It supports entering whole positive numbers only to keep things as simple as possible, but does provide some error handling without too much fuss.
The four functions add, subtract, multiply, divide are supported.
Chain calculations can be done as follows: 3 + 4 = (7 is displayed) * 3 = (21 is displayed) etc.
You may either download the aia project or recreate it with the following instructions.
Start MIT App Inventor 2 and give your project the name MyCalculator
Designer
In the Designer, Set the Screen Title to My Calculator
Uncheck Scrollable.
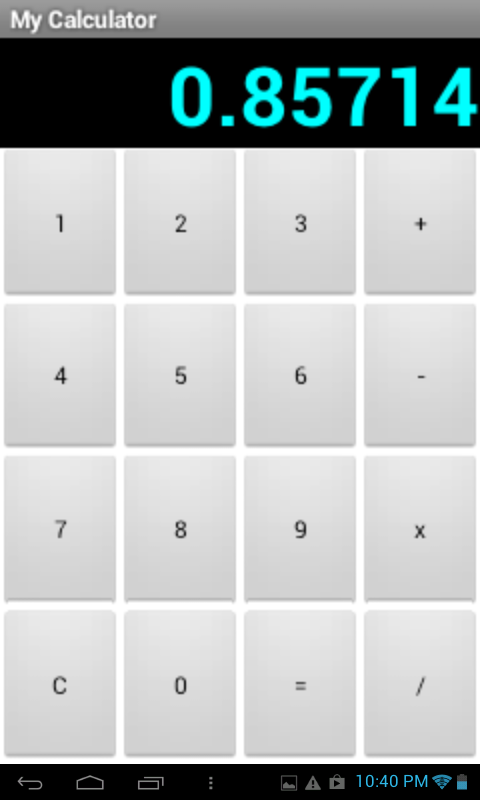
Calculator Display:
Create a label named DisplayLBL
Set it's properties as follows:
BackgroundColor Black
FontBold checked
FontSize 48
Text (empty)
TextAlignment right
TextColor Cyan
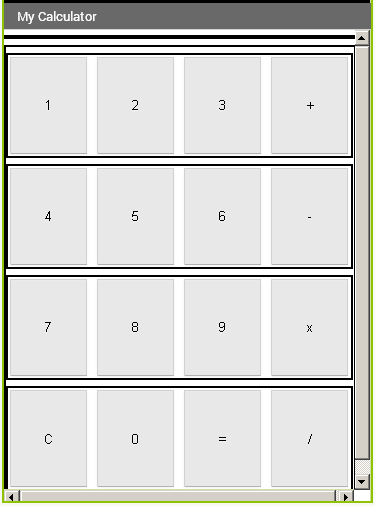
Numeric Keypad:
I chose to use the cell phone keypad layout rather than the traditional calculator layout.
Below this put a VerticalArrangment set to Fill parent in width and height
Inside the VSA put four HorizontalArrangements
Set each to Fill parent in width and height
Inside each HSA put four buttons (16 buttons in all)
Set each button's Text as follows:
1,2,3,+
4,5,6,-
7,8,9,x
C,0,=,/
Rename these buttons as follows:
OneBTN,TwoBTN,ThreeBTN,AddBTN
FourBTN,FiveBTN,SixBTN,SubtractBTN
SevenBTN,EightBTN,NineBTN,MultiplyBTN
ClearBTN,ZeroBTN,EqualsBTN,DivideBTN
Then set each button's Width and Height to Fill parent
That is all for the Designer!
Your Viewer pane in the Designer should look like this:
Blocks Editor
Now switch to the Blocks editor
Drag out ten Button Click blocks -- one for each of the digits 0 to 9.
Consider what happens when the user touches one of the digit buttons.
Suppose DisplayLBL.Text contains 45 and the user touches the 6 button.
You want 456 to display. This can be done with the 'join' Text block.
You can write blocks inside each of the digit click blocks to do this, but a more efficient way is by using a reusable procedure block.
Here is how to make a reusable procedure that can be called from each of the ZeroBTN to NineBTN Click blocks to join digits to the number in DisplayLBL.Text.
In the Blocks panel, Procedures section, drag out a 'to procedure do' block
Rename it to AddDigit
Add an argument named digit to this procedure to allow us to pass the value of the digit pressed.
Inside the procedure place a 'set DisplayLBL.Text to' block.
Attach a Text 'join' block to this.
Inside the join block put a 'DisplayLBL.Text' and a 'get digit' block.
The procedure should look like this:
Now we can add a call to this reusable procedure in each of our digit button blocks.
Here is what the OneBTN.Click block looks like with a call to AddDigit. Do this for ZeroBTN.Click to NineBTN.Click as well.
At this point the user can type digits into the display.
We now need to be able to perform an arithmetic calculation based on two operands and an operator.
The user touches the digit buttons (ZeroBTN to NineBTN) for Operand1 first, then touches an Operator button(AddBTN,SubtractBTN,MulitplyBTN,DivideBTN), then digit buttons for Operand2, and finally the EqualsBTN.
Create three global variables:
Operand1, Operator, Operand2
Set their default values to Empty Text.
Suppose the user has typed in a number for Operand1, then touched an Operator button.
We need to save the typed number in DisplayLBL.Text in Operand1, clear the text in DisplayLBL.Text and remember what Operator was touched.
After the user has typed in Operand2 into DisplayLBL then pressed the EqualsBTN button we can determine what arithmetic operation to perform by looking at the saved Operator.
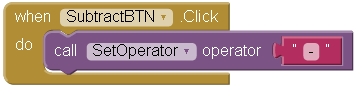
Create a procedure called SetOperator with an argument operator.
When this procedure is called from one of the four operator Click blocks (AddBTN.Click,SubtractBTN.Click,MultiplyBTN.Click,DivideBTN.Click):
Operand1 will contain the first number typed in
DisplayLBL.Text will be emptied for the next number to be entered
The operator symbol will be saved in global Operator variable
Here is a call to SetOperator from the SubtractBTN.Click block. Repeat this for the AddBTN.Click, MultiplyBTN.Click and DivideBTN.Click blocks:
Finally, when the user touches the = symbol button, the EqualsBTN.Click block is triggered.
At this point we need to store the contents of DisplayLBL.Text in global Operand2.
Next we need to determine what operation to perform based on the symbol stored in global Operator.
This is accomplished with 'if then else blocks' that return the calculated value to DisplayLBL.Text
The blocks to do this are as follows:
The initial blocks in EqualsBTN.Click make sure that there are numbers in the operand and operator variables. This is one example of error handling.
Finally, the C (clear) button clears the display and resets the variables:
At this point you can test your project. If there are errors, compare it to the attached project.
MyCalculator.aia -- Thank you very much Scott for your post I'd like to ask you an extension to your tutorial to test Storage.
Would you please add an example of Log of all
input and output to test TinyDB?
Or maybe you can suggest an example (url)
--
I have worked on that somewhat but it is a much more complex app when testing Components. I may create several apps linked by a menu app - each focused on a component category such as User Interface or Storage (which contains TinyDB).
Your question was the spark that I needed to figure out how to do it in a manageable way, so thanks!.
--
Hi Scott, thanks you for this tutorial, is really usefull. I have a question: when I do an operation the result appear in the screen, but when I press another number, it add to the result appeared after the operation, are there a form that the result disappear when I press another number? I'm trying to do it but can't found the form. Thanks you again and sorry about my bad explanation, I'm Spanish and my english is not so good. If you have a question about my problem, you don't have any doubt to ask me.
--
I have corrected this and attached the modified project, version 2.
I used a Hewlett Packard calculator similar to the one you show in the video for a physics class.
It had no equals button but used reverse polish notation to enter formulas with an Enter button.
A bit of a learning curve to use but it did not require entering braces or parenthese if you entered the formula by following the order of operations.
I also see the possibility of an App Inventor user making a simulation of the mechanical calculator or perhaps a mechanical adding machine.
Thanks for the video.
--
You could show how this correction was in its second version.
--
I'm developing a similar application with your but I would go showing the command line values that are entered and only after the equal button is pressed, the values would be calculated and the result shown. i'm just broke my head with this but could not yet reach a conclusion. Maybe you have any idea what you can give me.
My idea came from own calculator that comes with the android system cell, where the values are entered and being shown simultaneously on the display and when you press the equal key, the result is shown. I do not got to repair if it works this way RPN that you mentioned, but I think so.
I tried using lists to store the values and go showing them on the display but without results.
I am trying to create formulas like " NaAl3(SO4)2(OH)6" by tapping the buttons.
--
The Android SDK has features that help with custom keyboards. If someone in the open source project wanted to interface these with App Inventor, that would be a good project. But we don't have the resources at MIT to commit to this.
--
thanks for your interest
--
" NaAl3(SO4)2(OH)6" is not possible, AI2 does not have the numerical subscripts. However, NaAl3(SO4)2(OH)6 is possible. What you are trying to do is create a type of calculator, probably keeping track of valance etc. That is going to be very complicated. If you only want the formula, just add some numeric buttons, then set each key to concat to a string, where you have a global formula string using the Text Join. Use the blue icon to provide as many joins as necessary. The sodiumaluminumsulfate ?? would require the Na join AL join 3 join ( join etc., Something like that will do the display- it will not format the chemical symbols To provide the proper number of atoms, you will need is a fancy algorithm to make this automatic.
Something you might do is use a Webviewer component to go to this url: http://balance-equation.appspot.com/ and use the chemical equation builder. If you do the chemical balancing using AI2, you need to replicate the algorithm used to produce the results at that web page.
--
thank you so much.you are right.i want to provide this automatic. this is just small part of my project but ' the key point'.Everything depends on the formulas...i think i must give up
--
To be able to handle superscripts and subscripts you can use a string of Image components in a horizontal screen arrangement. then have images for all chemical symbols, superscripts and subscripts created with an image editor like GIMP (it supports typing text and can do superscripts and subscripts) and they can even be different sizes as long as they don't extend over or under other symbols. You would put the component name blocks for each Image component in a list and using an index, add symbols to the images using Image component advanced Image.Picture to blocks.
According to the > documentation < you use the Duration method to get the milliseconds between instants in time.
Then it is a matter of using the MakeInstant method to set the start and end dates and give Duration the instants it needs as input.
MakeInstant takes a "MM/DD/YYYY" string as input and you will need two of them -- one for the start date and one for the end date.
The last step is to convert the milliseconds returned by Duration to days to get the days between the two dates.
> Google < says there are 86400000 milliseconds in a day so divide the milliseconds returned by Duration by 86400000 to get the number of days between the dates.
--
Nice example Scott,
You can also add or subtract days, hours, minutes, seconds, weeks and years from an instant in time - there are dedicated blocks for these.
--
just another doubt .. if i put it as "12/2/2013 + 1 "..( i.e using appropriate math block) will it be treated as 13-2-2013.. and can > and < functions be used to check if current date is lesser or greater date when compared to a fixed date ?
--
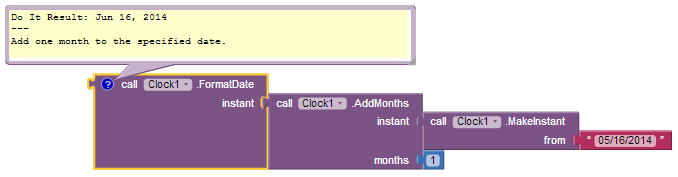
if i put it as "12/2/2013 + 1 "..( i.e using appropriate math block) will it be treated as 13-2-2013
No. You must use the AddMonths method (If your date format is MM/DD/YYYY then to add one month to the date):
If your date format is DD/MM/YYYY then you would use the AddDays method instead to add one day to the date.
...functions be used to check if current date is lesser or greater date when compared to a fixed date ?
Convert each date to milliseconds and compare that. An earlier date will have fewer milliseconds than a later date:
-- In case you have never used a Clock component before,
you have to pull one in from the Designer screen to get access to all the time conversion blocks.
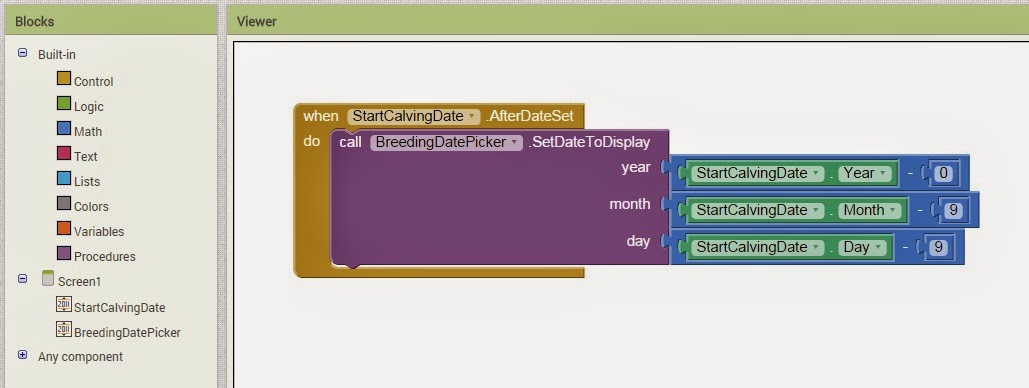
I'm attempting to build a date calculator that allows a user to select a date and then receive the date that is a certain number of days before the selected date. I've tried using the date picker to do this, with the user selecting the date on the first date picker and receiving the date on the second.
It seems that each part of the date (day, month, year) function independently of the other parts. Simply subtracting a number of days does not work. If each part is broken up into X number of days and X number of months, it works but the message "Error 2401: The date you entered is invalid" appears after selecting the date if one of the parts becomes a negative number.
Is there something I'm missing in this or am I approaching it from the wrong direction? It would be nicer for it to simply read the calculated date as text in a label, but I haven't figured out how to make that work. Thanks for any ideas folks can provide.
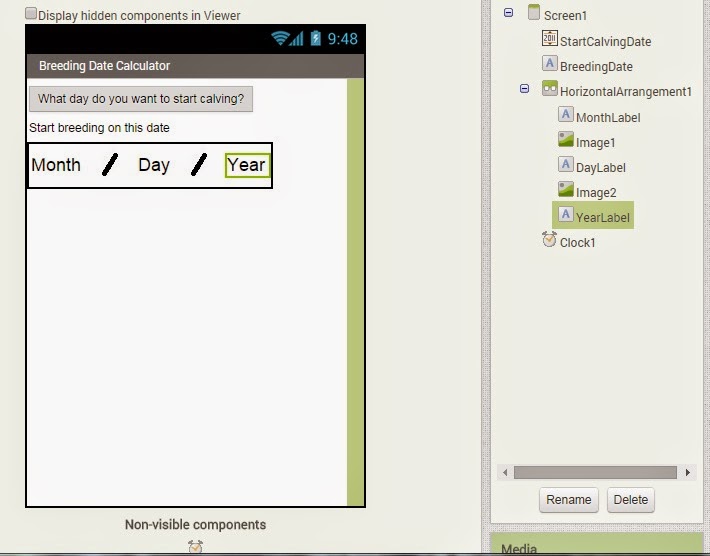
Designer
Blocks
-- well, it's a little bit complicated
you have to use the methods of the clock component to be able to calculate with dates
It might be appropriate to do what you want with calving time.
Another thing that might help you for ideas is to use the Search for topics block at the top of this page to the right of the colorful Google and type search terms like clock or date or date clock and then do the tedious work of finding if any of the discussions are relevant to your project.
Worked like a charm. I changed the 2nd date picker into a series of labels so it read rights right off the screen instead of having to push the second button. Screenshots below, if someone else is interested in trying this. Thanks for both of your help!
--
I have been looking fo something just like this, would it be possible to get an .aia file for it?
--
the aia file you can find in this thread
small tip: just take a look at my previous post in this thread...
--
Yes thanks, I was hoping to get the cowboy version with the single picker as well, I can't quite read the screen shot on my display. Both very good.
I am trying to make a calorie calculator that will allow the user to find their number of calories burned by choosing which workout they did and then the calculator will show how many calories that workout was worth. Does anyone have any idea on what blocks I need to be using? I have found basic calorie calculator tutorials on the internet, but nothing that went to the detail of choosing a workout then being able to display that and how many calories it was worth.
--
You will need Math blocks to do the calculation. Probably will use lists and TinyDb to store info about the exercise or you may want to access a web page and 'scrape' data if you are an accomplished programmer or use a more sophisticated database.
Workouts? Hmmm. The way I figure out stuff like that is to do a web search.... this is what I found using exercise calories burned ....perhaps something is useful in one of the links there:
If you can't find documentation for the activities you want to start, one way to figure out how to set the properties is to start up the activity manually and look at what appears in the Android System Log. For example, if you use YouTube to play a video, you'll see in the log:
If you can find the "cmp=" string, then the ActivityPackage is the part before the slash, and the ActivityClass is is the entire "cmp=" part, without the slash character. As in the YouTube example, there may also be "dat=" information that can specify with the DataUri property.