For questions, comments, or suggestions, please contact: Natalie Lao, natalie@csail.mit.edu
What it does:
What it does:
⦁ Drive around an EV3 LEGO robot by tilting a phone or tablet.
⦁ Tilting forward makes the bot go forward, back --> back, right --> right, left -->left. A steeper pitch will make the robot drive faster… etc.
Making the app:
In the Designer:
1. Drag a ListPicker and two Buttons into the Designer. You can position them however you wish, but in this example, I used a VerticalArrangement with evenly spaced empty label paddings.
2. Name the ListPicker “ConnectListPicker” and change its text to “Connect”. Name the first Button “StopStartButton”, uncheck the “Enabled” property, and change its text to “Start”. Name the last button “DisconnectButton” and change its text to “Disconnect”.
3. Drag out a Label and name it “TiltInstructionsLabel”. Set its text to “Tilt to control robot” and uncheck its “Visible ” property.

4. Drag a BluetoothClient, an AccelerometerSensor, and an Ev3Motors component into the Designer.
5. Go to the Ev3Motors’ Properties. Change the “BluetoothClient” property from “None” to your BluetoothClient component. Change “MotorPorts” to BC (default motor ports from EV3 assembly instructions).

In the Blocks Editor:
1. We first program the ConnectListPicker to be able to find the EV3 over Bluetooth and connect to it.
a. Open the ConnectListPicker drawer and drag out the “when .BeforePicking” block
b.Open the ConnectListPicker drawer and drag out the “set .Elements to” block
c. Open the BluetoothClient drawer and drag out the “.AddressesAndNames” block
d. The blocks should look like this:

e. Open the ConnectListPicker drawer and drag out the “when .AfterPicking” block
f. Open the Control drawer and drag out a “if/then” block
g. Open the BluetoothClient drawer and drag out the “call .Connect/address” block
h. Open the ConnectListPicker drawer and drag out the “.Selection” block
i. Open the StopStartButton drawer and drag out the “set .Enabled to” block
j. Open the Logic drawer and drag out a “true” block
k. The blocks should should look like this:
2. The DisconnectButton allows us to disconnect from the EV3
a. Open the DisconnectButton drawer and drag out the “when .Click” block
b. Open the Ev3Motors drawer and drag out the “call .Stop/useBrake” block
i. ༢Set useBrake to “true” (from the Logic drawer)
a. Open the StopStartButton drawer and drag out the “set .Text to” and “set .Enabled to” blocks
i. Set the text to “Start” (from the Text drawer)
ⅱ. Set .Enabled to “false” (from the Logic drawer)
a. Open the BluetoothClient drawer and drag out “call .Disconnect”
b. Open the TiltInstructionsLabel drawer and drag out the “set .Visible to” block
i. Set .Visible to “false”
a. Open the AccelerometerSensor drawer and drag out “set .Enabled to”
i. Set .Enabled to “false”
a. The blocks should look like this:
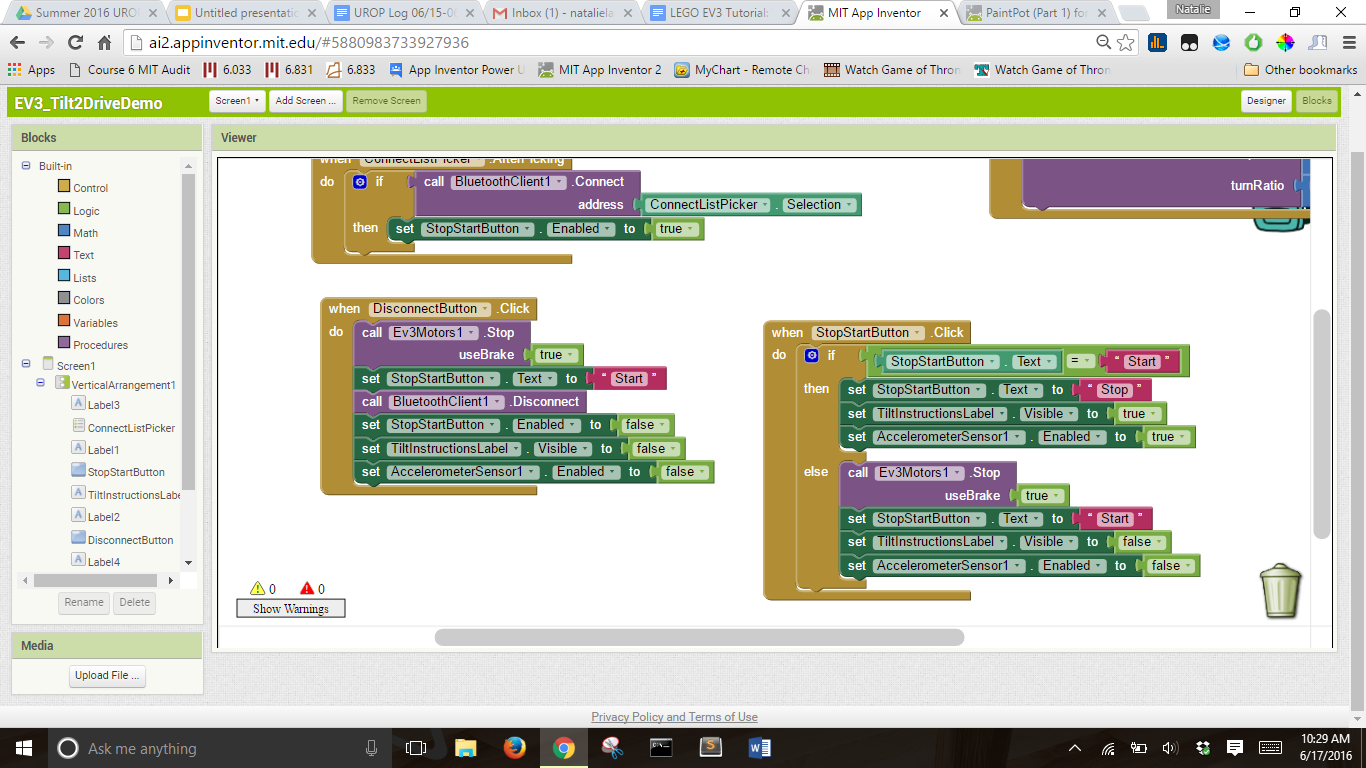
3. Control what happens when the StopStartButton is clicked
a. Open the StopStartButton drawer and drag out the “when .Click” block
b. Open the Control drawer and drag out the “if/then” block
i. Click the blue settings button and drag an “else” block into the “if”
a. If the Button’s current text is “Start”, we set its text to “Stop”, show TiltInstructionsLabel, and enable the accelerometer
b. If the Button’s current text is “Stop”, we brake the robot, set the button’s text to “Start”, hide TiltInstructionsLabel, and disable the accelerometer
c. The final block should look like this:

4. When the accelerometer is enabled, it controls the speed and direction of the EV3 robot
a. Open the AccelerometerSensor drawer and drag out the “when .AccelerationChanged” block
b. Open the Ev3Motors drawer and drag out the “call .RotateSyncIndefinitely” block
c. Open the Math drawer and drag out two multiplication blocks
d. Open the Math drawer and drag out two number blocks
e. The power parameter represents how fast the wheels of the robot are turning
i. We want the robot to go forward when we pitch the phone forward, so we hover over the “xAccel” variable of this “when” block to “get xAccel”. We multiply “get xAccel” by a number to increase its effects
ⅱ. This multiplication block plug into the power variable
a. The turnRatio parameter represents the difference in turn speed between the two wheels (i.e. how much the robot is turning). A turnRatio of 0 means the robot is going in a straight line
i. We want the robot to turn when we pitch the phone left or right, so we use the “get yAccel” block. A negative multiplier worked for me in this case.
a. If these multipliers don’t correspond to how fast you want your robot to go or the correct direction, you can test it and change the values.
b. The final block should look like this:

AIA and APK files:
⦁ APK
⦁ AIA
Instructions for running the app:
1. Make sure the motors are plugged into ports B and C on the EV3 Brick.
a. If you want the motors in other ports, you can change the “MotorPorts” property in the Designer for the EV3Motors component.
2. Turn on Bluetooth for your phone/tablet
3. On the LEGO EV3 Brick, make sure Bluetooth is turned on AND iPhone/iPad/iPod is off for the EV3 ("Settings")
4. Pair tablet with EV3 (passcode is probably 1234 but will show up on the EV3 Brick screen)
5. Once pairing is complete, open the EV3_Demo app
6. Click "Connect" and connect with the EV3
7. Press "Start"
8. Tilt to play
Notes:
⦁ It sometimes takes several seconds or multiple tries for the "Stop" button to register.
⦁ Wait a few seconds after disconnecting to reconnect.
⦁ If editing the app while connected via AI Companion, the phone/tablet will sometimes disconnect from the EV3 robot and the app has to be re-downloaded.
This tutorial lets you make an app that drives around an EV3 LEGO robot by tilting a phone or tablet. Tilting forward makes the bot go forward, back --> back, right --> right, left -->left. A steeper pitch will make the robot drive faster… etc.
App Inventor 2 tutorial-1.
App Inventor 2 tutorial-1.
Tutorial Version: App Inventor 2
Tutorial Difficulty: Intermediate
Tutorial Type: LEGO® EV3
댓글 없음:
댓글 쓰기