How to create a Service Account for Fusion Tables with the Google Developers Console
Fusion Tables are a great cloud-based way to hold data for your App Inventor app. Before you can use Fusion Tables, you need set up several things.
Create Google Developers account.
Create a project under that account
Set up the project to be able to use the Fusion Tables API
Create a service account for the project
Create a Fusion Table and associate it with the Service account
Steps A-E are one using the Google Developer console.
Once you’ve done all this, you can use Google Docs to create a Fusion table associated with the service account. Finally, you can work in App Inventor to create an app that uses the Fusion table.
1.0 - Start a Developers Console Project
If you already have a Google Cloud project, you’ll see the project name in a dropdown at the top of the page. You can create the service account under that existing project. Go to step 1.1.
Alternatively you may want to create a new project to use with your service account. Choose create a project from the dropdown. Google will ask you for a project name. Choose a name that does not include spaces.Fusion.

(You can always get back to the project manager from the upper-right corner of the console, next to the search bar)
(If you already have a project in the Console, it is automatically selected. You can make another one just for your Fusion Tables if you like, from the Project Manager)
Google will also ask you to specify a billing account for this project. Note that you can use this project for as many service accounts as you like.
You need to set up a billing account if you don’t already have one. Follow the directions at Google Cloud Platform Help: Manage your billing account to create a new billing account. Then select that account as the billing account for your new project.
When your new project is set up, you can return to console.developers.google.com and you should see your new project in the propdown at the top of the screen.
1.1
1.2
2.0 - The API Manager
2.1
2.2
After it is enabled, the button will change, and it will prompt you create credentials.
(The API is only enabled for the currently selected project. If you only have one, no problem)
2.3
If you came from the “Go to Credentials” button (2.3), then find the sentence that says "If you wish you can skip this step and create an API key, client ID, or service account." Click on "service account"

3.1 (alternative to 3.0)
If you didn’t come from the “Go to Credentials” button, select “Credentials” after selecting the API Manager in the Developer's Console menu.

3.2
3.3
Give it a simple name without spaces, like fusiontables.
Check "Enable Google Apps Domain-wide Delegation"
After a moment, it will report "Service account created." Click "close"
3.4 Service Account ID (email address)
You should now see a page entitled “IAM & Admin” that shows the service accounts for your project. It should look like below, with the new service account listed and a (long) email address, entitled “Service account ID”. You will need that email address later in App Inventor.
If you need to get back to this IAM & Admin page, you can find it by going to developer console https://console.developers.google.com and selecting IAM & Admin from the three horizontal lines menu at the upper left. Then select either Service Accounts or Permissions to see the email address (service account id).

3.5 Get your Key
With a service account now set up, you can get a key to bring into App Inventor.
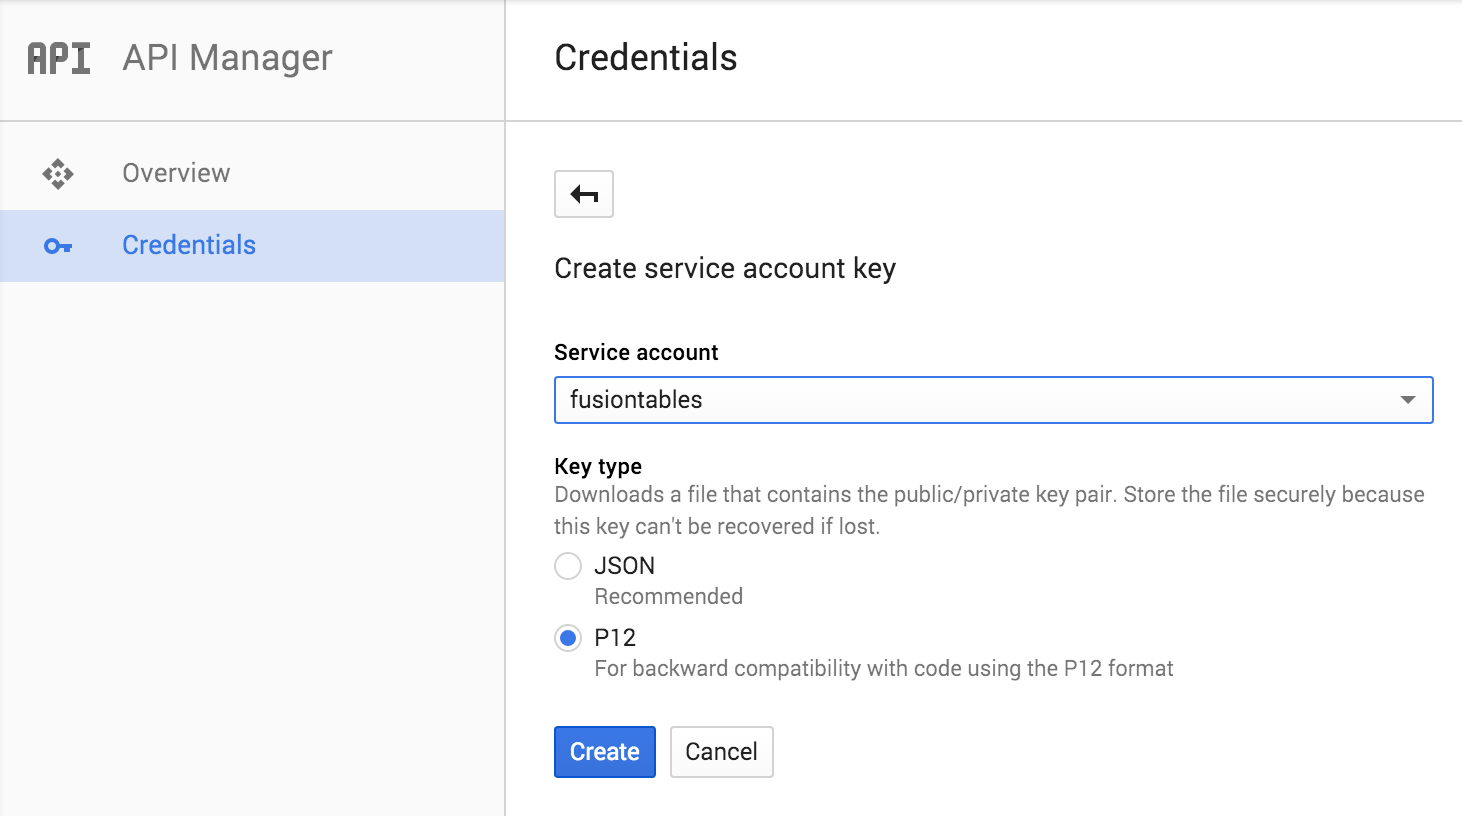
Choose that you want a service account key.
Choose which account you want a key for (you probably only have one, the one we just created -- select it from the dropdown list, and select Key type: P12. Click “Create.”

You will immediately download a new file that ends in .p12. This is the file you will need to upload into App Inventor.
If this file has any spaces in its name, rename the file to remove the spaces. App Inventor will reject the file if it has spaces or strange characters in the name, so you might as well check it now.
You’ll also be given the option of creating a password for the key, with the initial password “notasecret”. You can leave this as it is, unless you want to make your service account App Inventor app.
Whew! That was a long process. At the end of all this, you should have a service account, together with an account id (email address) and a p12 service account key.
You’re now ready to go ahead and create a fusion tables that use the service account and create App Inventor apps that use these Fusion tables. Part 4 of this document shows how to create Fusion tables and share them with your service account. Part 5 reviews what information you need to provide to App Inventor in order to create apps that use the tables.
4.0 Creating a Table
You now have the ability to share Fusion tables. Here we discuss how to create tables to share.
Open Google Drive at drive.google.com
4.1 “Connecting” Fusion Tables to Drive
Click “NEW”, then “More”, then “Connect more apps”.
4.2 Create a new Table
It will ask you if you want to import an existing data file, or to start with a completely empty new table. The choices here are yours, and yours alone! Afterwards, it will bring you into your new Fusion Table.

How to set up the table’s data and structure depends on your app, so that is outside the scope of this document.
4.3 Share the table with the Service Account
For App Inventor to be able to access this table, it must be shared with the Service Account email you created.
In the Fusion Table, click "Share"
Under "Invite people" enter your service account email, from the Developer Console (e.g. myservice...@developer.gserviceaccount.com)
Ensure "Can Edit" is selected.
Unclick "notify people" (the service account isn't a real person so it doesn't care about the notification)
Click "OK", and when it says "skip sending notification?" click "OK".
Click “Done”
5 What you need to bring into App Inventor
Now you’re ready to use your table in an App Inventor app such as Pizza Party. You can follow the tutorial here.
Here’s an overview of what you’ll need
- Service Account Email address (also called service account ID)
- Service Account key file (.p12)
- Fusion Table ID code (see below)
The Service Account email and keyfile are discussed above. (Section 3.4 and 3.5).
When you create your app, you’ll need to copy and paste the service account email address into the ServiceAccountEmail property of the Fusion Tables component in App Inventor.
You’ll also need to upload the key file as media into App Inventor. In the Fusion Tables component properties, select the KeyFile to the file you uploaded.
You’ll use these in setting up the FusiontablesControl component in your app. You’ll need to
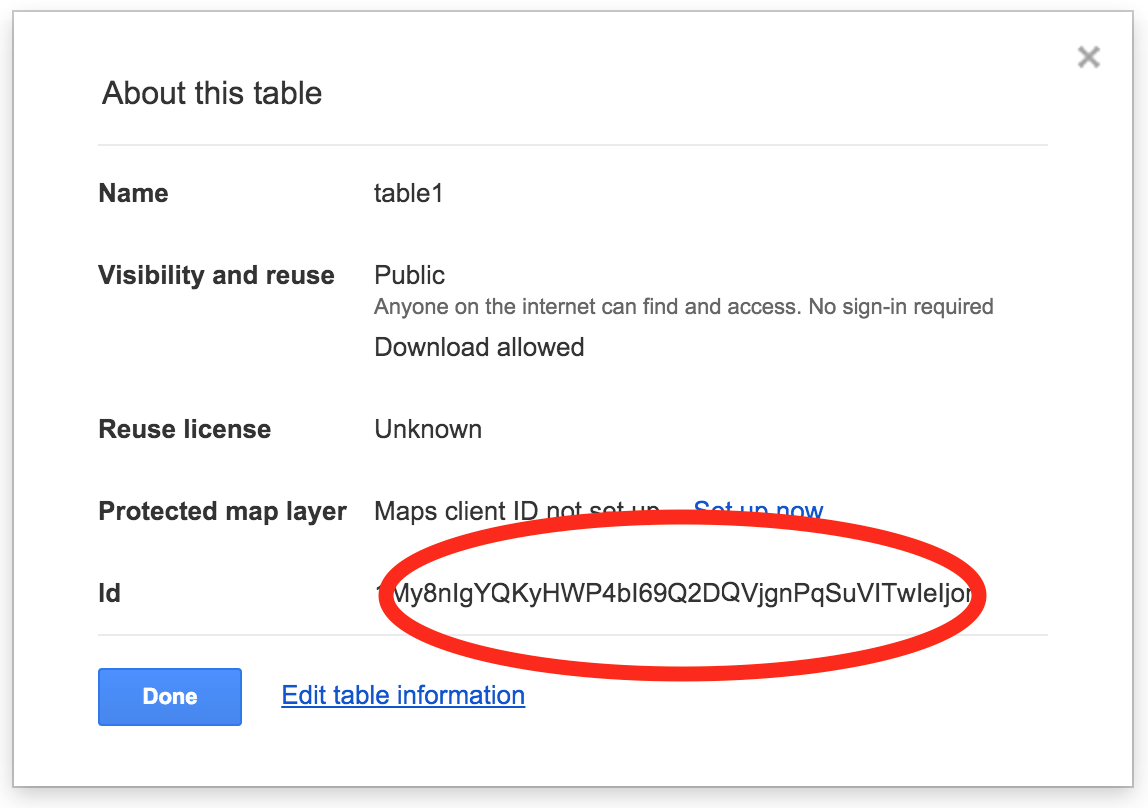
You will also need the Table ID. In the fusion table itself, go to “File > About This Table”. The ID is the last row. Copy it and paste it into a new text block in App Inventor.

댓글 없음:
댓글 쓰기