Grove - LED Bar
Introduction
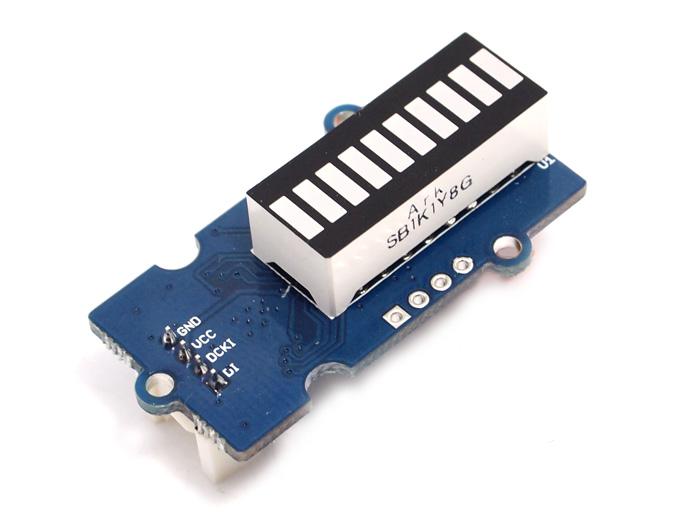 | 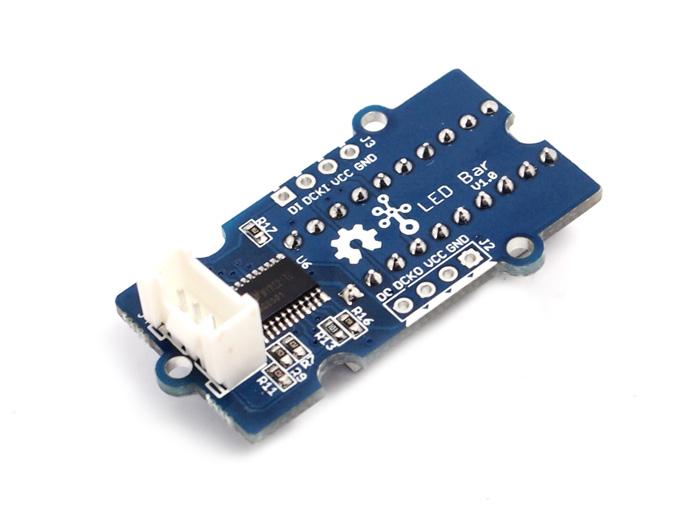 |
Grove – LED Bar is comprised of a 10 segment LED gauge bar and an MY9221 LED controlling chip. It can be used as an indicator for remaining battery life, voltage, water level, music volume or other values that require a gradient display. There are 10 LED bars in the LED bar graph: one red, one yellow, one light green, and seven green bars. Demo code is available to get you up and running quickly. It lights up the LEDs sequentially from red to green, so the entire bar graph is lit up in the end. Want to go further? Go ahead and code your own effect.

Features
- Input Voltage: 3.3V/5V
- Each LED segment can be controlled individually via code
- Intuitive display
- Flexible power option, supports 3-5.5DC
- Available demo code
- Suli-compatible Library
Tip
More details about Grove modules please refer to Grove System
Platforms Supported
Arduino Wio BeagleBone Raspberry Pi LinkIt ONE 


Caution
The platforms mentioned above as supported is/are an indication of the module's hardware or theoritical compatibility. We only provide software library or code examples for Arduino platform in most cases. It is not possible to provide software library / demo code for all possible MCU platforms. Hence, users have to write their own software library.
| Arduino | Wio | BeagleBone | Raspberry Pi | LinkIt ONE |
|---|---|---|---|---|
Caution
The platforms mentioned above as supported is/are an indication of the module's hardware or theoritical compatibility. We only provide software library or code examples for Arduino platform in most cases. It is not possible to provide software library / demo code for all possible MCU platforms. Hence, users have to write their own software library.
Note
More details about Suli-compatible Library, please refer to SuliDemonstration
With Arduino
This is a simple demo which can you help you to start with Grove - LED Bar quickly.
We need a Seeeduino V3.0 and a Grove - Base Shield as well.
Hardware Installation
Plug the Grove - LED Bar onto the digital port 8 on Grove - Base Shield, and then plug the base shield onto Arduino.
Download Code and Upload
You can download the library in github, click here, then extract it to libraries folder of Arduino.
Then open Arduino IDE, File -> examples -> LED_Bar -> Level, you can open the demo code.
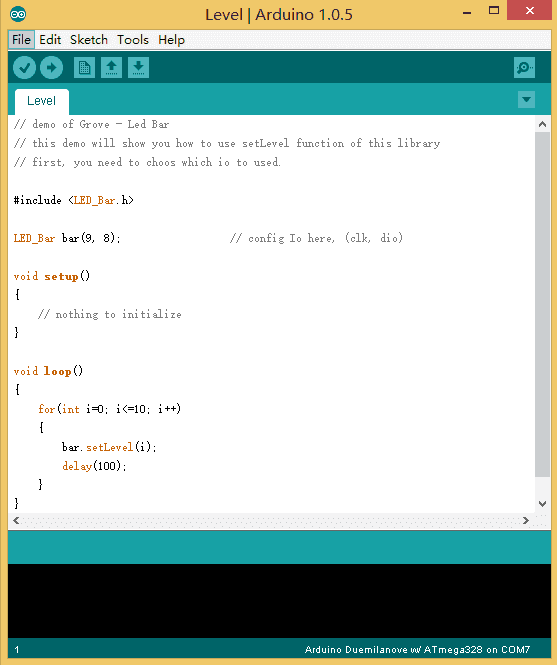
Click Upload to Upload the code, if you have any problem about how to start Arduino, please click here for some help.
Working Now
Your Grove - LED Bar is working now, it’s shine.
With Raspberry Pi
1.You should have got a raspberry pi and a grovepi or grovepi+.
2.You should have completed configuring the development enviroment, otherwise follow here.
3.Connection
- Plug the sensor to grovepi socket D3 by using a grove cable.
4.Navigate to the demos’ directory:
cd yourpath/GrovePi/Software/Python/
- To see the code
nano grove_ledbar.py # "Ctrl+x" to exit #
import time
import grovepi
import random

# Connect the Grove LED Bar to digital port D5
# DI,DCKI,VCC,GND
ledbar = 5

grovepi.pinMode(ledbar,"OUTPUT")
time.sleep(1)
i = 0

# LED Bar methods
# grovepi.ledBar_init(pin,orientation)
# grovepi.ledBar_orientation(pin,orientation)
# grovepi.ledBar_setLevel(pin,level)
# grovepi.ledBar_setLed(pin,led,state)
# grovepi.ledBar_toggleLed(pin,led)
# grovepi.ledBar_setBits(pin,state)
# grovepi.ledBar_getBits(pin)

    while True:
        try:
        print "Test 1) Initialise - red to green"
        # ledbar_init(pin,orientation)
        # orientation: (0 = red to green, 1 = green to red)
        grovepi.ledBar_init(ledbar, 0)
        time.sleep(.5)


        print "Test 2) Set level"
        # ledbar_setLevel(pin,level)
        # level: (0-10)
        for i in range(0,11):
            grovepi.ledBar_setLevel(ledbar, i)
            time.sleep(.2)
        time.sleep(.3)

        grovepi.ledBar_setLevel(ledbar, 8)
        time.sleep(.5)

        grovepi.ledBar_setLevel(ledbar, 2)
        time.sleep(.5)

        grovepi.ledBar_setLevel(ledbar, 5)
        time.sleep(.5)


        print "Test 3) Switch on/off a single LED"
        # ledbar_setLed(pin,led,state)
        # led: which led (1-10)
        # state: off or on (0,1)
        grovepi.ledBar_setLed(ledbar, 10, 1)
        time.sleep(.5)

        grovepi.ledBar_setLed(ledbar, 9, 1)
        time.sleep(.5)

        grovepi.ledBar_setLed(ledbar, 8, 1)
        time.sleep(.5)

        grovepi.ledBar_setLed(ledbar, 1, 0)
        time.sleep(.5)

        grovepi.ledBar_setLed(ledbar, 2, 0)
        time.sleep(.5)

        grovepi.ledBar_setLed(ledbar, 3, 0)
        time.sleep(.5)


        print "Test 4) Toggle a single LED"
        # flip a single led - if it is currently on, it will become off and vice versa
        # ledbar_toggleLed(ledbar, led)
        grovepi.ledBar_toggleLed(ledbar, 1)
        time.sleep(.5)

        grovepi.ledBar_toggleLed(ledbar, 2)
        time.sleep(.5)

        grovepi.ledBar_toggleLed(ledbar, 9)
        time.sleep(.5)

        grovepi.ledBar_toggleLed(ledbar, 10)
        time.sleep(.5)


        print "Test 5) Set state - control all leds with 10 bits"
        # ledbar_setBits(ledbar, state)
        # state: (0-1023) or (0x00-0x3FF) or (0b0000000000-0b1111111111) or (int('0000000000',2)-int('1111111111',2))
        for i in range(0,32):
            grovepi.ledBar_setBits(ledbar, i)
            time.sleep(.2)
        time.sleep(.3)


        print "Test 6) Get current state"
        # state = ledbar_getBits(ledbar)
        # state: (0-1023) a bit for each of the 10 LEDs
        state = grovepi.ledBar_getBits(ledbar)
        print "with first 5 leds lit, the state should be 31 or 0x1F"
        print state

        # bitwise shift five bits to the left
        state = state << 5
        # the state should now be 992 or 0x3E0
        # when saved the last 5 LEDs will be lit instead of the first 5 LEDs
        time.sleep(.5)


        print "Test 7) Set state - save the state we just modified"
        # ledbar_setBits(ledbar, state)
        # state: (0-1023) a bit for each of the 10 LEDs
        grovepi.ledBar_setBits(ledbar, state)
        time.sleep(.5)


        print "Test 8) Swap orientation - green to red - current state is preserved"
        # ledbar_orientation(pin,orientation)
        # orientation: (0 = red to green, 1 = green to red)
        # when you reverse the led bar orientation, all methods know how to handle the new LED index
        # green to red
        grovepi.ledBar_orientation(ledbar, 1)
        time.sleep(.5)

        # red to green
        grovepi.ledBar_orientation(ledbar, 0)
        time.sleep(.5)

        # green to red
        grovepi.ledBar_orientation(ledbar, 1)
        time.sleep(.5)


        print "Test 9) Set level, again"
        # ledbar_setLevel(pin,level)
        # level: (0-10)
        # note the red LED is now at index 10 instead of 1
        for i in range(0,11):
            grovepi.ledBar_setLevel(ledbar, i)
            time.sleep(.2)
        time.sleep(.3)


        print "Test 10) Set a single LED, again"
        # ledbar_setLed(pin,led,state)
        # led: which led (1-10)
        # state: off or on (0,1)
        grovepi.ledBar_setLed(ledbar, 1, 0)
        time.sleep(.5)

        grovepi.ledBar_setLed(ledbar, 3, 0)
        time.sleep(.5)

        grovepi.ledBar_setLed(ledbar, 5, 0)
        time.sleep(.5)


        print "Test 11) Toggle a single LED, again"
        # ledbar_toggleLed(ledbar, led)
        grovepi.ledBar_toggleLed(ledbar, 2)
        time.sleep(.5)

        grovepi.ledBar_toggleLed(ledbar, 4)
        time.sleep(.5)


        print "Test 12) Get state"
        # state = ledbar_getBits(ledbar)
        # state: (0-1023) a bit for each of the 10 LEDs
        state = grovepi.ledBar_getBits(ledbar)

        # the last 5 LEDs are lit, so the state should be 992 or 0x3E0

        # bitwise shift five bits to the right
        state = state >> 5
        # the state should now be 31 or 0x1F


        print "Test 13) Set state, again"
        # ledbar_setBits(ledbar, state)
        # state: (0-1023) a bit for each of the 10 LEDs
        grovepi.ledBar_setBits(ledbar, state)
        time.sleep(.5)


        print "Test 14) Step"
        # step through all 10 LEDs
        for i in range(0,11):
            grovepi.ledBar_setLevel(ledbar, i)
            time.sleep(.2)
        time.sleep(.3)


        print "Test 15) Bounce"
        # switch on the first two LEDs
        grovepi.ledBar_setLevel(ledbar, 2)

        # get the current state (which is 0x3)
        state = grovepi.ledBar_getBits(ledbar)

        # bounce to the right
        for i in range(0,9):
            # bit shift left and update
            state <<= 1;
            grovepi.ledBar_setBits(ledbar, state)
            time.sleep(.2)

        # bounce to the left
        for i in range(0,9):
            # bit shift right and update
            state >>= 1;
            grovepi.ledBar_setBits(ledbar, state)
            time.sleep(.2)
        time.sleep(.3)


        print "Test 16) Random"
        for i in range(0,21):
            state = random.randint(0,1023)
            grovepi.ledBar_setBits(ledbar, state)
            time.sleep(.2)
        time.sleep(.3)


        print "Test 17) Invert"
        # set every 2nd LED on - 341 or 0x155
        state = 341
        for i in range(0,5):
            grovepi.ledBar_setBits(ledbar, state)
            time.sleep(.2)

            # bitwise XOR all 10 LEDs on with the current state
            state = 0x3FF ^ state

            grovepi.ledBar_setBits(ledbar, state)
            time.sleep(.2)
        time.sleep(.3)


        print "Test 18) Walk through all possible combinations"
        for i in range(0,1024):
            grovepi.ledBar_setBits(ledbar, i)
            time.sleep(.1)
        time.sleep(.4)

    except KeyboardInterrupt:
        grovepi.ledBar_setBits(ledbar, 0)
        break
    except IOError:
        print "Error"
5.Run the demo.
sudo python grove_ledbar.py
6.This demo may not work if your grovepi dosen’t have the newest firmware, update the firmware.
cd yourpath/GrovePi/Firmware
sudo ./firmware_update.sh
Project

Inspired by OVERWATCH, we have made a very cool Wooden Laser Gun toy for fun these day!
The Wooden Laser Gun and the Gun Target are all based on an Arduino board called Seeeduino Lotus. The laser emitter on the Laser Gun is controlled to fire laser pulse to “activate” the Gun Target. And there are 3 light sensors on the Gun Target to detect the laser pulse. It seems very simple right? If you are interested in our project, please make one for yourself or your child! It’s worth to spend one day DIY it as a Xmas present.

Resources
Help us make it better
Thank you for choosing Seeed. A couple of months ago we initiated a project to improve our documentation system. What you are looking at now is the first edition of the new documentation system. Comparing to the old one, here is the progresses that we made:
- Replaced the old documentation system with a new one that was developed from Mkdocs, a more widely used and cooler tool to develop documentation system.
- Integrated the documentation system with our official website, now you can go to Bazaar and other section like Forum and Community more conveniently.
- Reviewed and rewrote documents for hundreds of products for the system’s first edition, and will continue migrate documents from old wiki to the new one.
An easy-to-use instruction is as important as the product itself. We are expecting this new system will improve your experience when using Seeed’s products. However since this is the first edition, there are still many things need to improve, if you have any suggestions or findings, you are most welcome to submit the amended version as our contributor or give us suggestions in the survey below, Please don’t forget to leave your email address so that we can reply.
Happy hacking
댓글 없음:
댓글 쓰기