Abraham Getzler
5/12/2016
Objective
This doc and associated app are meant to demonstrate and explain how to use lists to get around the Fusion Tables facility’s limitations of one row per DELETE.
Sample Data
This app uses the sample data format used in AI2’s Pizza Party tutorial, in this table:
The table looks like this:
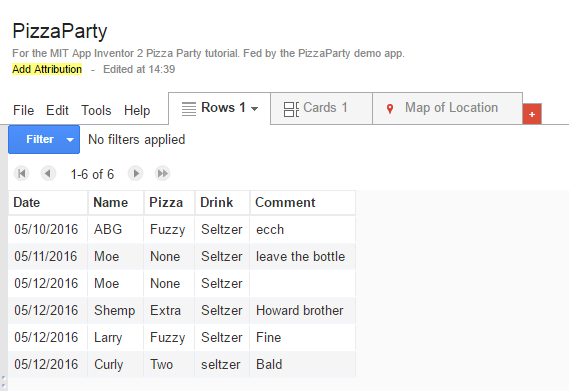
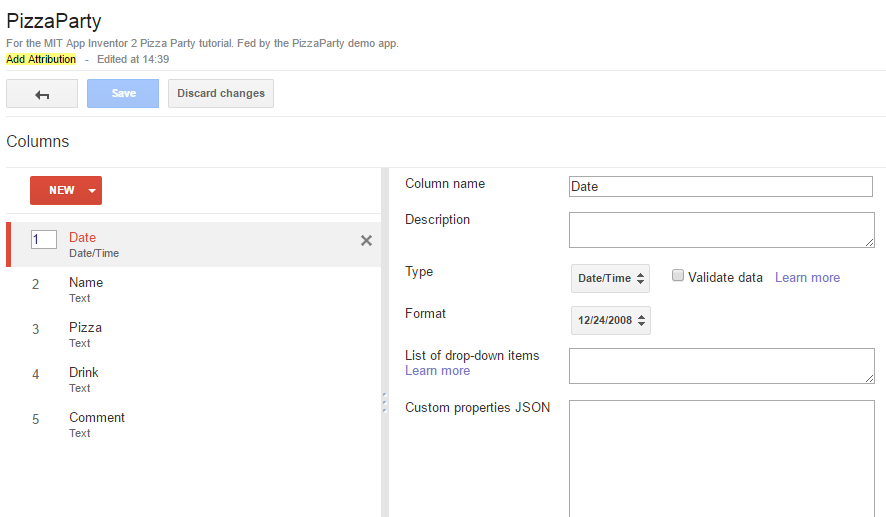
All the columns are text, except column 1, which is a date…
Authentication
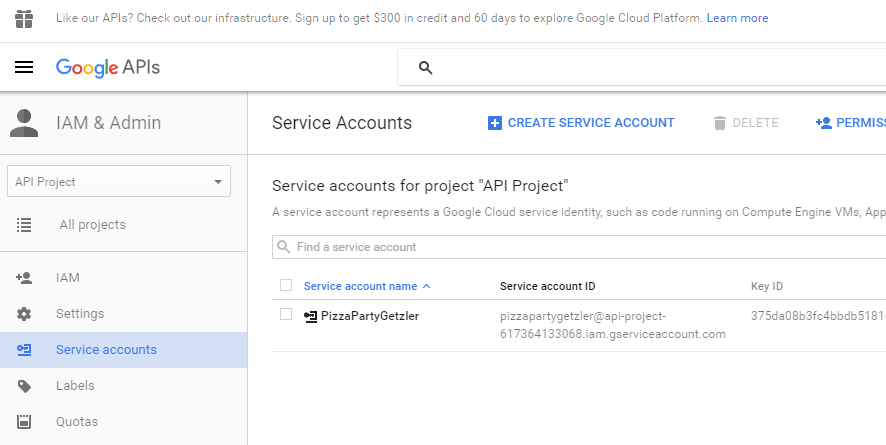
This app and the associated table are set up to work together using the Fusion Tables Service Account method.explained at http://ai2.appinventor.mit.edu/reference/components/storage.html#FusionTablesControl
My service account for this project looks like:
Pizza Party Table Permissions
These are set under Sharing for the Pizza Party table in Google Drive:
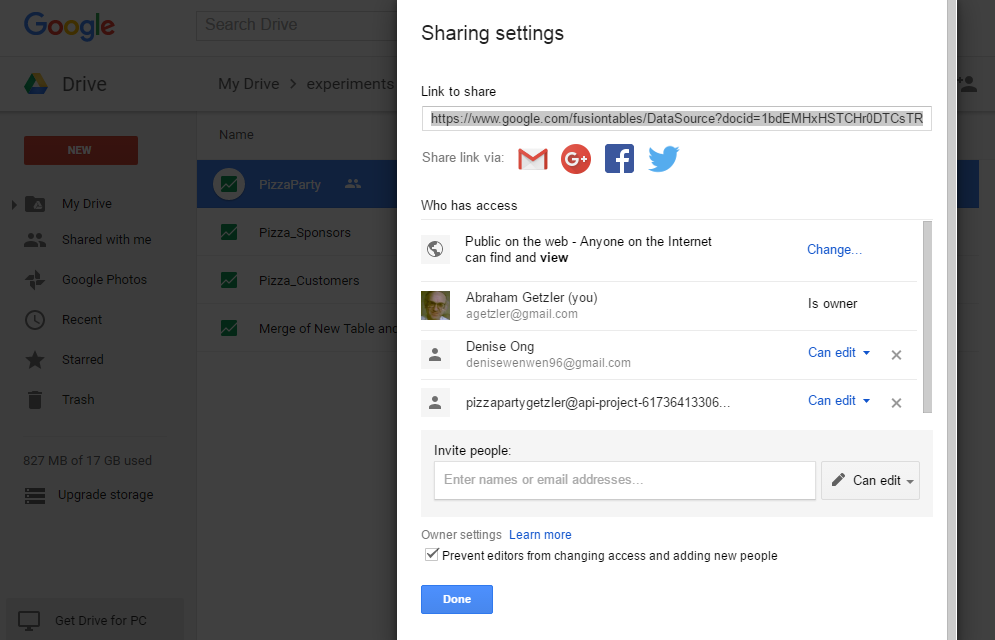
Notice that I had to copy the email address generated by Google for the API access in the API Console, letting this app add and delete rows to this table.
The .p12 file
Also, a .p12 file had to be gotten from the API Console, downloaded, and uploaded into the app’s Media drawer. Each AI2 Fusion Tables control will have to mention this .p12 file to gain permission to access this app’s API.

The Fusion Table Controls
There is a separate Fusion Tables control for each different context where I want to access my table, to handle the different processing required for each context after the query has completed.
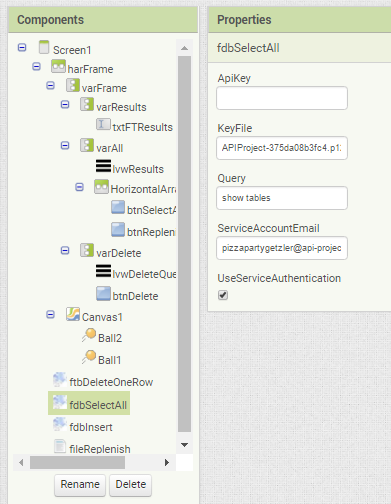
fdbSelectAll
This control handles all my SELECT operations for the purpose of getting ROWIDs and other data from my table. Notice that for this access technique, the API key is blank and the other fields are filled in from the Google Console, including the Service Account Email, and the .p12 file name, which you can select from the Media Drawer. Notice the check mark for Use Service Account Authentication.
ftbDeleteOneRow
This has the same attributes as previously mentioned controls. It catches successful deletes.
ftbInsert
This has the same attributes as previously mentioned controls. It catches successful deletes.
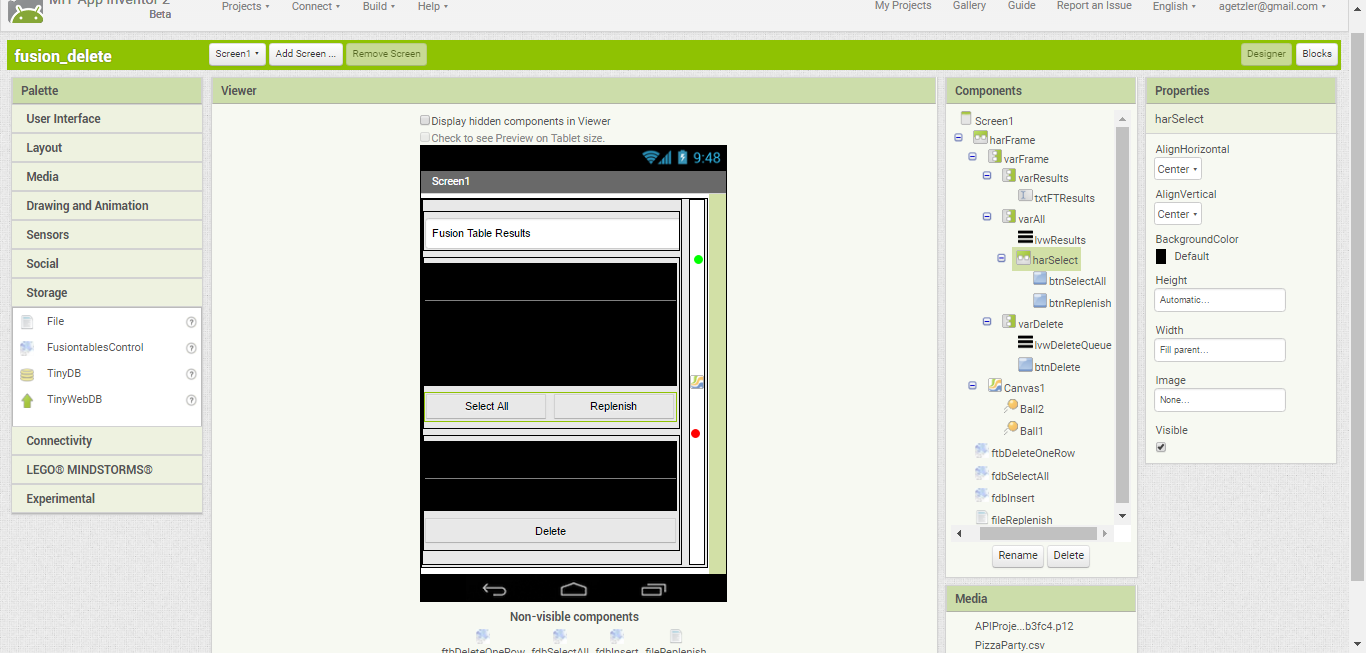
Designer
The app is all in one Screen, as a series of stacked Vertical Arrangements, in a Horizontal Arrangement with a Canvas on its right, for vertical scrolling and resizing of sub panes.
Initialization
Globals
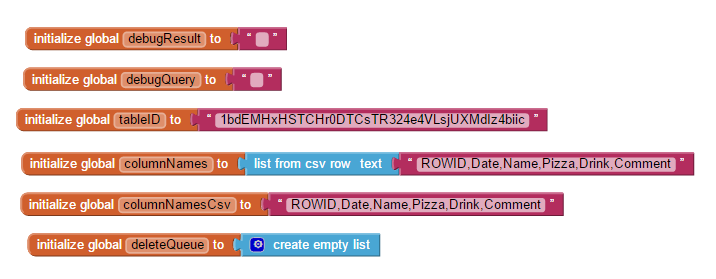
Some constants are hard wired in globals, like tableID and columnNamesCSV, needed for SELECTs. Two globals are reserved for debugging assistance to support the Block Editor right-click-Do-It facility. We pass Fusion Tables queries and results through them to hold them if there’s trouble. There is a global to hold the queue (list) of ROWID values that need to be deleted, initially an empty list.
Screen1.Initialize
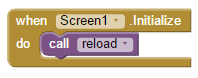
Reload
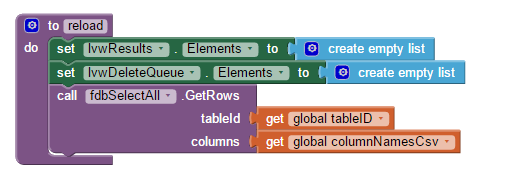
The reload procedure is used to refresh the display from the data base, and to prepare for user selection of which rows are to be deleted. This version of the app selects all the rows in the table, and leaves it up to the user to choose from the upper ListView (lvwResults) which rows he wants to be included in his collection of rows he wants to be deleted (lvwDeleteQueue). Both ListViews have to start out empty, to be filled in later when data arrives from Fusion Tables.
Next, the Fusion Tables are queried to ask for all the rows in the table, for all the column names including ROWID, using the .GetRows block.
A more refined version of this app would let the user specify filter conditions here.
We use the fdbSelectAll control for the query, so we can regain control afterwards and know that we have to display the returned data.
btnSelectAll.Click
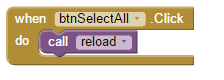
To let the user reload from the table at will, a Select All button is supplied. It also calls the reload procedure.
fdbSelectAll.GotResult
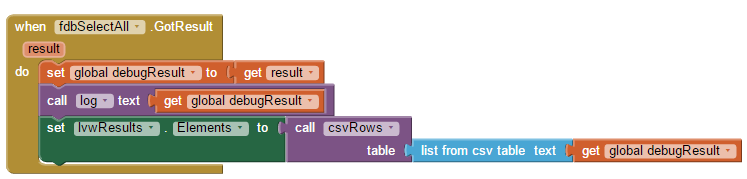
When our SELECT results come back, they are a big block of text. We save it in the global debugTesult, for debugging purposes. Also, so we can see it on the screen if we want, we pass it to the log procedure. The list from csv table block is used to transform the results text into a table (2 Dimensional list of lists), which is nice, but not good for loading into a ListView, which needs a one dimensional list. So we use a value procedure csvRows to transform the table into a list of Comma Separated Value (CSV) text values, one per row, which we can save in the Elements of the ListView lvwResults. The csv text format is handy, because each row is a single text item, but you can later on pick out columns from that row by turning it into a list with another csv list block.
Log
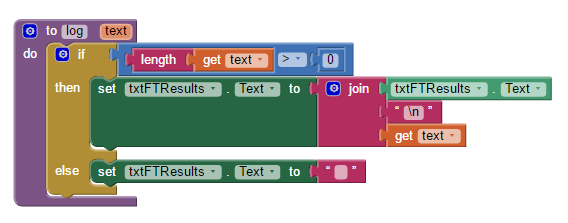
This procedure should not be confused with the math log() block. It is a procedure meant to capture and record a piece of text into a diary on the screen, for the convenience of the user if he needs to see in detail what just happened. Your computer is probably full of log files left by other programs without your knowledge. We use the disabled Text Box txtFTResults to show the log, to take advantage of its multi-line scrolling that wouldn’t be available in a Label component.
To clear the log, send it an empty text value, otherwise new text gets added at the end after a NewLine (\n).
csvRows
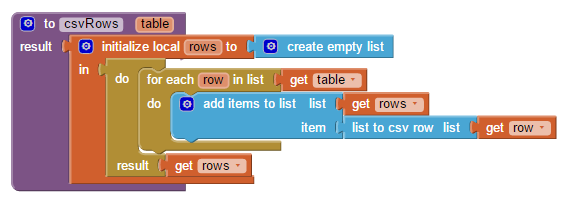
This result procedure takes as input a two dimensional (2D) list of lists (table), and returns a one dimensional (1D) list of Comma Separated Value (CSV) text row values.
It is good for loading ListView Elements from a table.
Juggling two lists between two ListViews
To allow the user to selectively delete rows from the Fusion Table, we offer a ListView lvwDeleteQueue where we can hold the information about what rows we want to delete when we hit the big Delete button.
Juggling the two ListViews is done through their .AfterPicking events. To transfer a row image from one ListView to the other, just click (Select) it in the ListView where it lives.
lvwResults.AfterPicking
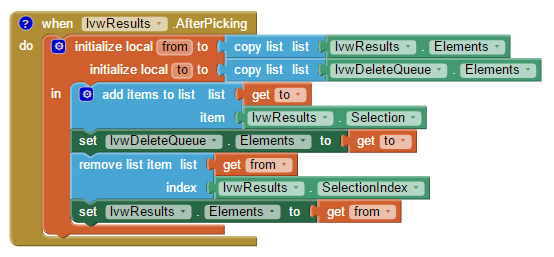
To do the transfer, we use temporary copies of the Elements lists of the two ListViews, from and to. First we add the selected item to the destination list, then we remove it from the ListView where it got picked. (If we did it in the other order, we would lose our place.) After each update, we reload the entire .Elements list of each ListView, to force a screen refresh.
lvwDeleteQueue.AfterPicking
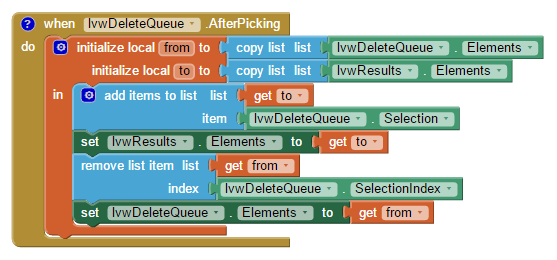
This has the same logic as lvwResults.AfterPicking, except it runs in the opposite direction, removing from the Delete ListView and restoring row images to the Selected ListView.
btnDelete.Click
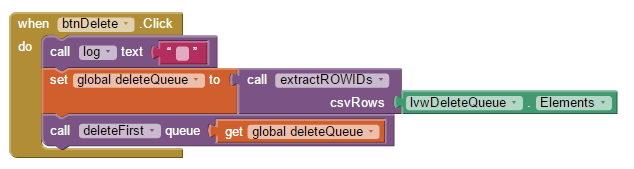
This button initiates the deletion process for all the rows listed in ListView lvwDeleteQueue.
The log is cleared at the start of the deletion process. Since we only need the ROWIDs of rows to identify them in a DELETE statement, we strip them off the Elements of ListView lvwDeleteQueue, using the value procedure extractROWIDs, and save the list of ROWIDs in the global deleteQueue for use during the entire deletion process. Once the ROWIDs are collected in our list deleteQueue, we pass it to the procedure deleteFirst to start the first delete.
extractROWIDs
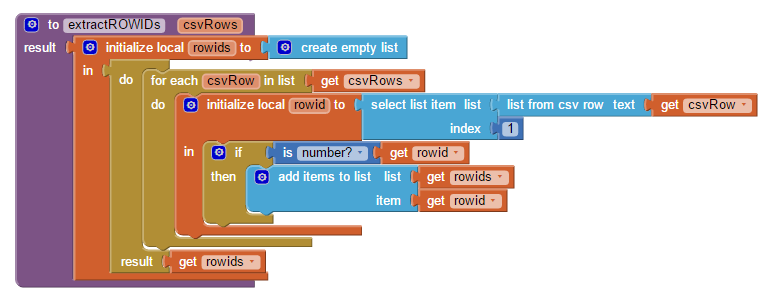
This value procedure will take the 1D list of CSV format rows of a Fusion Table SELECT and return just the ROWIDs, in a list. They are expected to be in column 1. The column title is stripped, since it’s not numeric and not a ROWID.
deleteFirst
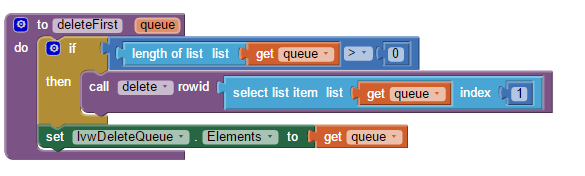
This procedure accepts a queue of ROWIDs to be deleted, and if there is a first element, initiates its deletion from our Fusion Table. Procedure delete is called with the ROWID at the head (position 1) of the queue.
Delete

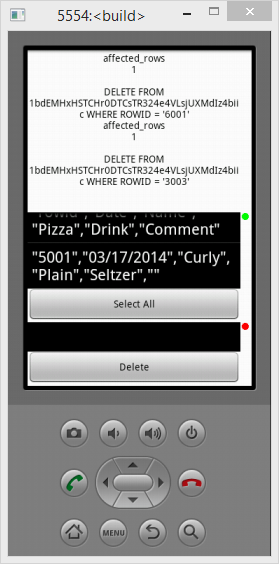
The delete procedure uses the JOIN text block to build a text string of the form
DELETE FROM tableID WHERE ROWID = ‘rowid’
where tableID is our table, and rowid was supplied in our call.
The DELETE statement is stored in global debugQuery and logged for debugging, then it is fed into the QUERY of the Fusion Tables control component ftbDeleteOneRow. Then the control is launched via a .SendQuery.
ftbDeleteOneRow.GotResult
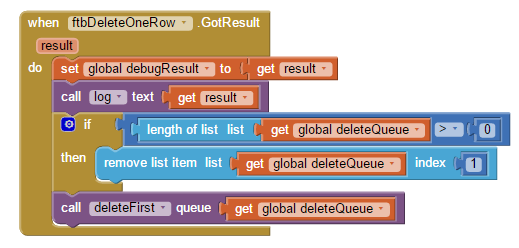
This event triggers after a deletion completes under direction of the Fusion Tables control ftbDeleteOneRow. The result is logged and the ROWID deletion queue deleteQueue is checked.
The ROWID at the head of the queue is removed (after the fact), if there is one, and deleteFirst is called to submit a delete of the new head of the deleteQueue list (if any.)
Replenishing the table
A button is included to insert more rows into the table, so it doesn’t run out. Rather than soliciting input for the various columns, I took the lazy and safe route and pulled the sample data in from a sample csv file in the Media drawer.
btnReplenish.Click
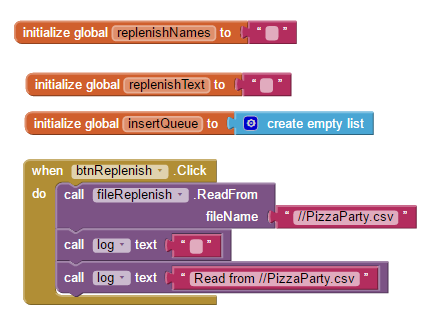
The Replenish button starts a file Read from //PizzaParty.csv in the Media drawer.
PizzaParty.csv
Date,Name,Pizza,Drink,Comment
05/10/2016,ABG,Fuzzy,Seltzer,ecch
05/11/2016,Moe,None,Seltzer,leave the bottle
05/12/2016,Moe,None,Seltzer,
05/12/2016,Shemp,Extra,Seltzer,Howard brother
05/12/2016,Larry,Fuzzy,Seltzer,Fine
05/12/2016,Curly,Two,seltzer,Bald
fileReplenish.GotText
This event catches the text from the PizzaParty.csv Read and prepares it for insertion into the table.
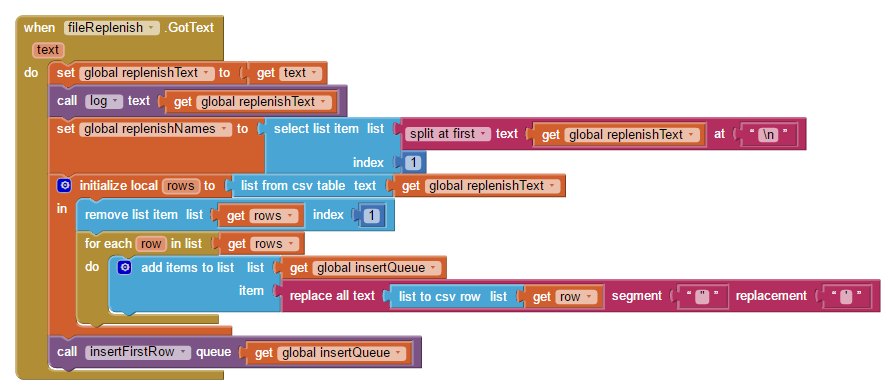
After logging the incoming text, the first line of the file is captured into global replenishNames for use later in the Insert block. After that, we don’t need it any more for the load, so we remove row 1 after converting our text to a table rows in the list from csv table block. Each row (sublist) in our newly converted list of lists is converted into a single CSV text using the list to csv row block,
Which is almost usable for an INSERT operation except for the fact that each value is delimitted with double quotes (“), and the INSERT statement works only with single quotes (‘). So we pass the list to csv row output through a replace all text block to change all “ to ‘.
After global insertQueue is loaded up with single-quote delimitted value lists, it is passed to procedure InsertFirstRow to start the insertion process,
InsertFirstRow

If there’s a Value List at the head of the queue, it is sent to the insert procedure.
Insert
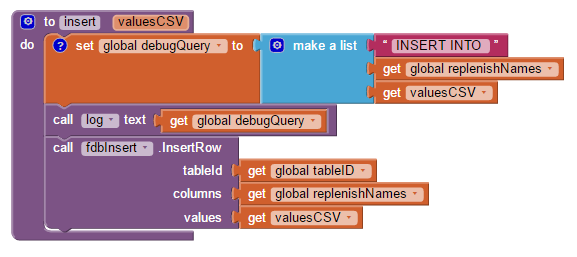
The logging here is a little sloppy, not really building a perfectly formatted SQL INSERT statement for the log. That’s okay, because we have an fdbInsert.InsertRow block with all the proper inputs set up and launched. Processing will resume at this Fusion control’s query completion event .
fdbInsert.GotResult
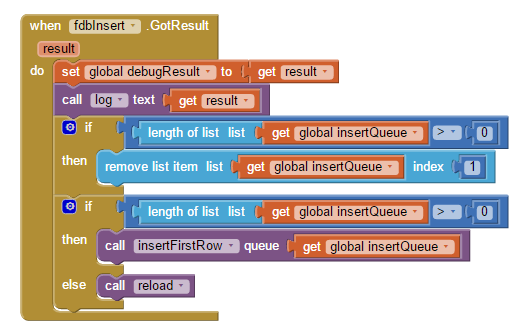
We log the insertion result, and remove the recently insert values item from the head of the list. If there are any more values to insert, we call InsertFirstRow again, otherwise we Reload the display.
The View management facilities
The display consists of three Vertical Arrangements, with their Heights controlled by the positions of two vertically draggable Balls in a thin vertical Canvas acting as a drag sensor.

This lets us expose or hide as much as we want of the three screen sections.
Here are the blocks…
Ball1.Dragged
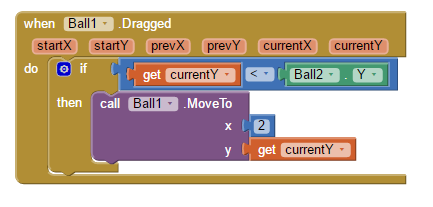
Ball1 is forced to remain above Ball2, since it controls the heights of the Vertical Arrangements directly above and below it.
Ball2.Dragged
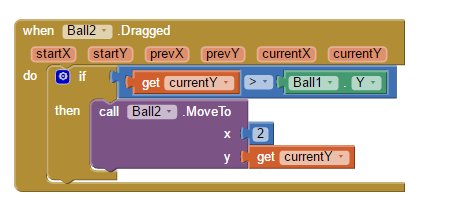
Ball2 is likewise constrained to be below Ball1.
Adjustment of the Vertical Arrangement Heights does not happen until the Drag completes.
Canvas1.TouchUp
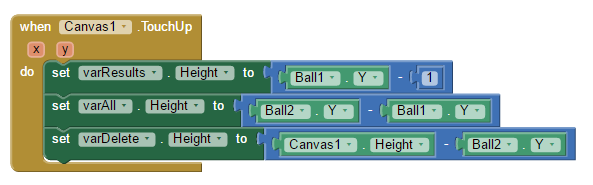
When the drag is finished, Canvas1 gets a .TouchUp event, which gives us the opportunity to assign Heights to the three Vertical Arrangements varResults, varAll, varDelete according to the vertical positions of Ball1 and Ball2 and the total Height of Canvas1.
댓글 없음:
댓글 쓰기